
Urban homesteading tiny homes in Canada — A 2026 guide
Estimated reading time: 12 minutes
Key Takeaways
- Urban homesteading tiny homes pair compact living with food production, composting, and micro-livestock to boost resilience in tight urban lots.
- Start with a clear site survey and bylaws check — zoning and animal bylaws vary widely across Canadian cities.
- Design matters: put mudroom access, compost loop, and rainwater cisterns where they save you time daily.
- Season extension, insulated design, and careful breed choice make backyard chickens and winter gardening practical in many Canadian climates.
- Use reliable planning tools and references — for a Canadian take on compact living see Tiny Home Living: Your Complete Guide to Micro Homes, Sustainability, and Lifestyle Freedom.
Table of contents
- What is urban homesteading tiny homes?
- Why combine tiny homes with urban homesteading?
- Planning: site assessment & legal checklist
- Designing tiny home layouts that support urban farming
- Urban farming techniques for small lots
- Backyard chickens for tiny homesteads
- Water, waste and energy strategies
- Seasonal calendar & planting guide (by region)
- Legal, community & financial considerations
- Case studies & example structure
- 12‑month starter plan (month-by-month)
- Resources & further reading
- FAQ
What is urban homesteading tiny homes? — definition and context
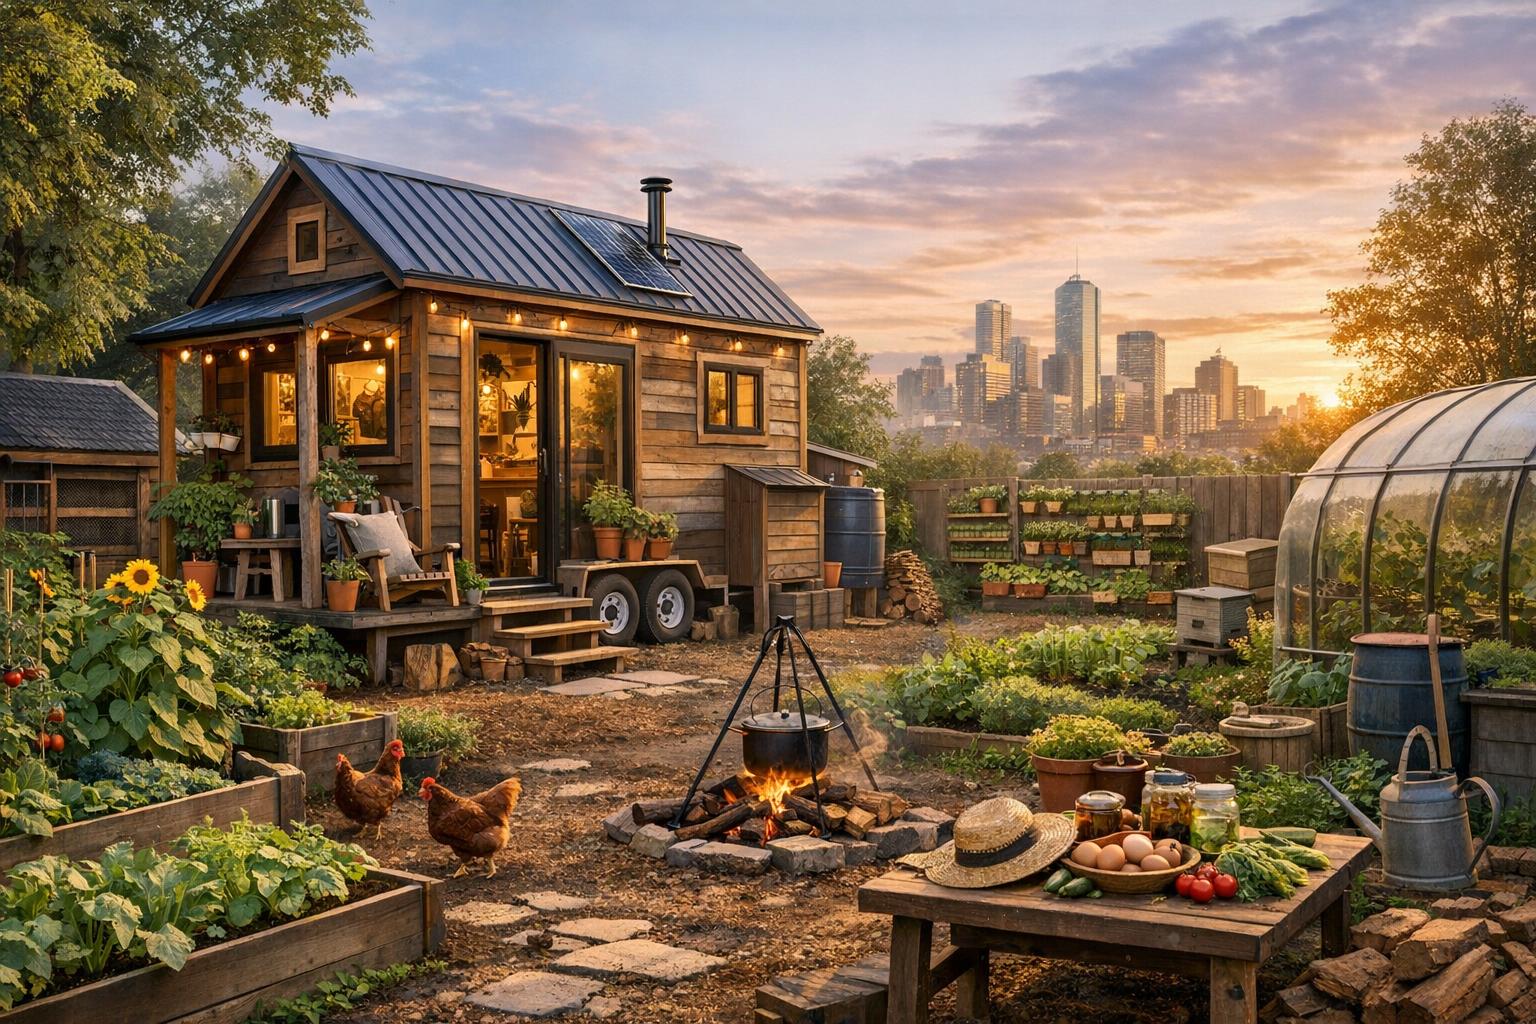
Urban homesteading tiny homes are small-footprint dwellings (often ≤400 ft²) designed to produce a meaningful portion of a household’s food, energy, and waste-recovery needs using urban farming, composting, and micro-livestock like backyard chickens where allowed.
Key terms (plain language):
- Tiny homes: on wheels or on a foundation — municipal classification affects permits.
- Urban farming: raised beds, containers, balconies, small greenhouses, and season extension.
- Backyard chickens: hens for eggs (roosters usually banned in cities).
- Micro-livestock: mostly hens; rabbits in rare jurisdictions where legal.
In Canada, expect limits: constrained space, patchwork rules by municipality, and a need to plan for cold winters and short daylight. For cultural context see Canada’s History: Urban Homesteading.
Why combine tiny homes with urban homesteading? — benefits and quick stats
Making the most of every square metre. Pairing tiny homes with urban homesteading reduces living costs, shrinks your footprint, and increases food security.
- Lower cost of living: smaller heating loads and fewer possessions.
- Lower footprint: less material and shorter food miles.
- Better food security: raised beds + preserving (freezing, pickling).
- Community resilience & health: seed/compost exchanges and outdoor work.
Data sources to consult: Statistics Canada, Agriculture and Agri-Food Canada, and peer-reviewed urban agriculture studies for yields per m².
Planning your tiny-home homestead in Canada — site assessment & legal checklist
Prevent expensive mistakes by surveying first, then confirming rules, then buying materials.
Step 1: 10‑point site survey (copy this)
- North arrow
- Lot size (m²/ft²)
- Planned tiny home footprint
- Setbacks
- Existing trees (shade map)
- Utility lines (gas, hydro, water)
- Soil test spot(s)
- Drainage low points
- Sun path notes
- “No-dig zones” (easements, roots)
Step 2: Sun & shade analysis
Take photos at 10:00 a.m., 1:00 p.m., and 4:00 p.m. on the same day; mark full sun/part sun/shade. Vegetables usually want 6+ hours of direct sun.
Step 3: Wind notes
Note prevailing direction; place windbreaks so they don’t shade beds. Use hoop houses behind sheds or fences.
Step 4: Soil vs containers
Use raised beds/containers if fill is suspect, soil is heavy clay, or tree roots dominate. Quick jar test shows sand/silt/clay layers.
Step 5: Zoning/bylaws — how to check
Search phrases like “[City name] zoning bylaw tiny homes” and “[City name] backyard chickens bylaw” — then call planning/building. Use the six-question script below when you call.
6-question script for the call: How is my tiny home classified? Is an ADU allowed? Minimum setbacks and lot coverage? Are backyard chickens allowed (how many, coop setbacks)? Wastewater rules? Any height/servicing requirements?
Common stumbling blocks: tiny homes treated as RVs, minimum house-size rules, coop location setbacks, limits on greywater/rainwater connections.
Permits & approvals to consider
- Building, electrical, plumbing permits
- Septic/holding tank approvals
- Development variance permit
- Chicken licence/permit
- Solar/net‑metering approvals
Email template to planning (copy/paste)
Subject: Zoning questions — tiny home + small garden + hens (address)
Hello [Office/Name],
I’m planning a small project at [address/lot]. Details:
- Tiny home type: [on wheels / on foundation / ADU] approx. [ft²]
- Proposed location: [distance to property lines]
- Urban farming: [raised beds/greenhouse size]
- Backyard chickens: [# hens, no rooster] with coop approx. [dimensions]
Could you confirm required permits and any key restrictions (setbacks, servicing, livestock rules)?
Thank you, [Name, phone]
File organization: keep folders for site plan, foundation/chassis plan, utility plan, composting/waste plan, coop plan, energy specs, and photos.
Planning tools: Epic Gardening: Epic Homesteading Book and the 2026 Old-Fashioned On-Purpose Planner.
Designing tiny home layouts that support urban farming
Good design makes daily chores easy. Prioritize a mudroom, a compost-access loop, and convenient rainwater placement.
- Mudroom: tray, brush, hooks, harvest baskets by the kitchen.
- Compost-access loop: 1–2 m clear path from kitchen to compost.
- Tool + seed storage: wall racks, under-stair bins, lockable outdoor chest.
- Rainwater: downspouts and cistern close to beds.
Rooftop & balcony gardening: structural engineer sign-off is essential — saturated medium can weigh 80–150 kg/m². Container depth rules: 15–20 cm for herbs, 30–40 cm for tomatoes, 40–60 cm for potatoes.
Commission simple layout diagrams for: a 200 ft² garden footprint, a 400 ft² lot with compact greenhouse, and a townhouse balcony plan (secure railing plan + drip irrigation). For design guidance see Epic Homesteading Book.
Urban farming techniques for small lots
Plan for access, soil depth, and steady planting.
Raised beds
Best width: 1.2 m (4 ft). Depth: 30–45 cm for most vegetables; 60 cm for potatoes. Starter mix: 50% screened compost, 30% topsoil, 20% coarse sand/aged bark.
In-ground mini-rows
Rotate crops in a 2–3 bed cycle (brassicas, legumes, solanaceae).
Container gardening
- Herbs: 2–4 L
- Salad greens: 10–15 L
- Tomatoes: 20–40 L
Vertical growing
A-frame trellis, teepee for beans, and wall trellises save footprint; anchor well for wind.
Succession planting & soil-building
Sow salad greens every 2–3 weeks; build soil with municipal compost, leaf mould, and home compost. Compost options: hot pile (~1 m³), tumbler, or worm bin (~60 x 45 x 30 cm).
Season extension
Cold frames, low tunnels (hoops every 4–6 ft, 6–8 mil plastic), and thermal mass (water jugs) extend the season in Canadian climates.
Further reading and planning tools: Epic Homesteading Book, The Urban Homestead (Indigo listing), and The Complete Idiot’s Guide to Urban Homesteading.
Backyard chickens for tiny homesteads — rules, breeds, coop design and care
Hens fit well where legal and managed for neighbours and predators.
Step 1: Check the rules
Search “[City name] backyard chickens bylaw” and call bylaw/planning. Use the 6-question chicken script: max hens, permits, coop setbacks, nighttime confinement, slaughter rules, noise/smell expectations.
Good small breeds for cold climates
- Australorp
- Plymouth Rock
- Buff Orpington
- Wyandotte
- Bantams (smaller birds, smaller eggs)
Coop sizing & predator-proofing
Inside coop: 2–4 ft² per bird; run: 8–10 ft² per bird. Use hardware cloth (not chicken wire), bury apron 6–12″, and double-latch doors. Vent high to remove moisture; avoid drafts on roosts.
Daily & winter care
- Daily: feed, fresh water, egg collection, quick health check.
- Winter: deeper dry bedding, water freeze prevention, ventilation checks.
When sharing legal details, link exact municipal pages for your city. For a practical chicken introduction see Backyard Chickens for Tiny Homesteads.
Water, waste and energy strategies for tiny-home homesteads
Rainwater harvesting
Common setups: 200–1,000 L cisterns, first-flush diverters, gravity-fed hoses or small pumps. Check municipal rules for irrigation use.
Greywater basics
Greywater (sinks, showers, laundry) may be reused for subsurface landscape irrigation where allowed — follow plumbing codes and use biodegradable soaps.
Drip irrigation
Simple raised-bed layout: main line along bed edge, 2–3 drip lines per 4′ bed, pressure regulator, filter and timer.
Compost & waste
Choose hot compost, tumblers, or worm bins depending on space. Bokashi handles meat/dairy but needs a compost or burial follow-up.
Micro-solar & energy conservation
Do an energy audit first, then consider roof vs ground mounts and battery options. Confirm net-metering and permit needs with your utility.
Planning tools: Epic Homesteading Book.
Seasonal calendar and planting guide for Canada (2026) — region-aware
Match your plan to local frost dates and daylight. Use Environment and Climate Change Canada and seed-company calculators to find average last spring and first fall frost dates for your site.
Three broad climate buckets
- Maritime / Coastal BC: longer shoulder seasons; manage drainage and slugs.
- Southern Ontario / Southern Quebec: strong summers; start seedlings indoors.
- Prairies / Northern: short season; favor fast-maturing varieties and season extension.
Seed-start anchors
- Tomatoes: start indoors 6–8 weeks before last frost.
- Peas: direct-seed 2–4 weeks before last frost.
- Salad greens: sow every 2–3 weeks.
- Garlic: plant in fall for next summer harvest.
Printable asset suggestion: a 12-month calendar template with seed-start dates, transplant windows, season-extension milestones, and chicken care reminders — track relative to your frost dates with the 2026 planner.
Legal, community and financial considerations in Canada
Where projects succeed or stall. Repeatable steps: search zoning/ADU/tiny-home bylaws, contact planning/building/bylaw enforcement, and collect permit fee schedules.
Grants and rebates
Look for municipal urban agriculture grants, provincial energy rebates (insulation, heat pumps, solar) and utility net-metering programs.
Budget template (localize before spending)
- Tiny home (on wheels): $40,000–$120,000
- Foundation/site prep: $2,000–$15,000
- Garden startup: $300–$2,000
- Coop & chickens: $200–$1,500
- Rainwater & irrigation: $200–$2,000
- Micro-solar: $3,000–$15,000
- Permits/fees: $0–$5,000
Track costs and tasks with the 2026 planner and reference books like Epic Homesteading Book.
Case studies and examples — how to gather and structure them
Include 2–3 real Canadian examples with a consistent template: location, lot size, tiny home type, garden footprint, hens, yields, startup cost summary, permits used, challenges, top tips, and photo credit + source URL.
Where to find examples: local urban-ag meetups, community gardens, tiny-home groups, and municipal pilot showcases. For historical movement context see Canada’s History.
Step-by-step starter plan — first 12 months
A practical month-by-month roadmap; adapt to your frost dates.
Months 1–2: Site assessment & permits
- 10‑point site survey
- Sun photo test (10/1/4)
- Call planning with the 6-question script
- Decide raised beds vs containers; draft layout
- Order seeds and basic tools
Months 3–4: Foundations, beds, seed starts
- Finalize tiny home placement
- Build 1–3 raised beds
- Set up compost system
- Start seedlings indoors
Months 5–6: Planting & early care
- Transplant warm-season crops after last frost
- Direct-seed quick crops every 2–3 weeks
- Install drip irrigation and mulch
- If legal: build coop first, get 2–4 pullets, start routine
Months 7–8: Peak production
- Succession planting
- Manage pests and harvest often
- Preserve extras (freeze, dry, pickle)
Months 9–10: Fall transition
- Plant fall crops (kale, spinach)
- Add compost and cover bare soil
- Harvest and store root crops; plant garlic
Months 11–12: Winter prep & evaluation
- Winterize coop and water systems
- Set up cold frames or indoor greens
- Review what worked and update next-year layout and budget
Resources and further reading (Canadian-focused)
Core library — add municipal and provincial links for local readers:
- Canada’s History — Urban Homesteading
- Epic Homesteading Book
- The 2026 Old-Fashioned On-Purpose Planner
- The Complete Idiot’s Guide to Urban Homesteading
- The Urban Homestead (Indigo listing)
- ADU: Ontario zoning guide
- ADU: Canadian regulations guide
- ADU permitting — British Columbia
- Tiny home financing — Canada
- Urban farming + tiny homes — Canada
- Tiny Home Living — Complete Guide
- Backyard chickens — tiny homesteads
FAQ — quick answers to common searches
Are backyard chickens legal in my city?
Sometimes. Check your municipal bylaws and animal services pages and call bylaw enforcement to confirm max hens, coop setbacks, and permit needs.
How much food can I realistically grow in X m²?
It depends on sun, water, and planting intensity. A 10 m² intensive garden can supply much of your salads and herbs in season — use local yield guides to set expectations.
Can I install rainwater systems?
Often yes for irrigation, but rules vary by city. Ask building/plumbing departments about permits for storage, pumps, or connections.
Do tiny homes need a foundation in Canada?
That depends on municipal classification (on wheels vs on foundation vs ADU). Ask planning/building how they define and permit tiny homes.
How many hens can I keep on a tiny lot?
Local bylaws set limits — many cities allow a small number (2–6) and ban roosters. Verify for your address.
Do I need 6 hours of sun for urban farming?
Fruiting crops like tomatoes perform best with 6+ hours. Leafy greens tolerate less sun but yield drops in shade.
What’s the smallest “good” garden setup?
One 4′ x 8′ raised bed plus containers is enough to learn and harvest quickly.
Will chickens smell?
A dry, well-ventilated coop with regular bedding changes should not smell. Odours usually come from damp bedding, poor ventilation, or overcrowding.
Conclusion and next steps
Urban homesteading tiny homes can make small spaces more productive and resilient. Start with three moves: complete the 10‑point site survey, call municipal planning with the provided script, and map a first-season urban farming plan that matches your sun hours. With step-by-step planning you can reach a first harvest without breaking rules or burning out.
Further reading: Canada’s History — Urban Homesteading, Epic Homesteading Book, and the 2026 planner.
Leave a Reply