
Accessible ADUs for Vacation Properties: Regulations, Universal Design & Practical Year‑Round Upgrades (2026)
Estimated reading time: 17 minutes
Key Takeaways
- Accessible ADUs let cottage owners and hosts increase bookings and serve guests of all ages and abilities.
- Start early on permits: a solid municipal upload pack speeds approvals and reduces surprises.
- Universal design increases market appeal and reduces future retrofit cost—aim beyond minimum code.
- Priorities: safe year‑round entry, accessible bathroom, reliable heat and moisture control, and clear circulation.
- Use examples and templates like the St. Catharines pre‑approved ADU designs and Canada market overviews such as ADU market trends in Canada.
Table of contents
- Background and context in Canada
- Must‑read permit & zoning checklist
- Barrier‑free & accessibility standards
- Core universal design principles
- Key design features & room‑by‑room upgrades
- Retrofitting priorities & costs
- Accessibility for rental operations
- Case studies & sample layouts
- Costs, financing & incentives
- Seasonal & maintenance checklist
- Implementation plan & timeline
- Practical resources & templates
- FAQ
Accessible ADUs for vacation properties bridge two needs: inclusive stays for more guests and resilient, year‑round performance in Canada’s climate. This guide is written for cottage owners, owner‑occupier hosts, developers, and landlords planning or retrofitting accessible ADUs and tiny homes used as vacation rentals. You’ll get practical checklists, room‑by‑room targets, sample layout specs, and sample cost/timeline ranges.
Background and context in Canada (why this matters now)
Market drivers: aging, families, and inclusive tourism
Canada is aging: projected demographics mean more demand for barrier‑reduced travel, step‑free entries, and safer bathrooms. For hosts, accessible stays appeal to seniors, families with strollers, people recovering from injuries, and guests with disabilities—broadening your market.
For an industry overview, see the Canada ADU market discussion at ADU market trends in Canada and accessible design notes in Accessible ADU Design: Aging in Place.
Who sets the rules: NBC, provinces, and your municipality
Building rules work in layers:
- National Building Code (NBC): baseline technical standards (see NRC / NBC resources).
- Provincial/territorial codes: adopt and adjust the NBC.
- Municipal zoning & permits: setbacks, height, lot coverage, and short‑term rental licensing.
Two cottages in the same province can face different rules. A useful municipal example is the St. Catharines pre‑approved designs, which speed approvals but still require site review.
Climate and year‑round living: snow, frost, and insulation targets
Accessible ADUs must be designed for Canadian winters:
- Check local snow loads and design accordingly (Ontario examples note ~2.4 kPa).
- Frost protection and drainage for entries, ramps, and foundations.
- High insulation targets—many designers aim near R‑40 for walls/ceilings in small dwellings (verify local requirements).
For climate‑resilient design references, see Climate Resilient ADUs.
Must‑read permit & zoning checklist (municipal upload pack)
Quick municipal checklist (copy/paste ready)
- Confirm permit needs: building permit for new builds and many retrofits; gather municipal zoning bylaw PDF, site plan, survey, and legal description.
- Check zoning: setbacks, lot coverage, height limits, allowed use (detached vs attached ADU). Example program: St. Catharines pre‑approved ADU designs.
- Short‑term rental rules: licence requirements, parking minimums, and fire safety inspections. Local policies evolve—confirm with your municipality.
- Documents to prepare: site plan (to scale), dimensioned floor plans, elevations, energy statement (R‑values), HVAC/ventilation specs, septic/water approvals, and electrical plans.
Barrier‑free and accessibility standards (start with NBC, then confirm locally)
NBC Section 3.8 is the technical starting point for barrier‑free design; provinces add details. Guideline targets commonly used by designers:
- Ramp slope: maximum 1:12 (8.3%).
- Door clear width: ~810 mm (32″) minimum.
- Turning radius: 1.5 m (60″) clear where possible.
For accessibility guidance and design examples, see Accessible ADU Design and the Accessible Tiny Home Guide. Use the NRC site for current NBC references.
Core universal design principles for accessible ADUs
Universal design means creating spaces usable by the greatest number of people without specialized adaptation. It goes beyond code to include equitable use, low physical effort, flexibility, and tolerance for error.
- Equitable use: one main entrance with no steps; a universal bathroom.
- Flexibility: adjustable counters, furniture on casters.
- Simple & intuitive: single‑lever taps, clearly labelled controls.
- Tolerance for error: anti‑scald valves, slip‑resistant flooring.
- Size & space: 1.5 m (60″) turning circle where possible.
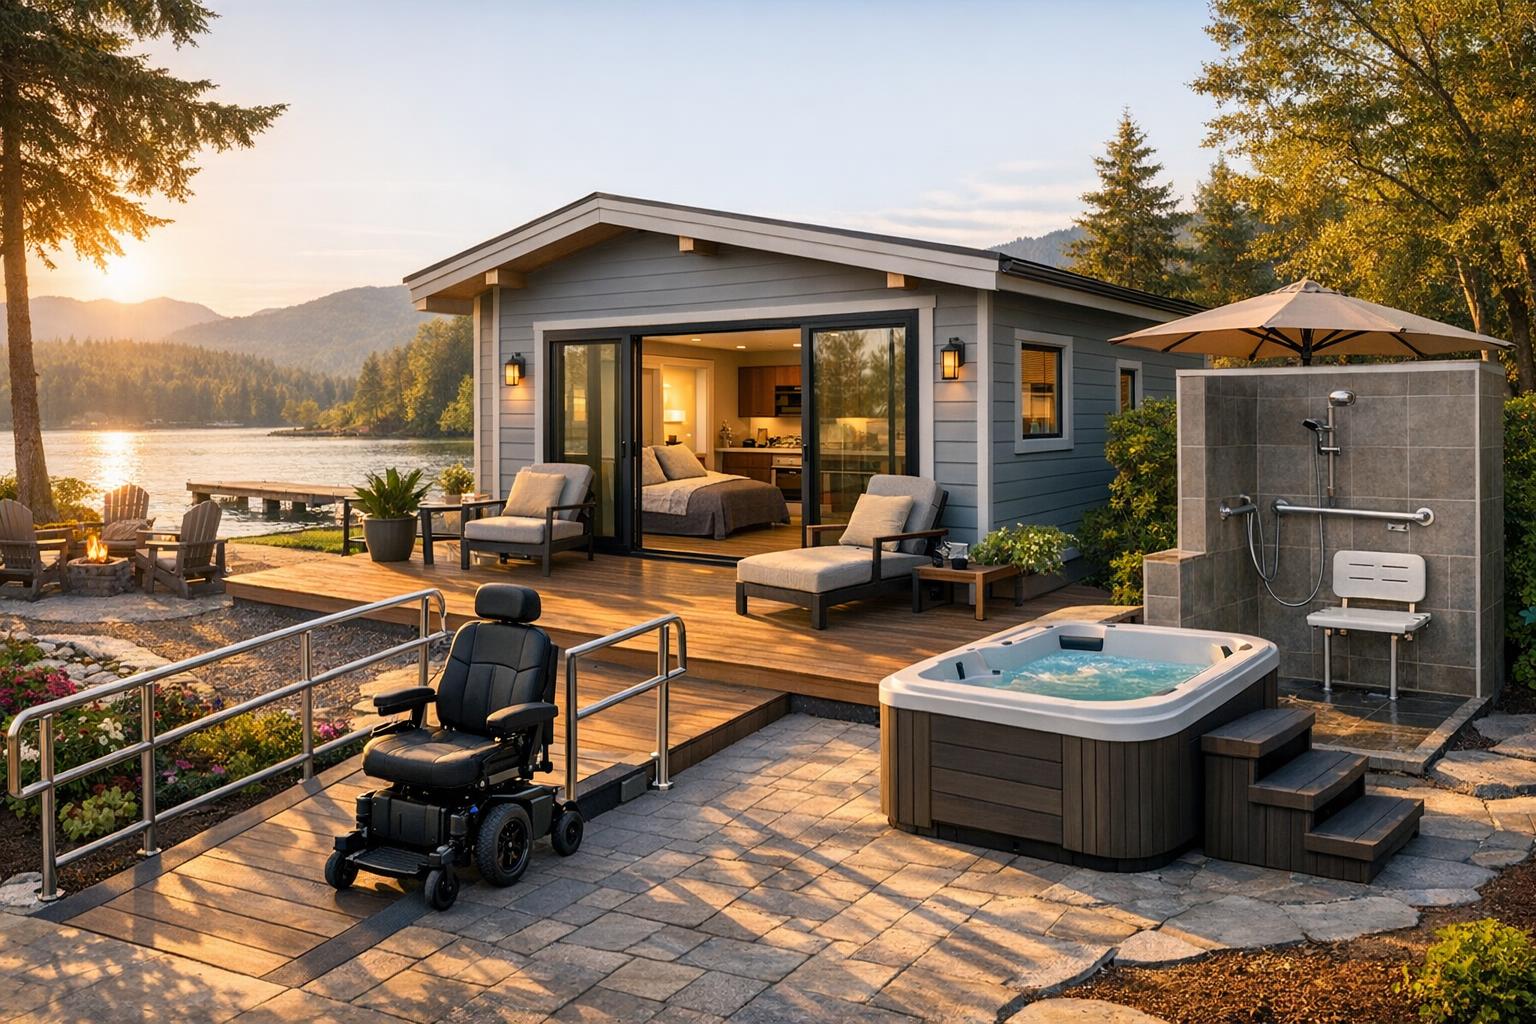
Key design features and room‑by‑room upgrades (with dimensions)
Exterior and site access
- Path width: minimum 1.5 m (59″) clear.
- Cross‑slope: ≤ 1:50 (2%). Surface: non‑slip; aim for pendulum slip resistance > 36.
- Entrance: zero‑step entry where possible; threshold ≤ 5 mm bevel or ramp at 1:12.
- Ramp handrails where rise > 600 mm (24″). Landings min 1.2 m x 1.2 m (47″ x 47″).
- Lighting: LED path lighting; target ~100–200 lux at doorways.
- Parking: accessible stall ~3.6 m x 6.0 m (12′ x 20′) near entry.
Doors, circulation, and thresholds
- Door clear width: 810–860 mm (32–34″); use pocket/sliding doors in tight layouts.
- Hall width: target 1.2–1.5 m (48–60″) clear.
- Turning radius: 1.5 m (60″) in living + bathroom where possible.
- Thermal breaks and weather seals at thresholds to avoid drafts and freezing.
Bathrooms
Bathrooms are the highest‑risk room for slips and injuries—plan transfers, traction, and simple controls.
- Roll‑in / curbless shower: minimum 1.2 m x 1.2 m (48″ x 48″), linear drain, folding seat.
- Grab bars: height ~800–1,100 mm (31–43″), corrosion‑resistant fixings, through‑bolt into blocking.
- Toilet seat height: 460–480 mm (18–19″).
- Sink knee clearance: target ~860 mm (34″) high; knee depth 700–800 mm (28–31″).
- Flooring: slip‑resistant tile; consider electric or hydronic heated floors for comfort and drying.
- Ventilation: exhaust ~50 L/s for small bathrooms; HRV integration recommended for cottages.
Kitchens and food prep
- Include one adjustable or lower work zone; knee space ~860 mm (34″).
- Front‑control cooktops, reachable wall ovens, pull‑out storage, and pull‑down shelves.
- Single‑lever faucets and insulated exposed pipes for safety.
Sleeping & living areas
- Main‑floor bedroom preferred; clear space beside bed ~1.3 m (51″) on at least one side.
- Bed height ~460–520 mm (18–20″).
- Use modular furniture and foldaway partitions to avoid narrow corridors.
Lighting, controls, & sensory accommodations
- High‑contrast edges, task lighting, dimmers, and tactile markers on switches.
- Switch heights: ~900–1,050 mm (35–41″). Add visual + audible alarms for hearing‑impaired guests.
- Optional smart features: voice assistants, app thermostats, large‑button remotes.
HVAC, insulation & thermal comfort
- Insulation: target ~R‑40 walls/strong ceiling R‑values—use continuous insulation and thermal breaks.
- HVAC: cold‑climate ductless mini‑split heat pumps; consider radiant floors in bathrooms.
- Ventilation: HRV/ERV for moisture control; keep plumbing inside the thermal envelope and insulate pipes.
Safety & emergency features
- Grab bars & handrails installed to strength requirements; non‑slip surfaces on ramps and entries.
- Emergency call options: panic cord in bathroom + second option near the bed.
- Printed emergency instruction card inside the unit with the full address and exit routes.
Retrofitting existing ADUs & tiny homes (cost‑effective priorities)
Start at the highest risk/highest use: entry, bathroom, and reliable heat/moisture control. Then improve circulation, kitchen, and controls.
Quick wins (low budget)
- Lever door handles: $20–$100 each.
- Portable aluminum ramp: $300–$1,500.
- Grab bars (installed): $200–$800.
- Bed risers, non‑slip mats, and brighter path lighting.
Mid‑level upgrades
- Curbless shower retrofit: $10,000–$30,000 (linear drain, waterproofing, floor slope rebuild).
- Door widening to 810–860 mm: structural costs vary.
- Mini‑split heat pump: $3,000–$8,000.
Full remodel vs replace
If >50% of structural elements require major change or modern HVAC/plumbing can’t be accommodated without large penetrations, plan for a rebuild. Use contractors with accessible retrofit experience and confirm insurance/WSIB status.
Accessibility for vacation rental operations (hosts & managers)
Accurate listing descriptions
Use measured facts, not vague claims. Copy/paste template:
Accessibility features: [zero‑step entry / ramp slope], [door widths], [turning space], [shower type + size], [grab bars], [bed height], [parking distance to entry].
Cleaning & maintenance
- Monthly wiggle test for grab bars and rails; use non‑abrasive cleaners.
- Seasonal inspection of ramps, skirting, and non‑slip coatings.
Guest communication templates (copy‑ready)
Pre‑arrival confirmation:
“Thanks for booking. Measured accessibility features: entry [zero‑step / ramp], door clear width [__ mm / __”], bathroom [roll‑in shower __ x __], parking distance to the door [__ m / __ ft]. If you require further accommodations, please contact us.”
Liability & insurance
Ask your insurer about short‑term rental coverage, slip‑and‑fall risk, and accessibility‑related claims. Keep records: permits, inspections, invoices, and maintenance checks.
Case studies & sample layouts (copy‑ready)
Case study 1: Converted Ontario cottage ADU (retrofit)
Before: steep steps, bedroom on second floor, inefficient heating. After: zero‑step entry, roll‑in bathroom, insulated mini‑split, universal kitchen updates. Outcome: retrofit cost ~ $25,000 net after a $40,000 grant offset (example scenario). Verify grant availability in 2026.
Case study 2: BC purpose‑built tiny home (detached ADU)
About 60 m² (646 ft²) tiny home with sliding doors, HRV, NBC‑aligned universal plan features; build cost ~ $150,000. Zoning and process vary by municipality.
Sample layout specs (1‑bed ADU)
- Clear path: 1.5 m (60″) through main living zone.
- Turning circles: 1.5 m (60″) in living and bathroom.
- Kitchen: lower counter segment with knee clearance ~860 mm (34″).
- Bathroom: roll‑in shower 1.2 m x 1.2 m (48″ x 48″).
- Bedroom: 1.3 m (51″) clear space beside bed.
Costs, financing, and incentives (Canada‑focused)
Costs vary by province, labour market, site access, servicing, and winter timing. Planning ranges:
- Full accessible ADU build (~75 m²): low $100K — medium $200K — high $350K.
- Retrofit bath/kitchen: $10K — $25K — $50K.
- Year‑round HVAC & comfort upgrades: $5K — $15K — $30K.
Check municipal ADU grants (example: St. Catharines summaries) and CMHC programs; confirm eligibility and rules before budgeting. See CMHC at CMHC and ADU financing references at ADU Financing Canada.
Seasonal & maintenance checklist for year‑round living (downloadable content)
Winterization (before first freeze)
- Inspect insulation and air sealing; verify skirting and wind blocking for tiny homes on piers.
- Insulate pipes; add heat tracing where required.
- Keep approach and ramp clear; consider heated mats where safe and allowed.
Summer & moisture control
- HRV/ERV filter maintenance and HVAC filter replacement on schedule.
- Check for condensation behind furniture and at windows; ensure exterior shading and insect screens.
Annual schedule
- Torque‑check grab bars/handrails, reapply non‑slip coatings as needed, test alarms monthly and replace batteries annually.
Implementation plan & timeline (phased)
Phase 1: Assessment & permits (4–8 weeks)
- Site survey, accessibility audit, concept sketch + rough budget, municipal pre‑consultation notes, draft permit package.
Phase 2: Design & contractor selection (6–10 weeks)
- Universal design specification sheet, construction drawings, contractor bids, and contract with insurance/WSIB confirmation.
Phase 3: Construction or retrofit
- Small retrofit: ~8–16 weeks. Full build: ~6–12 months.
- Prioritize: weather‑tight shell → accessibility essentials → HVAC/ventilation → finishes and safety details.
Phase 4: Commissioning & guest‑ready checks (1–2 weeks)
- Test alarms (visual + audible), confirm door clearances/turning spaces, review ramp traction and winter drainage, prepare guest pack (emergency info and measured accessibility features).
Practical resources & templates (Canada)
- National Building Code / NRC: https://nrc.canada.ca/en
- Canada ADU regulations guide: Canadian Regulations Guide
- Example municipal pre‑approved plans: St. Catharines
- ADU market overview: The future of the ADU market in Canada
- Grant summary & program notes: St. Catharines ADU grants (example)
- ADU financing references: ADU Financing Canada
- Video overview / technical commentary: technical example video
FAQ
1) How do I make a cottage accessible for guests with mobility issues?
Start with the basics: zero‑step entry or ramp (max 1:12), lever handles, grab bars anchored into solid blocking, wider clear paths, and safer lighting. NBC Section 3.8 is a common starting point—check local rules. See municipal example plans at St. Catharines pre‑approved designs and design guidance at Accessible ADU Design.
2) What permits do I need to build an ADU in Ontario or BC?
Most projects need zoning confirmation and a building permit for new construction or structural/plumbing/electrical changes. Some municipalities provide pre‑approved plans that reduce design time but still require site review; see the St. Catharines example above.
3) When does an ADU need a building permit?
Typical triggers: new construction, structural changes, adding/moving plumbing or electrical/HVAC, or changing a space into a separate dwelling unit. Confirm with your municipal building department; use local portals and planning pages as the official source.
4) What upgrades make tiny homes suitable for year‑round living in Canada?
Focus on higher insulation (example target R‑40), cold‑climate heat pumps (ductless mini‑splits), HRV/ERV ventilation, pipe freeze protection and insulated skirting for units on piers, and snow‑load‑aware roof/entry detailing.
5) Are there grants in Canada for accessible ADU retrofits?
Sometimes—municipal programs and CMHC resources can help. Grant amounts and rules change; verify details with your municipality and program administrators (example program summaries are available in some municipal guides).
6) What are quick, low‑cost accessibility upgrades for vacation rentals?
Good quick wins: lever handles, a portable ramp, properly anchored grab bars, brighter path lighting, and non‑slip mats/strips.
7) How wide should doors be for accessible ADUs?
Common target: 810–860 mm (32–34″) clear width. Verify local measurement methods, hinge and hardware allowances, and provincial code specifics.
8) How do I list accessibility features accurately on rental platforms?
Use measured facts: e.g., “Door clear width 810 mm (32″)”, “Zero‑step entry (flush threshold)”, “Roll‑in shower 1.2 m x 1.2 m (48″ x 48″)”. Offer to confirm additional accommodations on request.
9) What should I ask a contractor before starting an accessible retrofit?
Ask for past accessible retrofit examples, how they’ll add blocking for grab bars, their winter detailing plan (thresholds, drainage, ice control), and proof of insurance and WSIB/provincial equivalent.
10) Where do I find the latest NBC information for 2026?
Use the NRC site and follow links to the current NBC pages: https://nrc.canada.ca/en.
Final note: Treat accessibility and year‑round living as a single plan—safe outdoor access, simple circulation, a truly usable bathroom, and moisture/thermal control built for Canada will make your ADU safer, more bookable, and more resilient. For further reading and downloadable checklists, see the Canada ADU regulations and financing guides referenced above.
Leave a Reply