
Tiny home light design in 2026: Clear, practical choices for brighter, calmer small homes
Estimated reading time: 12 minutes
Key Takeaways
- Skylight installation, smart window strategies, and well-placed reflective surfaces are the fastest, most practical moves to improve natural light benefits and mood improvement in tiny homes.
- Good daylight can reduce electric lighting needs by ~20–40% and make a compact room feel up to ~30% larger.
- Choose daylighting solutions by where light needs to land, how it spreads, and how it interacts with privacy, ventilation, and thermal performance.
- Simple finishes (high LRV paint, light floors, mirrors) plus one well-placed skylight or clerestory often deliver the biggest perceptual gains per dollar.
Table of contents
- Introduction: what this guide promises
- Why natural light matters in small spaces
- Core principles of tiny home light design
- Skylight installation: types, placement, pros & cons
- Window strategies for maximum daylight
- Reflective surfaces, finishes, and materials
- Integrating daylight with artificial lighting
- Health & mood improvement explained
- Practical checklist & quick wins
- Common mistakes and how to avoid them
- Real-life mini case studies
- Cost, ROI, and energy considerations
- Resources, tools & further reading
- FAQ
Introduction: what this guide promises
In 2026, tiny home light design is about clear, practical choices: *skylight installation*, smart *window strategies*, and well-placed *reflective surfaces* that deliver real natural light benefits and steady mood improvement. This guide promises practical, design-forward strategies that make a small home feel brighter, bigger, and calmer.
For a broader, daylight-focused treatment, see Tiny Home Living: Your Complete Guide to Micro Homes, Sustainability, and Lifestyle Freedom.
Why natural light matters in small spaces (natural light benefits)
Daylight matters more when you live small. In a tiny home, one dark corner can make the whole place feel tight. But one good roof or window change can light up most of your footprint. For broader context on daylight in tiny homes, see Tiny Homes: Space Cost Sustainability.
Two numbers to keep in mind as you plan:
- Good daylight can cut your need for electric lighting by about 20–40%.
- Strong daylighting can make a compact room feel up to ~30% larger.
In a tiny home, daylight is not just “nice.” It changes how you feel and how the space works. These are the most useful natural light benefits to understand for tiny home light design and long-term mood improvement.
1) Your body clock works better
Daylight helps set your circadian rhythm (your sleep-wake clock).
- Morning light has more blue-rich light. This tells your brain to lower melatonin so you feel alert.
- Evening low light helps melatonin rise again so you can sleep.
In small homes, where you’re often in one main room all day, light timing matters even more. For broader context on tiny home daylight strategies, see Tiny Home Living: Your Complete Guide.
2) Vitamin D support (with safe sun habits)
Sunlight helps your skin make vitamin D, which supports bones and immune health. In Canada, winter sun is weaker and days are short, so you may need to be extra intentional.
Important safety note: daylighting your home is helpful, but don’t overdo direct sun exposure on skin. Use safe sun practices and talk to a clinician if you have concerns.
3) Mental health and “cabin fever”
More daylight is linked with better wellbeing and can help with seasonal low moods (including SAD). In a tiny footprint, a gloomy interior can feel like being stuck in a box. A bright interior feels like you can breathe.
4) A tiny home can feel up to ~30% larger
Good daylighting improves how you see space. Strong, even daylight reduces harsh shadows and makes surfaces read as farther apart. That “bigger” feeling matters in 200–400 sq ft homes.
5) Energy and performance benefits
Daylit spaces can:
- reduce electric lighting needs by about 20–40%
- be linked with ~15–20% productivity improvements in daylit environments
Why tiny homes amplify the effect
- One tubular skylight often lights a 20–50 sq ft hallway.
- A well-placed skylight can disperse light to 50–100 sq ft depending on roof height and finishes.
That’s why good daylighting can feel like a “whole-home upgrade” in a tiny build. For inspiration on styling and lived experience, see Truform Tiny – Living Beautifully, trend context from Pella’s 2026 Home Design Trends, and a quick overview clip on YouTube.
Core principles of tiny home light design
Great tiny home light design is not about adding random glass. It’s about planning where light enters, where it lands, and how it spreads—using the right window strategies and the right approach to skylight installation. For a broader treatment, see Tiny Home Living: A Comprehensive Guide.
Orientation & layout (start with the sun)
Rule to use: orient living areas and sleeping areas toward the sun path (south in Northern Hemisphere).
In Canada, south exposure often gives the most winter sun. If you can, place your main daytime zone (kitchen/living) so it gets strong midday light.
Use a sun path calculator (many free apps) to see where shadows fall in different seasons.
A simple prioritization rule (what goes where)
- Locate primary daytime spaces (kitchen, living) where midday sun peaks.
- Place lofts/bedrooms where morning/evening sun is strongest depending on routine.
If you wake early, east light helps. If you work late, prefer softer morning light and better afternoon light.
Balance daylight with privacy and thermal comfort
Windows are close to neighbours and beds in tiny homes. Privacy matters. Good fixes that still let in daylight:
- Clerestory windows for private daylight
- Low‑E glazing to reduce heat loss in winter and heat gain in summer
- Simple shading (blinds, shades, exterior awnings)
Daylight distribution vs. glare
To spread light:
- use taller windows, not just wider ones
- add light-coloured surfaces near the window
- use diffusion (sheers, frosted film) so light spreads softly
Integrate daylight with building and energy basics
Skylights and windows are holes in your insulated shell. In Canada, plan for proper flashing, insulated curbs, and high-performance glazing that meets local energy rules. If you’re cutting into a roof or load-bearing wall, check permits and involve a licensed pro.
Quick decision matrix: skylight vs. high window vs. ribbon window
Choose a skylight when:
- you have limited wall space
- neighbours are close (privacy issue)
- you need light in the middle of the plan
- you want stack ventilation (venting skylight)
Choose a high window (clerestory) when:
- you want privacy + daylight
- you want even light across a wall
- you’re trying to avoid roof work
Choose a ribbon window (long band) when:
- you want wide, even daylight in kitchen/living
- you have a strong view you want to frame
- your wall can handle the opening (structure checked)
These basics make later choices (glass type, placement, finish) much easier. For styling ideas, see Truform Tiny and trend context from Pella. For lighting trends and LED ideas, see FlexfireLEDs.
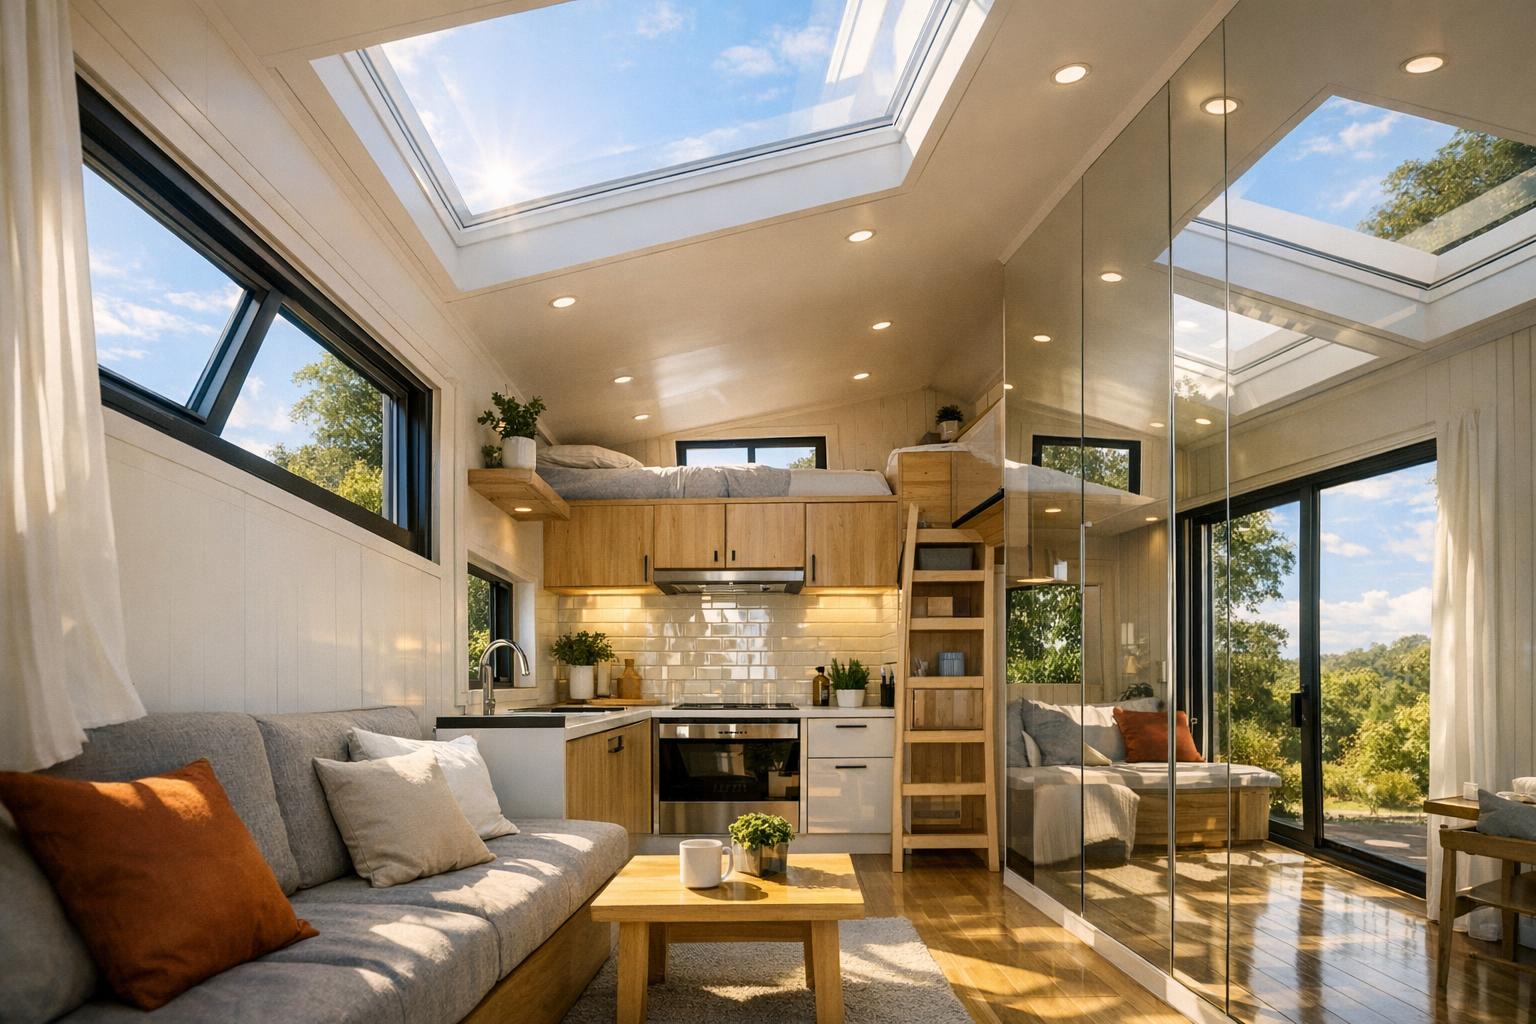
Skylight installation: types, placement, pros & cons
Skylight installation is one of the fastest ways to change the feel of a tiny home, because roof light drops in from above and spreads more evenly. Done well, it supports natural light benefits and real mood improvement—but only if you plan for structure, water, and condensation.
Skylight types (with best uses and cost ranges in CAD)
Fixed skylights (non-operable)
- Best for: pure daylight, simplest builds
- Typical cost: $500–1,500 CAD
- Pros: fewer moving parts, often lowest leak risk when installed correctly
- Cons: no added ventilation
Venting/operable skylights (manual or remote)
- Best for: kitchens, bathrooms, any space that traps heat or moisture
- Typical cost: $800–2,500 CAD
- Pros: adds airflow, supports humidity control
- Cons: more complex flashing and sealing, more maintenance
Tubular skylights / sun tunnels (light pipes)
- Best for: hallways, closets, loft corners, centre corridors
- Typical cost: $300–800 CAD
- Pros: small roof opening, diffuser spreads light softly, often DIY-friendly
- Cons: no sky “view,” less dramatic than big skylights, light output depends on tube length and bends
Solar‑powered venting skylights (with battery/solar and sensors)
- Best for: automated ventilation, off-grid convenience, humid rooms
- Typical cost: $1,200–3,000 CAD
- Pros: can auto-open/close, may pair well with smart shades
- Cons: higher cost, more parts to service
Placement strategies that work in tiny homes (examples)
- Over the kitchen for strong task light and to clear cooking vapour.
- Over the bathroom to reduce humidity (pair with venting unit + fan).
- In hallways and centre corridors — tubular units shine here.
- Over a loft bed with an east or west-facing tubular or small venting skylight for morning/evening cues.
Roof pitch guidance (why it matters)
A common sweet spot for many standard skylights is 15–30° roof pitch. Tubular skylights often work well on steeper roofs. Low-slope or flat roofs may favour fixed or curb-mounted skylights with proper slope built into the curb.
Structural and waterproofing notes (tiny-home specific)
Cutting a skylight requires reinforcement (sistering joists, headers), correct flashing kits, waterproof membranes, and following manufacturer instructions for sealants like butyl tape where specified.
Insulation, condensation, and cold-climate performance
Condensation is the big hidden problem in many Canadian regions.
- Choose insulated glass and aim for a U-factor < 0.3 in cold climates.
- Use low‑E coatings to improve comfort.
- Insulate skylight curbs well and control indoor humidity with ventilation.
Ventilation and energy benefits
Operable skylights support “stack ventilation.” Pair skylights with shades to reduce summer heat gain; shading can cut heat gain by about 10–15%. Smart/solar models can automate venting and shading.
Cost, DIY vs. pro, and maintenance
DIY-friendly: tubular skylights (often 2–4 hours for simple installs). Pro-level: large curb-mounted units, venting units in complex roofs, any alteration of engineered trusses.
Annual maintenance: inspect seals and flashing, clean glass/diffuser, check bird screens, test motors/batteries, re-seal per manufacturer guidance.
Safety and permits
Use fall protection, check local building permits before cutting roofs or exterior walls, and consider fire-safety and egress rules when altering bedrooms.
Done right, skylights become a daily wellness tool, not a leak risk. See practical inspiration at Truform Tiny, trend cues from Pella, and a quick overview clip on YouTube. For LED pairing ideas, see FlexfireLEDs.
Window strategies for maximum daylight
Good window strategies make daylight feel smooth and “everywhere,” not harsh in one spot. Windows also control privacy, ventilation, heat loss, and glare—especially in Canadian winters and bright summers.
Sizing rule of thumb (glazing ratio)
Start with window area around 10–20% of floor area. More glass = more daylight, but also more heat loss/gain. Your best number depends on climate, shading, and glass performance.
Vertical placement: why tall windows help
Tall windows push light deeper into a room.
Example: 24 x 60 in vertical windows can improve daylight reach while keeping low wall space open for seating or storage.
Frame choices that give you more glass
- Slim-frame materials: aluminum-clad wood or fiberglass.
- Look for 1–1.5 in profile to maximize glass area.
- Ensure a thermal break to reduce heat flow and condensation risk.
Clerestory & ribbon windows
Clerestory = high, narrow window above eye level for high-angle light and privacy. Ribbon = long band of glass for even daylight. Tiny-home example: a 6–12 in band above kitchen cabinets adds daylight without eating main wall space.
Cross-ventilation: pair windows with height
Use operable windows on opposite walls; pair low operable units with high clerestories to support stack ventilation.
Glazing tech (simple definitions + targets)
- Low‑E coating: reflects heat to improve comfort.
- Double pane + argon fill: reduces heat transfer.
- U-factor: lower is better. Cold-climate target: U ≤ 0.25–0.30.
- SHGC: lower reduces overheating; general target: 0.3–0.5 depending on climate.
Tints and frits (when to use each)
- Tinted glass cuts glare and harsh sun.
- Fritted glass diffuses light and improves privacy while still allowing daylight.
Placement examples
- South-facing living/kitchen: window band at counter height + clerestory above for deeper daylight.
- East-facing loft sleeping: narrow vertical or small slider to catch morning light.
- North bathroom: frosted or translucent window for soft, diffuse daylight and privacy.
- Entry: transom above the door to make the entrance feel open.
Cost and install notes (CAD)
Typical windows cost $400–1,200 CAD each. DIY framing can work for small, non-structural changes; structural wall cuts are often a pro job.
For more ideas and trend references, see Truform Tiny, Pella, and a visual overview on YouTube.
Reflective surfaces, finishes, and light-enhancing materials
Reflective surfaces help daylight travel farther. In tiny home light design, that means fewer dark corners and a softer, more open feel—two big drivers of mood improvement.
Paint and sheen (simple targets)
- Choose light wall colours with LRV > 80.
- Use semi‑gloss on cabinets and trim in kitchens and baths.
- Use a matte or satin white ceiling for balanced reflection without harsh glare.
Floors that bounce light
Light floors reflect more daylight than dark matte floors. Good options: polished concrete, glossy vinyl, light-toned wide-plank flooring. Reflective, light floors can bounce about 20–50% more light into a room compared to matte dark floors.
Mirrors and backsplashes
- Place a full-length mirror opposite a window or skylight to send light back across the room.
- In kitchens, a mirrored backsplash can “double” the feeling of window size (but take care near cooktops to avoid glare).
Cabinetry and hardware
Glossy cabinet fronts and chrome/brass hardware add small but real light bounce. Use them as “light helpers,” not the main strategy.
Diffusion and glare control
- Sheers soften strong sun and reduce sharp shadows.
- Frosted films add privacy and diffuse light in bathrooms and near neighbours.
- Diffusing glass works well for high windows where you want glow, not a clear view.
Watch a short visual primer at YouTube and see LED pairing ideas at FlexfireLEDs.
Integrating daylight with artificial lighting
Daylight changes by hour and season. Tiny home light design works best when you blend daylight with simple, layered electric lighting that supports natural light benefits and evening mood improvement.
Layered lighting (3 layers)
- Ambient: main soft fill (recessed, ceiling fixtures, cove lighting)
- Task: bright light where you work (under-cabinet LEDs, desk light)
- Accent: strips or spots that add depth (behind shelves, toe-kicks)
Tunable white LEDs for circadian support
Tunable white (CCT shifts roughly 2200K–6500K) helps match daytime alertness and evening winding down:
- Daytime tasks: 5000–6500K
- Evening wind-down: 2200–2700K
Sensors and controls
Daylight sensors can dim lights when daylight reaches your target lux. Smart shades and skylight vents can be integrated so heat, glare, and light work together. For LED ideas, see FlexfireLEDs and a trend clip on YouTube.
Health & mood improvement explained
The goal of daylight is not just a pretty photo. In a small home, smart lighting changes how you sleep, how steady you feel, and whether winter feels manageable. This is where natural light benefits connect to real mood improvement.
Circadian entrainment (plain language)
Your brain uses light like a daily timer:
- Bright morning light lowers melatonin and helps you wake.
- A steady, brighter day supports alertness.
- Lower, warmer light at night helps you feel sleepy at the right time.
In tiny homes where multiple functions share space, the timing and direction of light are especially important.
Serotonin, stress, and the “calm space” effect
Daylight exposure is linked with better mood and lower stress. Many tiny-home owners report that brighter, more even daylight feels calmer and less “cave-like.”
SAD and Canadian winters
Short winter days can make low mood more common. Designs that increase morning daylight exposure can help reduce that “winter dip.”
How design choices translate into mood improvements
- Skylight installation: overhead light and a sky view are strong wakefulness cues.
- Window strategies: even distribution reduces deep shadows and enclosure feelings.
- Reflective surfaces: increase incidental daylight exposure throughout the day.
For a short read on emotional benefits tied to ADUs, see The Emotional Benefits of ADUs. For case examples and trend commentary, see Truform Tiny, Pella, and this video.
Practical checklist & quick wins for tiny-home owners
Use this practical checklist to improve tiny home light design step by step. Each item includes a cost tier and one clear action.
Free / low-cost wins (often under $1,000)
-
- Orient sleeping/living areas south where possible (free) — Action: use a sun-path app to check winter vs. summer sun.
-
- Paint walls LRV > 80; use semi-gloss in wet areas (low) — Action: test paint swatches in morning and late afternoon light.
-
- Mirror placement opposite windows (low) — Action: mount safely; consider tempered glass in high-traffic zones.
-
- Use sheer/diffusing curtains to avoid glare (low) — Action: install a simple track so you can fully cover glass on bright days.
-
- Polish or choose reflective flooring and glossy cabinetry (low–mid) — Action: brighten the “light path” from window/skylight to the back of the room.
- Add a tubular skylight for narrow zones (low) — Action: measure roof pitch, tube run, and ceiling access before buying.
Mid-budget upgrades ($1,000–$5,000)
-
- Install clerestory/ribbon windows above eye level (mid) — Action: plan a continuous band (6–12 in tall) for even, private light.
-
- Choose low‑E double‑pane glazing (U < 0.3) (mid) — Action: request U-factor and SHGC numbers from the supplier.
-
- Add cross‑ventilation operable windows or vents (mid) — Action: place openings on opposite walls, or pair a low window with a venting skylight.
- Install tunable LEDs for circadian support (mid) — Action: set a daytime scene (cooler) and evening scene (warmer).
High-investment upgrades (often over $5,000)
-
- Slim-frame windows to maximize glass area (high) — Action: compare frame thickness and thermal-break designs.
-
- Smart sensors/shades/vent integration (high) — Action: plan power and wiring early, especially for off-grid setups.
-
- Solar-powered venting skylight (high) — Action: use where humidity or heat build-up is worst (kitchen/bath).
- Safety & permits for roof/wall cuts (required) — Action: verify local codes before altering structure; consider a licensed contractor.
Budget tiers summary: Low: <$1,000; Mid: $1,000–$5,000; High: >$5,000. For styling and practical ideas, see Truform Tiny, trend context from Pella, and lighting trends at FlexfireLEDs.
Common mistakes and how to avoid them
These common mistakes show up in many tiny builds. Each fix is simple, but it must be planned.
-
- Over‑glazing one orientation → causes heat gain/loss and glare. Fix: balance east/west, add shading or tinting, and use low‑E glazing.
-
- Neglecting shading → leads to overheating and glare. Fix: add exterior shading or blinds; use sheers or diffusion film.
-
- Poor ventilation → traps humidity and increases condensation risk. Fix: pair operable skylights/windows with a good fan and proper insulation.
-
- Ignoring condensation and thermal breaks → can lead to mold and heat loss. Fix: choose insulated curbs, hit U-factor targets, and detail vapour/air barriers carefully.
- Relying only on glossy surfaces → can create uncomfortable glare. Fix: mix glossy accents with matte ceilings, textiles, and diffusers.
Avoiding these errors is often cheaper than fixing them later. See trend and technical references at FlexfireLEDs, Truform Tiny, and Pella.
Real-life mini case studies / before-and-after examples
1) Ontario DIY van conversion (DIY-friendly)
- Before: dim loft, no overhead access for a big window change
- Changes: installed a tubular skylight (~$500), added a mirror opposite a window, repainted with light tones
- After: owner described it as “3x brighter,” with less anxiety and better morning energy
Inspiration: Truform Tiny.
2) BC high-end tiny home
- Before: kitchen felt shadowed and tight
- Changes: clerestory ribbon windows, low‑E glazing, glossy cabinets for light bounce
- After: more even illumination and a brighter “calm” feel; owner reported improved mood and faster resale interest
Video reference: YouTube trend clip and design trends at Pella.
3) Prairies ADU
- Before: north-facing interior rooms lacked daylight
- Changes: south ribbon windows plus reflective floors and mirrors
- After: occupants reported fewer winter mood dips and higher perceived space
See styling ideas at Truform Tiny.
Cost, ROI, and energy considerations
Typical cost ranges (CAD)
- Skylights: $300–3,000 (tubular → fixed → venting/solar)
- Windows: $400–1,200 each
- Finishes & mirrors: $200–1,000
- Smart/tunable systems: varies (often mid to high)
Energy and payback basics
Well-daylit spaces can cut electric lighting needs by ~20–40%. With good glazing and smart shading, many households may see payback in 5–10 years, depending on climate, energy rates, and occupancy.
Resale value
In eco-conscious markets, bright, efficient tiny homes may sell faster and sometimes command a 5–10% premium when daylighting is paired with quality finishes.
Seasonal guidance (U-factor and SHGC)
- Use U-factor ≤ 0.25–0.30 for cold climates to reduce heat loss.
- Consider SHGC < 0.4 for strong summer sun control; in colder regions a slightly higher SHGC can help with passive winter heat if overheating is managed.
If you’re off-grid, daylighting plus solar PV and batteries can make lighting and vent controls more reliable. See visual and trend references at YouTube and FlexfireLEDs.
Resources, tools & further reading
-
- Truform Tiny – Living Beautifully (tiny home design examples)
-
- Pella – 2026 Home Design Trends (window trends and performance context)
-
- FlexfireLEDs – 2026 lighting trends (LED & tunable lighting ideas)
-
- Natural Resources Canada (NRCan) — home energy info and retrofit guidance
Frequently Asked Questions (FAQ)
Q: How much daylight should a tiny home have?
A: Use glazing around 10–20% of floor area as a starting point, then adjust by climate, shading, and performance numbers (U-factor, SHGC). Pair glazing with reflective finishes to get more benefit per square foot of glass.
Q: Are skylights worth the cost in cold climates?
A: Yes, when chosen and installed correctly. Pick insulated glass (U-factor < 0.3), insulate curbs, control indoor humidity, and prefer venting units where ventilation helps. Proper flashing and structural support are essential to avoid leaks.
Q: What’s the best window for privacy but still lots of light?
A: Clerestory windows (high, narrow) and frosted or fritted glass provide daylight while preserving privacy. Ribbon windows set high on the wall can also deliver even light without direct sightlines.
Q: Can a tubular skylight replace a regular window?
A: Tubular skylights are great for narrow zones and interior corridors where wall windows aren’t possible. They don’t provide a view and are less dramatic than large windows, but they are cost-effective and often DIY-friendly.
Q: How do I avoid glare from reflective finishes?
A: Mix glossy accents with matte surfaces, position mirrors opposite but not directly facing very bright windows, use sheers or diffusing films, and add adjustable shading for peak-sun hours.
Q: Where can I get trusted product specs and flashing kits?
A: Consult manufacturer pages for specs and flashing kits — for example, Velux and FAKRO list product-specific instructions. For design trends and performance context see Pella.
For quick inspiration and practical examples, visit Truform Tiny, review lighting trends at FlexfireLEDs, and watch overview clips on YouTube.
Leave a Reply