
Rainwater garden ADU: Practical design & sizing guide for Canadian ADUs
Estimated reading time: 12 minutes
Key Takeaways
- A rainwater garden ADU captures and infiltrates runoff from an ADU roof, reducing peak flows and improving site resilience.
- Use the CRD guidance as a technical backbone for sizing, soils, and infiltration testing: CRD guide.
- Simple sizing formula: capture volume = roof area × storm depth × runoff coefficient (0.9 for roofs), then convert to footprint using effective depth and porosity.
- Design must include a safe overflow route — overflow is not optional.
- Plant with native, wet-tolerant species by zone and expect the first year to require the most maintenance.
Table of contents
- Introduction
- Why ADU landscaping and stormwater management belong together
- How rain gardens work (stormwater management 101)
- Sizing: formula and worked example
- Planning your rainwater garden for an ADU
- Design options and integration strategies
- Step‑by‑step installation guide
- Plant species and design ideas for Canadian climates
- Maintenance, monitoring and performance metrics
- Costs, incentives and financing
- Permits and municipal considerations
- Canadian success stories & case study templates
- Frequently Asked Questions
Introduction
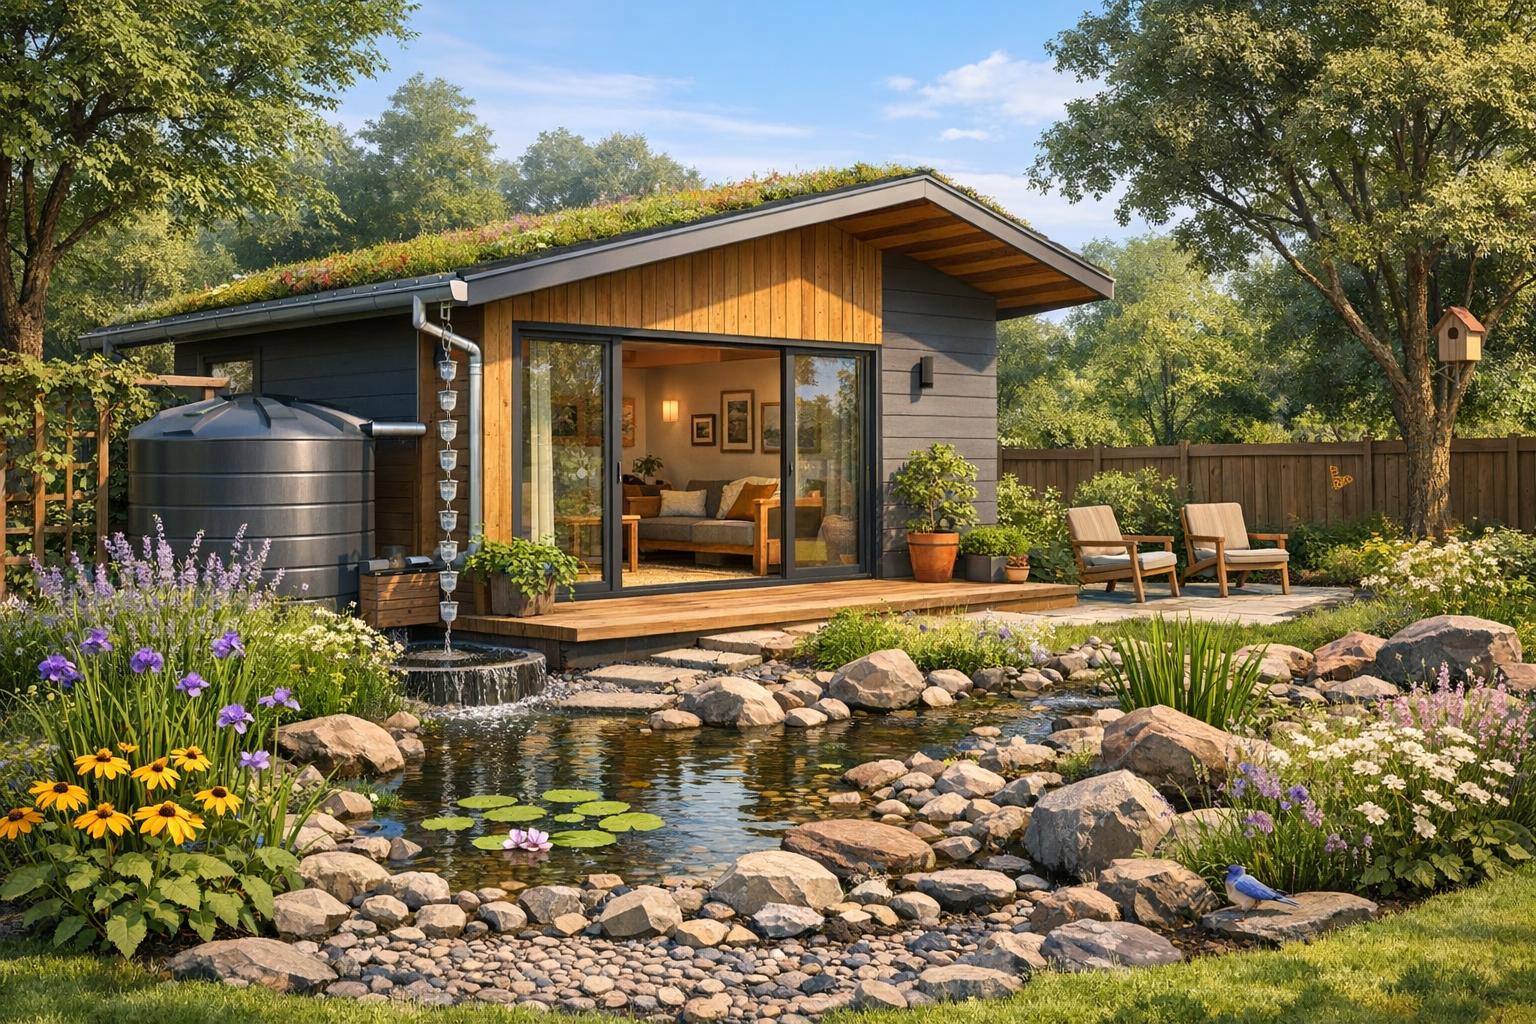
A rainwater garden ADU is a planted depression or engineered soil bed designed to capture and infiltrate roof and site runoff from an Accessory Dwelling Unit (ADU). It’s integrated into ADU landscaping to reduce stormwater runoff, provide biodiversity, and enhance site resilience. For a fuller ADU overview, see ADUs: The Ultimate Guide to ADUs for Canadian Property Investment.
This guide gives practical, step-by-step help to design and size a rainwater garden for typical Canadian ADU roofs. You’ll also get Canadian program examples, clear stormwater benefits you can measure, and links to municipal guides you can use as checklists and worksheets. Sizing, soil mix and maintenance recommendations follow CRD best practices (CRD guide).
Why ADU landscaping and stormwater management belong together
An ADU adds roof area and sometimes paving—these hard surfaces shed water faster than lawn or garden beds. That can:
- Increase puddling in your yard
- Push more water toward your house or neighbours
- Send more water, faster, into municipal storm drains
Pairing ADU landscaping with stormwater management is a simple way to keep more rain on your own site. A rainwater garden slows runoff, spreads it out, and lets it soak in—reducing peak flow during storms and helping both your property and the street.
How rain gardens compare with other low-impact choices
- Rain barrels / cisterns: Great for reuse but limited storage in big storms.
- Permeable paving: Helps water soak through hard surfaces; needs good base prep and cleaning.
- Bioswales vs rain gardens:
- Bioswales mainly move water safely (shallow channel).
- Rain gardens mainly infiltrate water (soak it into soil on-site).
Emerging guidance for integrating rain gardens into ADU projects is appearing in Canadian ADU resources, including advice on tying roof drainage into a garden that fits small lots: Rain Garden Integration for ADUs in Canada.
How rain gardens work (stormwater management 101)
A rain garden is green infrastructure—it manages stormwater close to where it falls. Basic flow:
- Capture: Water comes off the ADU roof into gutters and downspouts.
- Convey: Water is guided into the rain garden with a downspout diverter, splash block, or buried pipe to an inlet.
- Infiltrate: Water moves down through an engineered soil profile.
- Store temporarily: Soil void spaces hold water for a short time.
- Overflow safely: Extra water routes to a safe place (storm connection, ditch, or drywell—only where allowed).
Typical layer “cross-section” (simple build-up)
- Mulch at surface: ~50 mm
- Engineered planting soil: typically 300–450 mm depth
- Gravel reservoir / underdrain (optional): 150–300 mm gravel depth; may include perforated pipe
- Geotextile separation (only if needed): Use carefully so it doesn’t block flow
Key design ideas
- Runoff coefficient: roofs ≈ 0.9
- Design storm depth: use municipality’s preference; many guides use a small storm for sizing and require overflow for larger events
- Overflow is not optional: even a well-sized garden needs a route for extreme events
CRD includes practical rules on sizing, soil, and infiltration testing: CRD guide.
A simple sizing formula + worked example (metric)
Formula (metric):
- Capture volume (m³) = roof area (m²) × rainfall depth (m) × runoff coefficient (use 0.9 for roofs)
- Garden footprint (m²) = Capture volume / (effective depth × porosity)
Example defaults (confirm local design storm):
- Rainfall event: 25 mm = 0.025 m
- Runoff coefficient: 0.9
- Effective planting depth: 0.30 m
- Engineered soil porosity: 0.40
Worked example (copy-ready):
For a 50 m² ADU roof:
Capture volume = 50 × 0.025 × 0.9 = 1.125 m³
Garden footprint = 1.125 / (0.30 × 0.40) = 9.4 m² (round to 10 m²)
Provide an overflow route sized for larger storms.
Source for sizing defaults and testing: CRD guide.
Planning your rainwater garden for an ADU (site assessment + sizing)
Good stormwater management starts with a quick site check to avoid two common problems: an undersized garden that overflows and a garden that drains too slowly and stays ponded.
Site assessment checklist
- Roof and drainage: ADU roof area (m²); downspout locations; gutter capacity
- Slope and grading: measure slope; keep positive drainage away from foundations; keep garden at least 1.0–1.5 m from foundation unless protected
- Soils and infiltration: identify soil type and perform percolation tests
- Utilities and setbacks: check underground services and municipal setbacks
- Cold climate considerations: frost depth, frost-protected overflows, underdrain details
Percolation test (simple method)
- Dig a test pit 30 cm deep and ~20 cm diameter.
- Fill with water and allow to drain completely.
- Refill and time how long the water level drops 25 mm.
- Repeat across the proposed area and average results.
- Consult local guidance (see CRD guide) for target infiltration rates.
Sizing checklist + decision tree
- Step 1: Use the capture volume formula (roof area × storm depth × 0.9).
- Step 2: Convert volume to footprint using effective depth and porosity.
- Step 3: If infiltration is low, plan for a larger footprint, an underdrain, a raised rain garden, or combined storage (cistern + overflow to garden).
Check for municipal residential rain garden programs before you build — they can influence design and documentation. Example: Brandon’s residential rain garden program (call for 2026 applicants).
Design options and integration strategies
Rainwater gardens are flexible and can be adapted to tight lots while retaining ADU access and outdoor space.
Placement choices (pros and cons)
- Adjacent to the ADU foundation (compact): short pipe runs; needs foundation protection and overflow routing.
- Linear swale connecting to a larger garden: great for narrow side yards; needs slope.
- Direct connection to downspouts: predictable capture; inlet needs sediment protection.
- Raised rain garden / bermed garden: for clay or high water table; adds vertical storage.
ADU landscaping aesthetics
Layered planting looks like a garden, not a ditch:
- Centre (wettest): sedges, rushes
- Mid-zone: flowering perennials
- Edge/back: shrubs for screening
Hardscape ideas: permeable stepping stones, narrow gravel paths, low retaining walls that double as overflow benches. Keep an access path 600–900 mm wide for maintenance.
Materials and construction details (copy-ready specs)
- Engineered soil mix: 60–70% clean sand + 30–40% compost/topsoil by volume to achieve ~35–45% porosity; minimum planting depth 300 mm.
- Underdrain options: perforated pipe in gravel with cleanouts; slope ~1% to daylight or approved outlet; gravel reservoir 150–300 mm when used.
- Inlet construction: rock apron + energy dissipation; add a sediment trap upstream.
- Overflow routing: to storm sewer with permission or to a gravel infiltration trench; size for extreme events.
- Mulch: coarse wood chip or shredded bark, initial layer 50–75 mm.
Technical backbone and practice: CRD guide.
Step‑by‑step installation guide (detailed sequence)
This sequence works for DIY and contractor installs. Adjust if you include an underdrain.
- Permitting check & locate utilities: confirm municipal rules for stormwater and obtain utility locates.
- Detailed site survey: measure roof area and downspouts; confirm grade and overflow direction.
- Mark out footprint and protection zones: stakes + string; mark inlet and overflow points.
- Excavate to design depths: typical 300–450 mm planting soil; add 150–300 mm gravel if underdrain needed.
- Install underdrain (if required): geotextile (if needed), gravel bed, perforated pipe with ~1% slope, cleanouts.
- Install engineered soil mix: place in lifts, lightly tamp (do not compact), shape basin and overflow channel.
- Construct inlet: connect diverter or pipe, install rock apron + sediment trap.
- Plant by micro-zones: wet-tolerant at centre, drier at edges; mulch ~50 mm.
- Build the overflow route: gravel trench or pipe to safe discharge, keep away from foundations.
- Water and establish: water twice weekly for first 8–12 weeks during dry periods; weed the first season.
- Final inspection + documentation: photograph as-built inlet, basin, overflow; keep receipts for programs or rebates.
Seasonal timing and winter-proofing
- Best window: spring to early fall when soil is workable.
- Winter notes: ensure overflow/underdrains not blocked and minimize standing water before freeze-up.
Plant species and design ideas for Canadian climates
Select species native or well-adapted to your ecozone; confirm with local lists. Trend guidance for 2026 highlights regenerative gardening and more native supply: Proven Winners: Top Canadian Gardening Trends 2026.
BC Coastal (coastal temperate)
- Carex obnupta (slough sedge)
- Juncus effusus (soft rush)
- Iris ensata / Iris sibirica
- Cornus sericea (red-osier dogwood)
- Polystichum munitum (western sword fern)
Prairies (AB / MB / SK)
- Rudbeckia spp. (black-eyed Susan types)
- Ratibida pinnata (gray-headed coneflower)
- Echinacea purpurea (coneflower)
- Baptisia australis (false indigo)
- Carex spp. for moist sites
Ontario / Quebec (Great Lakes / St. Lawrence)
- Iris versicolor (blue flag iris)
- Lobelia cardinalis (cardinal flower)
- Asclepias incarnata (swamp milkweed)
- Solidago (goldenrod)
- Cornus sericea (red-osier dogwood)
Planting layout rules:
herbaceous density 6–12 plants/m²; plant in drifts of 3–7; shrub spacing 1–2 m; plugs are cheaper, containers establish faster.
Maintenance, monitoring and performance metrics
A rainwater garden is low maintenance once established, but Year 1 is critical.
Year 1 establishment checklist
- Weeks 1–12: hand-weed weekly, water in dry spells, inspect inlet/outlet after storms.
- Months 3–12: top up mulch, remove sediment from inlet trap monthly during high-sediment periods.
- End of first season: prune dead stems, replant bare spots.
Long-term care
- Remove accumulated sediment, refresh mulch, inspect underdrain cleanouts, prune shrubs.
- Every 5–10 years expect settling—top up planting soil if needed.
Simple monitoring (homeowner-friendly)
- Visual rule-of-thumb: after a moderate storm, ponding should not persist longer than 48 hours.
- Keep a basic log: record ponding duration after three design storms per season and photograph inlet/overflow after storms.
- More formal: flow meter on a downspout diverter or rain gauge + roof-area formula.
For infiltration thresholds and testing guidance: CRD guide.
Costs, incentives and financing (Canada-specific)
Costs depend on size, soil, access, and underdrain need. These are planning ranges (CAD):
- Small (1–10 m²): $1,500–$4,000 — often DIY or small contractor
- Medium (10–25 m²): $4,000–$12,000 — contractor-installed
- Large/complex (>25 m²): $12,000–$30,000+
Typical cost split: materials 30–50%, labour 50–70%.
Check municipal programs for grants or rebates; example: Brandon’s residential rain garden program.
For ADU financing options see ADU Financing Canada Guide.
Permits and municipal considerations in Canada
Rules vary. Treat a rain garden like a small stormwater project, especially when connected to an ADU.
- Check local zoning for ADU landscaping, setbacks and lot coverage.
- Check whether stormwater changes are regulated; notify public works if connecting overflow to storm system.
- Get utility locates before excavation.
- If creating a hard-lined outlet or storm connection, obtain written municipal approval.
Provincial/municipal variations exist — confirm locally. See the CRD technical guidance and ADU integration context: CRD guide and Rain Garden Integration for ADUs in Canada.
Canadian success stories + visual case studies
ADU-specific case studies with measured results are emerging. Below are three case-study templates you can use to document projects properly. Use modeled estimates (clearly labelled) if monitoring data are not available.
Vancouver laneway-style ADU (case study template)
- Document: site type, ADU roof area, rain garden footprint, soil strategy, overflow route, cost, outcome (ponding time vs target), modeled capture for chosen design storm.
- Integration context: Rain Garden Integration for ADUs in Canada.
Toronto backyard ADU retrofit (template)
- Include: before/after drainage problems, downspout routing changes, foundation setbacks used, plant palette, winter performance.
- Show modeled estimates where monitoring isn’t available.
Prairie city participant example (Brandon program)
- Capture whether the garden serves main roof, ADU roof or both; soil type; raised bed vs underdrain; summer and snowmelt performance.
- Program info: Brandon program.
Frequently Asked Questions
Q: How big should my rainwater garden be for a typical ADU?
A: Use the capture formula: roof area × storm depth × 0.9 (roof runoff). Convert volume to footprint by dividing by (effective depth × porosity). Example: a 50 m² roof with a 25 mm event gives ~10 m² footprint at 0.30 m effective depth and 0.40 porosity.
Q: What if my soil is clay and drains slowly?
A: Options include increasing footprint, installing an underdrain to an approved outlet, or building a raised rain garden with engineered media. Perform percolation tests and follow guidance in the CRD guide.
Q: Do I need a permit to build a rain garden for my ADU?
A: Possibly. Municipal rules vary—check zoning, stormwater regulations, and whether connecting an overflow to storm infrastructure requires approval. Always get utility locates and written permission for any storm connection.
Q: What plants should I choose?
A: Choose native or regionally adapted, wet-tolerant species by micro-zone. See regional plant lists in this guide and trend resources like Proven Winners: Top Canadian Gardening Trends 2026 for ideas.
Q: Are there incentives to offset costs?
A: Some municipalities, conservation authorities, and utilities offer grants or rebates. Check local programs (example: Brandon’s program) and conservation authority offerings in your region.
Leave a Reply