
How to Build a Podcast Studio in a Tiny Home in Canada: Practical 2026 Guide
Estimated reading time: 16 minutes
Key Takeaways
- A small room can still sound professional when layout, isolation, treatment, ventilation, and gear are planned together.
- Start with the use case first so you do not overspend on unnecessary equipment too early.
- Soundproofing and acoustic treatment are different: one blocks noise, the other improves the sound inside the room.
- Canadian creators need to plan for climate, condensation, ventilation, power, permits, and product availability.
- Compact 2025 tech can reduce clutter, heat, cable mess, and power draw in a tiny home setup.
- The best build order is simple: plan first, seal and treat second, buy gear third, then test and refine.
Table of contents
- Define what your tiny home podcast studio needs to do
- Assess your tiny home space before building
- Canada-specific planning factors for Canadian creators
- Choose the best podcast studio layout for a tiny home
- Soundproofing vs acoustic treatment
- Step-by-step soundproofing for a tiny home podcast studio
- Seasonal maintenance and moisture control in Canada
- Acoustic treatment products and DIY options that fit small spaces
- Choose the right 2025 tech for a tiny home podcast studio
- Streaming essentials for creators using the studio on camera
- Software and workflow setup
- Internet and reliability tips for Canadian creators
- Power, safety, and ventilation planning
- Building code and when to call a professional
- Step-by-step installation walkthrough
- Typical costs and timelines in Canada
- Mini case studies
- Frequently Asked Questions
- Resources and practical tools
This practical 2026 guide is for Canadian creators who want to build a professional podcast studio inside a tiny home. You will learn how to assess your space, improve audio with soundproofing and acoustic treatment, choose compact 2025 tech, and launch a reliable podcast or streaming setup in Canada.
The big idea: a small room can still sound professional when layout, isolation, treatment, ventilation, and gear are planned together.
“You do not need a large room to get a polished voice. You need a smart room.”
Define what your tiny home podcast studio needs to do
A podcast studio in a tiny home has to balance four things at once:
- recording quality
- space efficiency
- comfort and ventilation
- Canadian code and climate realities
Start by choosing your main use case.
Common use cases
- Audio-only podcasting: focus on microphone placement, quiet gear, and acoustic treatment.
- Video podcasting: add lighting, camera framing, cable hiding, and a clean background.
- Live streaming: plan for stronger internet, lower latency, and better heat control.
- Voiceover work: aim for the quietest zone and tighter room sound.
- Remote interviews: make space for headphones, clean call audio, and backup recording. See remote work retreat Canada and remote work ADU.
Quick checklist before you buy anything
- Will the podcast studio be for one person or two?
- Will it use a fixed desk or fold-away setup?
- Will it be permanent or portable?
- Will you record locally only or also live stream?
- Is the tiny home off-grid or on standard power?
These answers shape every later choice. A solo audio show needs less gear than a two-person video setup. Canadian creators often save money by deciding this first instead of buying gear too early.
Assess your tiny home space before building
Before you build the podcast studio, assess the tiny home properly.
Measure and document the space
Do these tasks first:
- measure length, width, and ceiling height
- photograph every wall
- mark doors, windows, outlets, vents, lights, and storage obstacles
- note noisy appliances like fridges, mini-splits, fans, pumps, and dehumidifiers
Typical tiny home sizes vary:
- trailer-based homes: about 120 to 200 sq ft
- park-model or foundation-based small homes: up to about 400 sq ft
- loft spaces: often only 6 to 8 feet wide with low ceilings
Mark reflective surfaces and sound leaks
Hard reflective surfaces make speech sound echoey. Watch for:
- glass
- bare wood
- laminate
- metal
Also mark sound leak points:
- door gaps
- opening windows
- outlet boxes on outside walls
- vent penetrations
- thin interior walls
Plan around multi-use limits
Many tiny home spaces do double duty. Common examples include:
- desk by day, studio by night
- dining area by day, recording set by night
- sleeping loft that doubles as a recording nook
- closet conversion with poor airflow
Tiny spaces can work well if you plan carefully. Real-world recording studio in a tiny house examples show that small-footprint studios are possible.
Canada-specific planning factors for Canadian creators
Canadian creators face issues that many generic studio guides skip.
Climate and moisture
Winter condensation is a real problem. Warm indoor air hits cold surfaces and creates moisture. That moisture can damage:
- microphones
- camera gear
- wood
- insulation
- drywall
- acoustic panels
Good insulation helps comfort and can help isolation. But a very insulated room can also trap moisture if ventilation is poor. Check panel areas by season, manage vapour properly, and use dehumidification when needed. See winter-proof tiny home Canada and air quality in tiny homes.
Permits and building rules
Tiny homes on wheels may be treated differently from tiny homes on foundations. Structural changes, electrical work, HVAC changes, new vents, or adding wall mass may require permits or inspections depending on your province or municipality.
Do not assume US advice applies directly in Canada. Review tiny home permits Ontario guide and tiny home permits British Columbia.
Noise bylaws
If you record at night, host guests, or use speakers, local noise rules may matter. This is especially true in dense urban lots, laneway homes, parks, and shared rural properties.
Product availability in Canada
Basic build materials are usually easy to get in Canada, including:
- mineral wool
- weatherstripping
- acoustic caulk
- drywall
Specialty acoustic products may be harder to get. Cross-border orders can mean duties, brokerage fees, exchange-rate swings, and hard returns. Many baseline methods are similar to how to build a podcast studio in your garage guidance, but Canadian sourcing changes the math.
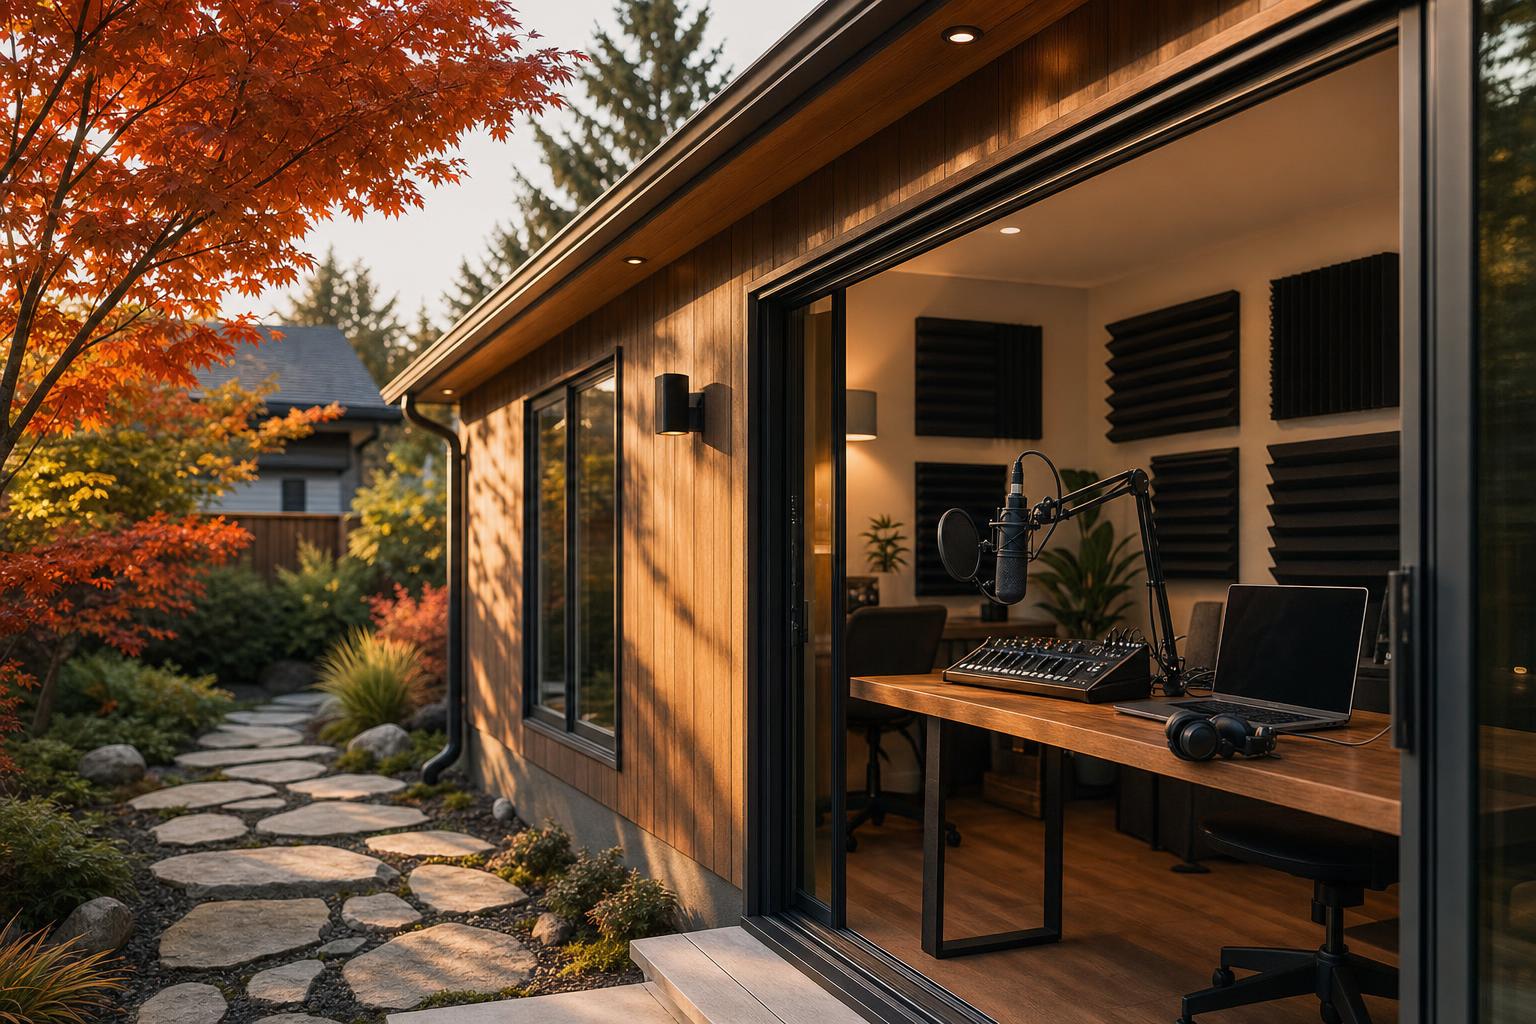
Choose the best podcast studio layout for a tiny home
After noise control, layout is the biggest decision. Bad placement can make great gear sound weak. Tiny homes are multi-use by nature, but compact and trailer-based recording spaces prove that a small podcast studio is practical. See Terry O’Reilly’s Under the Influence podcast studio and another tiny house recording studio example.
Layout option 1: Corner booth
A corner booth is a small 4′ x 4′ style podcast studio area carved out of a living room or office zone.
Setup
- desk in the corner
- monitor or camera on a wall mount
- mic arm clamped to desk
- acoustic panels on both side walls
- ceiling cloud above
Pros
- easy retrofit
- no major renovation
- works with existing furniture
Cons
- corners boost bass
- open rooms let in household noise
Add bass traps and a thick rug to improve the sound.
Layout option 2: Closet studio
This turns a 3′ to 4′ deep closet into a small podcast studio or vocal booth.
Setup
- remove some shelving
- install a narrow desk or wall shelf
- add treatment to side walls and ceiling
- build in silent ventilation
Pros
- tidy look
- better isolation than open living space
Cons
- overheats fast
- hard for two people
- awkward camera framing
A better-sealing closet door can improve soundproofing.
Layout option 3: Loft desk
A loft desk uses the upper sleeping area as a tiny home podcast studio zone.
Setup
- low desk
- seated or kneeling posture
- careful lighting because of low ceilings
- close-mic recording to cut room sound
Pros
- away from kitchen and entry noise
- feels like a separate zone
Cons
- low ceilings create reflections
- camera angles feel cramped
- heat rises into the loft
Layout option 4: Convertible living area or trailer setup
This podcast studio folds away after each session.
Setup
- dining table or wall desk as workstation
- fold-away mic arms
- rolling acoustic panels
- cable raceways for quick teardown
Pros
- best for very small homes and trailers
- no dedicated room needed
Cons
- setup time every session
- cable discipline matters
- harder to keep mic and camera positions consistent
This is especially useful for trailer-based tiny home living. See trailer-style tiny house recording layouts.
Measurements and sight-lines
Use these practical targets:
- allow 24 to 30 inches behind the chair if possible
- keep camera about 1.0 to 1.5 m from the subject
- use about 35 to 50 mm equivalent framing to avoid face distortion
- keep the background 0.6 to 1.0 m behind the host if possible
Place the key light:
- slightly above eye level
- just off camera axis
- diffused, so nearby walls do not cast hard shadows
For tiny-space lighting strategy, review tiny home light design.
Soundproofing vs acoustic treatment
Soundproofing and acoustic treatment are not the same.
- Soundproofing means reducing sound entering or leaving the space.
- Acoustic treatment means improving how the room sounds inside.
People confuse them because both affect audio quality in a podcast studio. Foam panels do not soundproof a room. They mainly absorb reflections.
In a tiny home, the best first wins are often cheap and simple:
- seal gaps
- quiet noisy devices
- move the mic closer to the speaker
- add basic treatment
Regular home studio methods still work, but they must fit small-home limits like weight, airflow, and structure. See noise reduction in Canadian housing and soundproofing tiny homes for privacy.
Step-by-step soundproofing for a tiny home podcast studio
Phase 1: Diagnose the noise
Use a phone dB meter app at different times:
- morning traffic
- quiet evening hours
- rain and wind
- when HVAC turns on
- when neighbours or machinery are active
Listen for:
- low-frequency rumble: trucks, roads, HVAC
- mid-frequency noise: voices, TV
- high-frequency hiss: fans, vents
Map the worst wall, ceiling, or floor area.
Phase 2: Seal gaps first
This is the best low-cost soundproofing step.
Do this:
- install door sweeps
- add weatherstripping around doors and windows
- use acoustic caulk around trim, baseboards, and gaps
- add foam outlet gaskets on outside-wall outlets
- hang dense curtains over windows
Sound travels through air gaps. A tiny crack can weaken the whole room. Basic sealing steps are well aligned with podcast studio sealing guidance.
Phase 3: Add mass where allowed
Adding mass means making walls or ceilings heavier so they block more sound.
Options include:
- a second layer of 5/8″ drywall
- damping compound between layers
- acoustic drywall in a small target area
Be careful with trailer-based tiny home builds. Extra drywall adds weight fast. Check the structure before adding heavy layers.
Phase 4: Decouple vibration paths
Decoupling means separating surfaces so vibration does not travel as easily.
Major options:
- resilient channels
- isolated wall or ceiling layers
Small-space options:
- speaker isolation pads
- mic stand isolation
- rubber underlay under the studio floor zone
Structural work in Canadian homes may need licensed help or inspection.
Phase 5: Add absorption and balanced diffusion
Hard tiny home interiors often create:
- flutter echo
- harsh mids
- muddy lows
Place treatment like this:
- bass traps in corners
- broadband panels at first reflection points on side walls
- a ceiling cloud above the desk
- a rug under desk and chair
- light diffusion behind the host using books, slats, or uneven objects
A broadband absorber is a panel that absorbs a wide range of frequencies, not just highs. Too much absorption can make speech dull, so add a little diffusion for a more natural tone.
Phase 6: Quiet HVAC and ventilation
Tiny booths and closet studios get hot fast.
Use:
- low-noise ductless mini-splits where suitable
- low fan speed during recording
- quiet inline fans with silencers
- flexible ducts to move fan noise away
- lined duct boxes or baffles where practical
Choose safe, CSA-approved heaters. Fanless or very quiet units are best. This matters even more in Canadian winters when windows stay shut. See heat pump for tiny home, eco-friendly heating ADU guide Canada, and air quality in tiny homes.
Phase 7: Test and tune
Use simple checks:
- clap test
- room-analysis apps
- repeated voice recordings from the same mic position
RT60 means the time it takes for sound to fade by 60 dB. In a very small speech room, aim for short, even decay of about 0.2 to 0.4 seconds.
Listen for:
- flutter echo
- boxiness
- boomy bass
- electrical hum
- fan noise
Move one thing at a time and re-test.
Seasonal maintenance and moisture control in Canada
A tiny home studio needs seasonal care, especially in colder provinces.
Check these items:
- inspect behind acoustic panels for condensation
- check caulking and weather seals each year
- use vapour-permeable fabric where it makes sense
- dehumidify in wet or coastal seasons
- watch for freeze-thaw movement around windows and doors
Moisture can harm:
- mineral wool frames
- wood
- drywall
- microphones
- camera electronics
For Canadian creators, this is not just a soundproofing issue. It is a gear protection issue too. Review ADU maintenance checklist Canada and tiny home winterization checklist.
Acoustic treatment products and DIY options that fit small spaces
Space-saving products
Good small-room options include:
- portable panels on stands
- hanging absorbers
- acoustic blankets
- moving blankets for temporary setups
- ceiling clouds that save floor space
For renters, portable panels, blankets, and stands are easiest. Owners can use wall-mounted panels and fixed ceiling treatment.
DIY acoustic panels
A simple 2′ x 4′ panel usually uses:
- a basic wood frame
- mineral wool or rockwool inside
- breathable fabric wrapped around it
- a small air gap off the wall if possible
That air gap helps low-mid absorption.
You can also build compact triangular bass traps from rockwool offcuts.
Dual-purpose ideas help in a tiny home:
- fabric-wrapped panels that match the décor
- bench seating with treatment inside
- small isolation shields that also look like wall art
DIY studio treatment often uses mineral wool and simple framing methods. You can also pair the build with design-conscious material choices such as sustainable flooring options for tiny homes or reclaimed materials for tiny homes in Canada.
Where to buy in Canada
Use Canadian big-box stores for:
- insulation
- weatherstripping
- caulk
- rugs
- lumber
- hardware
Use Canadian pro-audio and music retailers for:
- acoustic panels
- blankets
- mic stands
- microphones
- interfaces
- lights
Cross-border buying can add:
- duty
- brokerage
- exchange-rate risk
- harder returns
Many basic treatment materials are easy to source through major home-improvement channels such as major home-improvement studio materials.
Choose the right 2025 tech for a tiny home podcast studio
2025 tech matters because newer compact gear cuts clutter, power draw, and setup friction. This is a 2026 guide, but 2025 tech means the features and gear types that became common around 2025 and still make sense now.
USB vs XLR
- USB microphones: all-in-one mics that plug right into a computer
- XLR microphones: traditional mics that need an interface or mixer
USB
- simpler
- less clutter
- best for solo creators
XLR
- more flexible
- better for multi-mic growth
- more control
In small untreated rooms, close-talking dynamic mics are often the best choice because they reject more room noise.
Bus-powered USB-C vs Thunderbolt interfaces
Bus-powered means the interface gets power from the computer. That means:
- fewer wall adapters
- less cable mess
- easier off-grid use
- simpler mobile workflow
Thunderbolt can offer:
- lower latency
- more channels
- stronger pro workflows
If your tiny home podcast studio is simple and portable, bus-powered USB-C is often enough.
Gear by budget tier
| Tier | Budget (CAD) | What it usually includes | Best for |
|---|---|---|---|
| Starter | Under $800 | Dynamic USB mic or entry XLR mic, compact 2-channel interface, closed-back headphones, desk boom arm, 1080p webcam, 1–2 small LED lights, pop filter or shock mount | Solo Canadian creators starting a compact podcast studio |
| Mid | $800–$2,500 | 1–2 XLR dynamic broadcast mics, 2–4 channel USB-C or Thunderbolt interface, headphones for host and guest, better boom arms, mirrorless camera or premium 4K webcam, 2–3 LED panels, small monitors on isolation pads | Two-person shows or video podcasts |
| Pro | $2,500+ | Premium mics, advanced interface or small mixer, onboard DSP, multi-camera setup, higher-end monitors, dedicated streaming machine or strong laptop, measurement mic and software | Only worth it when treatment, workflow, and soundproofing are already solid |
2025 tech features worth using
Useful features include:
- compact USB-C or Thunderbolt interfaces with onboard DSP
- on-device AI noise removal
- beamforming microphones
- ultra-compact powered monitors
DSP means built-in audio processing like EQ, compression, and de-essing.
Beamforming means a mic or mic array focuses on the speaker and rejects more side noise.
These help a tiny home podcast studio because they reduce:
- extra rack gear
- cable clutter
- power draw
- desk space use
They also improve voice clarity in tough rooms. For adjacent compact-home tech planning, see smart home tech trends and air quality sensor tiny homes.
Streaming essentials for creators using the studio on camera
A video-ready podcast studio needs more than good sound.
Useful gear includes:
- capture cards for mirrorless cameras
- collapsible green screens
- fabric backdrops
- slim LED panels that stay cool
- styled real backgrounds when space is tight
Framing tips
- avoid ultra-wide lenses that stretch the face
- keep the lens near eye level
- separate the host from the background if you can
- use shelves or practical lights for depth
Video gear creates heat and uses power, so it must fit the same tiny home limits as audio gear. Review interior lighting for tiny homes and livability upgrades for tiny homes in Canada.
Software and workflow setup
Beginner-friendly software usually falls into four groups:
- DAWs for recording and editing
- OBS Studio for streaming
- remote-call apps for interviews
- noise-reduction and dynamics plugins
Useful terms
Gain staging means setting levels so the recording is strong but does not clip or distort.
Loopback or virtual audio routing means sending app audio into your recording or livestream mix cleanly.
Simple workflow
- mic to interface
- interface to computer
- headphones for monitoring
- record locally even during livestreams
- save remote guest tracks separately when possible
Real-time noise reduction helps, but it should not replace room treatment or soundproofing. See tiny home automation Canada 2025 and AI tiny homes.
Internet and reliability tips for Canadian creators
A polished podcast studio can still fail if the internet is weak.
Internet options in Canada
- Fibre or cable: best case for most creators
- DSL: often limited upload speeds
- Fixed wireless, LTE, or 5G: useful in rural areas, but variable
- Starlink or other LEO satellite: common for remote tiny home users, but latency can change
Upload speed targets
- audio-only livestream: at least 2 Mbps up
- 1080p video stream or video podcast: 5 to 8 Mbps up
- cloud multi-track uploads: 10 Mbps up or more is better
Reliability tactics
- use Ethernet when possible
- keep a hotspot or backup WAN ready
- lower bitrate or resolution when latency spikes
- ask remote guests to use wired internet and headphones
This matters for Canadian creators in both cities and rural areas. See internet for tiny homes in Canada and universal WiFi for tiny homes in Canada.
Power, safety, and ventilation planning
Map the power use in your tiny home podcast studio before you plug everything in.
Count:
- computer
- audio interface
- lights
- monitors
- camera batteries and chargers
- heaters
- fans
- router and modem
Good practice
- use surge protection
- keep cables tidy
- use a dedicated 15A to 20A circuit if available and allowed
- choose low-power laptops and LEDs for off-grid setups
Safety reminders
- do not overload circuits
- do not block vents
- do not bury hot adapters under blankets or panels
- keep heaters away from fabric panels and curtains
Keep noisy devices like fridges and pumps as far from microphones as possible. For utility planning, review tiny home utilities Canada guide, off-grid living Canadian tiny homes, and tiny home safety Canada.
Building code and when to call a professional
This guide is practical, but it is not legal or engineering advice.
You may need licensed help for:
- new electrical circuits
- wall or ceiling rebuilds
- adding mass to a trailer structure
- cutting new vent openings
- HVAC redesign
- structural decoupling
Foundation-based tiny homes often fall more directly under provincial building codes. Homes on wheels may still face park rules, municipal rules, electrical standards, or safety compliance checks.
Canadian creators should verify local requirements before changing structure, wiring, heating, or ventilation. Review tiny home legal requirements in Canada, Canadian ADU regulations guide, and ADU legal clinic Canada 2026.
Step-by-step installation walkthrough
Think of this as a weekend-to-finished-studio roadmap.
Step 1: Measure, photograph, and sketch
- note exact room dimensions
- mark noise sources
- mark outlets and internet points
Step 2: Prioritize first-day fixes
- seal doors, windows, and outlets
- add a rug
- hang temporary curtains or blankets
- place 2 to 4 panels at first reflection points
These often create the biggest first improvement.
Step 3: Install furniture and mounts
- place the desk
- add wall or clamp arms
- mount monitor or camera
- install cable raceways
- choose supportive seating
Consistent mic distance matters more than perfect décor. For compact furnishing ideas, see tiny home furniture Canada and smart furniture Canada ADU.
Step 4: Set up and test the audio chain
- connect mic, interface, headphones, and computer
- set gain properly
- record a short test script
- listen for hum, clipping, fan noise, and room echo
Quick fixes:
- move the mic closer
- reduce room noise
- separate power cables from signal cables
- try a different outlet if hum appears
Step 5: Set up lighting and camera
- place a key light
- add optional fill or backlight
- frame the background
- remove clutter and reflections
- run a private stream test
Step 6: Final acoustic tuning
- add bass traps or a ceiling cloud
- re-check side-wall reflections
- compare before and after recordings
- change one variable at a time
Typical costs and timelines in Canada
Here is a practical budget range for a tiny home podcast studio in CAD.
Budget ranges
- Low-cost DIY: $500 to $1,500
sealing, basic treatment, entry-level gear - Mid-range build: $1,500 to $5,000
better furniture, fuller treatment, upgraded camera and audio gear - Pro mini-studio: $5,000 to $15,000+
structural changes, advanced gear, custom cabinetry, more complete lighting
Labour costs vary by region. Electricians, carpenters, and HVAC pros should be budgeted separately.
Timelines
- basic setup: one weekend
- renovation build: 1 to 4 weeks, depending on permits and custom work
Mini case studies
Case study 1: Closet-to-studio conversion
Before: A 3′ x 5′ closet in a small Canadian urban home sounded boxy and got hot fast.
After: The owner sealed the door, added DIY panels on side walls and ceiling, swapped to a close-talk dynamic mic, and added a quiet ventilation path.
Key lesson: In a small podcast studio, airflow matters as much as soundproofing.
Case study 2: Loft desk setup
Before: A loft in a foundation-based tiny home had low ceilings, mini-split noise, and awkward camera angles.
After: The creator used a low desk, added ceiling treatment, used close-mic technique with 2025 tech like smarter noise control, and tuned the mini-split for quiet operation.
Key lesson: Separation helps, but heat rises and loft camera framing is harder. See multifunctional loft design 2025 and heat pump for tiny home.
Case study 3: Trailer-based mobile studio
Before: A trailer-style mobile setup had tight space, insulation concerns, and limited heating options.
After: The studio used compact treatment, careful sealing, light gear, and a fold-away recording layout inspired by trailer-style podcast spaces.
Key lesson: A tiny home podcast studio can work on wheels if weight, heating, and layout are planned early. See trailer-style podcast space inspiration.
Frequently Asked Questions
Why does my tiny home podcast studio sound boomy?
Close walls and corners build up low frequencies. Add bass traps, move the desk slightly off the wall, and use closer mic placement. Good soundproofing will not fix bass buildup by itself. See acoustic design for Canadian tiny homes.
Foam panels didn’t soundproof the room. Why not?
Foam mainly absorbs reflections inside the podcast studio. It does not block much outside noise. For soundproofing, start with sealing gaps and adding mass where practical. Review soundproofing tiny homes Canada.
My room is too hot to record in
Use quieter ventilation, lower-heat LED lights, and safe heating or cooling gear. This is a common issue for Canadian creators in sealed winter rooms and tiny closet studios. See passive cooling tiny homes Canada and eco-friendly heating guide Canada.
I still hear traffic or neighbours
Try a dynamic mic, move it closer, schedule recording during quiet hours, improve sealing, and use 2025 tech like on-device AI noise reduction when needed. Review noise bylaws for ADUs 2025 and soundproofing tiny homes Canada.
I’m on limited power. What gear should I avoid?
Avoid high-draw heaters, oversized lights, and always-on devices you do not need. In a tiny home, small bus-powered gear is usually easier to manage. See tiny home utilities Canada guide and off-grid living Canadian tiny homes.
When should I stop upgrading and move the setup elsewhere?
If your main problem is severe structural noise like trains, heavy trucks, or constant machinery, moving the podcast studio may be smarter than endless upgrades. In some cases, an external pod or small outbuilding may work better if legal and practical. See backyard studio Canada design and remote work ADU.
Resources and practical tools
Helpful support tools for this kind of build include:
- planning checklists
- shopping lists by budget
- floorplan PDFs for corner, closet, loft, and trailer setups
- acoustic panel placement diagrams
- simple RT60 guides
- recommended dB meter and room-analysis apps
Canadian creators should also gather local links for:
- municipal permit pages
- local noise bylaw pages
- ISP comparison tools
- Canadian retailers for treatment and gear
A professional podcast studio in a tiny home is possible when you plan the layout carefully, handle soundproofing in the right order, and choose compact 2025 tech that fits your space and budget.
The best sequence is simple: plan first, seal and treat second, buy gear third, then test and refine over time.
For Canadian creators, a small, well-planned room can outperform a larger untreated one, especially when climate, ventilation, power, and internet are part of the plan from the start.
Leave a Reply