Disaster Recovery ADUs: Rapid, Resilient Housing After Wildfires & Floods
Estimated reading time: 10 minutes
Key Takeaways
- Disaster recovery ADUs are self-contained, rapidly deployed living units that can serve as immediate emergency housing and later as durable secondary housing.
- Factory-built, modular, and semi-modular pathways can cut time on site and reduce costs by roughly 30–40% compared with conventional builds.
- Successful deployments rely on parallel actions: documenting damage, confirming funding eligibility, fast municipal engagement, and clear procurement.
- Canadian funding options include insurance, provincial disaster assistance (DFAA), CMHC programs, municipal incentives, and charitable support.
- Design choices should reflect local hazards: ember- and fire-resistant assemblies for wildfires, elevated and water-resistant systems for flood risk, and resilient MEP details for faster hookups.
Table of contents
- Introduction
- Why ADUs & Tiny Homes Work for Disaster Recovery
- How Fast Can You Rebuild? Timelines & Delivery Models
- Funding Options for Canadians
- Design & Construction Considerations
- Regulations, Permitting & Emergency Standards
- Steps to Deploy ADUs After a Disaster — Practical Checklist
- Case Studies & Examples
- Common Questions (FAQ)
- Resources & Links
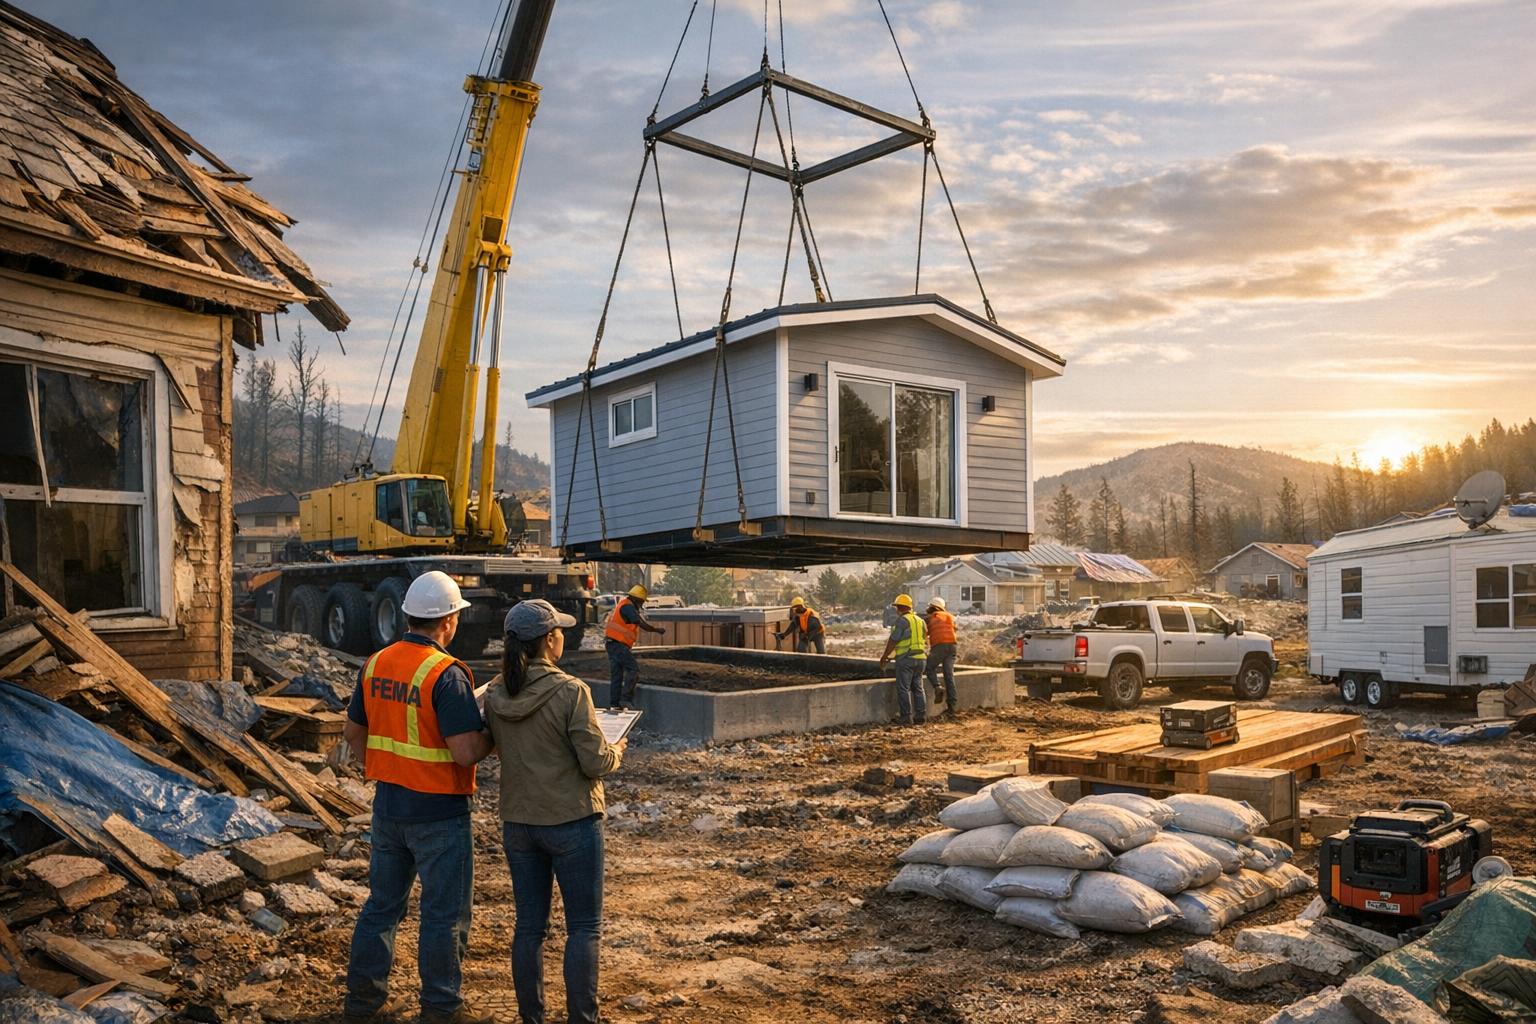
Disaster recovery ADUs are accessory dwelling units designed and deployed rapidly after wildfires, floods, or other disasters to provide immediate emergency housing and support longer-term post-disaster construction. In plain terms, disaster recovery ADUs are self-contained living units (tiny homes or modular ADUs) that include independent utilities and are built or installed rapidly to provide emergency housing and/or durable secondary housing during recovery. They help families stay close to work, school, and medical care while rebuilding.
The material in this post explains what makes these units fast and cost-effective, how they fit into tiny home rebuilding, and what to expect with compliance and permitting. You’ll also learn about Canadian ADU funding options, common delivery timelines, design and construction choices for wildfire and flood risk, plus a practical deployment checklist.
Note: Funding eligibility, program names, and timelines vary by province, territory, and municipality — verify with provincial/municipal officials and program pages such as ADUStart — Emergency Shelter Canadian ADUs and the Public Safety Canada DFAA Schedule 3.
Why ADUs & Tiny Homes Work for Disaster Recovery
After a disaster, most people need two things at once: a safe place to live now and a path back to long-term housing. Disaster recovery ADUs support both. A single unit can start as emergency housing and later become a legal, durable home on the property.
Key benefits (with real-world impact)
- Rapid deployment
Factory-built units can be produced off-site while your lot is being cleared and checked. - Lower total cost
Modular and prefab builds can reduce material waste and labour costs by about 30–40% compared with conventional construction. - Flexibility across recovery phases
Use it as a temporary home during repairs, then keep it as a long-term ADU for family, caregiving, or rental income. - Neighbourhood reintegration
Families can stay near schools, jobs, and support networks instead of moving far away to a hotel or group shelter. - Reduced waste and cleaner sites
Prefab construction reduces on-site waste, rework, and weather delays.
ADUs vs. short-term shelters (what changes day-to-day)
Congregate shelters and temporary group settings can be essential in the first days. But they are often crowded and far from home. In contrast, ADUs and tiny homes support post-disaster construction because they are:
- On-property or close-by
- Private and self-contained
- Built for independent living (kitchen, bathroom, heat)
- Easier to convert to permanent housing later
“ADUs let families stay in their neighbourhoods, maintaining schools and jobs during recovery.” — Municipal/Builder interview quote (to be confirmed)
For a detailed primer on emergency ADU models in Canada, see ADUStart — Emergency Shelter Canadian ADUs.
How Fast Can You Rebuild? Timelines & Delivery Models
Speed depends on the delivery model, your site conditions, and how fast permits and utilities move. For disaster recovery, most homeowners choose a prefab pathway because it reduces time on site and keeps the schedule more predictable.
Three common pathways (use these ranges)
- Rapid-deploy models (4–8 weeks)
Fully assembled units. You mainly do site prep and utility hook-ups. - Semi-modular assembly (8–12 weeks)
Prefab components arrive, then a local crew finishes and connects everything on site. - Traditional site-built ADUs (12–20 weeks)
Built like a small house from the ground up. More design freedom, but more weather risk and longer timelines.
Where time is usually lost (typical bottlenecks)
- Municipal permitting: normally 4–8 weeks (varies by jurisdiction).
- Utility connection assessment: 2–4 weeks for power, water, sewer/septic, and sometimes gas.
- Site prep & foundation: 2–6 weeks — debris removal, grading, and foundation choice can add time.
- Procurement lead times: Manufacturer schedules, transport, and material supply can shift quickly after large events.
Can permits be faster during declared disasters?
Sometimes. During major events, provinces and municipalities may use emergency measures that shorten administrative steps. Public Safety Canada outlines approaches that can support faster recovery; see the federal DFAA schedule for program details: Public Safety Canada — DFAA Schedule 3.
For an Ontario-focused look at ADU regulation and practical considerations, see WM Construction — ADU Regulations (Ontario), and for prefab design principles see Prefab House Revolution.
Funding Options for Canadians (Canadian ADU funding)
Canada’s modernized disaster recovery framework (since April 1, 2025) means there may be more than one way to pay for post-disaster construction, including an ADU or tiny home rebuilding plan. Many households use a mix: insurance + provincial disaster assistance + loans + local programs.
Federal and provincial support (DFAA and provincial administration)
- DFAA resilience enhancement funding (up to 15%)
Public Safety Canada describes resilience enhancements that may provide up to 15% of standard replacement value for eligible upgrades (e.g., elevated foundations, fire-resistant cladding, backup power). See the federal schedule: Public Safety Canada — Schedule 3.
Municipal incentives & CMHC loans
Municipalities may offer zoning flexibility, expedited permitting lanes, or fee reductions. CMHC and provincial loan programs can provide low-interest recovery loans — check eligibility on the CMHC site: CMHC — Official Site.
Other common sources
- Insurance payouts (document carefully and follow claim rules).
- Charitable grants and coordination (e.g., Red Cross Canada — redcross.ca).
- Community fundraising for items like furnishings or backup power.
Actionable funding steps
- Document damage extensively (photos, video, inventory) before debris removal, where safe.
- Contact your provincial disaster recovery office within days to confirm DFAA eligibility; initial assessment timing is often 2–4 weeks.
- Ask your municipal planning department about ADU eligibility and any expedited review or temporary relief orders.
- Get 2–3 quotes from modular ADU or tiny-home manufacturers and add a simple lifecycle cost view.
- Submit within six-month windows where required; follow program cut-offs and Orders in Council.
For a practical overview of disaster recovery funding in Canada, see EcoFlow’s summary: EcoFlow — Disaster Recovery Funding (Canada), and for a focused ADU finance guide consult The Ultimate Guide to ADU Financing Canada.
Design & Construction Considerations for Post-Disaster ADUs
Good disaster recovery ADUs are not just fast. They are built for the next event too. That means smart material choices, strong connections, and systems that keep working during outages.
Resilient materials and building details
For wildfire risk:
- Metal roofing
- Concrete or fibre-cement siding
- Ember-resistant vents
- Non-combustible detailing around decks and soffits
For flood risk:
- Elevated foundations
- Waterproof sealants
- Sump pumps
- Backwater valves
For Canadian climate: design for local snow-load requirements, especially in mountain and northern areas.
Speed-up choices for MEP
- Modular plumbing stacks
- Pre-wired electrical panels
- Labelled quick-connect utility points
Energy efficiency and accessible-ready features
Aim for strong insulation and verify required R-values with your provincial code. Accessible-ready features to consider:
- Ramps or no-step entry options
- 32–36 inch door clearances where practical
- Lever handles
- Accessible bathroom layout (turning space, shower approach)
Off-grid and backup systems
A basic resilience kit often includes:
- Portable generator (roughly 3–8 kW for essential loads)
- Solar + battery storage sized in kWh for key circuits
- Water storage (litres) plus simple filtration
For practical resilience design guidance, see Climate Resilient ADUs: Adaptive Building Strategies and accessibility standards such as Accessible Canada — Accessible-Ready Housing.
Ballpark cost ranges (Canada)
- Rapid-deploy modular ADU (300–500 sq. ft.): $70,000–$120,000
- Semi-modular ADU with resilience upgrades: $90,000–$150,000
- Traditional site-built ADU with custom resilience: $120,000–$180,000+
Costs vary by region, site conditions, and resilience features. DFAA resilience enhancement funding may offset part of eligible upgrades (see Public Safety Canada link above).
Regulations, Permitting & Emergency Standards
Even in disaster recovery, safety rules still apply. What may change is the speed of administration or certain local restrictions, depending on emergency orders.
The key rule to remember
Even during declared disasters, ADUs must meet National Building Code safety, fire protection and accessibility standards; some administrative rules (setbacks, owner-occupancy, permit timelines) may be relaxed via provincial/municipal emergency measures.
Who to call (with quick scripts)
- Municipal planning department
“Is my property eligible for an ADU? Do you have expedited review or disaster relief orders in place?” - Provincial emergency management office
“Is this event declared for assistance? What are the timelines, and is there any regulatory relief for rebuilding?” - Building inspector / fire marshal
“What inspections are required for a tiny-home or modular ADU installation on my lot?” - Electrical utility + water/sewer authority
“Can you book an expedited assessment and connection? What documents do you need from my contractor?”
Documentation and inspections checklist
- Damage documentation photos + inventory
- Site plan and proposed ADU drawings
- Structural engineer sign-off for resilience features
- Electrical and plumbing permits and inspection scheduling
- Fire safety plan and exit routes
- Accessibility compliance notes where applicable
- Final occupancy permit issued by municipality
Ontario-specific permitting guidance and broader regulatory context can be reviewed at ADUStart — ADU Permitting (Ontario) and the Canadian ADU Regulations Guide: ADUStart — Canadian ADU Regulations Guide.
Steps to Deploy ADUs After a Disaster — A Practical Checklist
Use this as a working plan for emergency housing and longer-term post-disaster construction. Timelines overlap on purpose, so you can move faster.
Phase 1: Rapid Assessment (Days 1–7)
- Document damage (photos, video, inventory).
- Request a safety assessment (structure, debris, hazards).
- Identify household needs (beds, accessibility, pets, medical equipment).
- Call: insurer; provincial disaster recovery office; municipal planning department.
Phase 2: Funding & Applications (Weeks 1–4)
- Submit insurance claims and keep receipts.
- Apply for DFAA-related programs and resilience enhancements where eligible.
- Ask about municipal ADU incentives and expedited permitting.
- Get 2–3 modular ADU/tiny-home rebuilding quotes (include delivery and utility scope).
Phase 3: Site Prep & Permitting (Weeks 3–8)
- Debris clearance (follow local safety rules).
- Soil, drainage, and utility assessments.
- Submit an expedited permit application (if available).
- Book foundation work (pad, piers, or elevated design).
Phase 4: Procurement & Installation (Weeks 6–14)
- Sign with a manufacturer/contractor and lock the delivery date.
- Schedule transport and crane (if needed).
- Coordinate utility hookups (power, water, sewer/septic).
- Install and complete on-site finishing (semi-modular builds).
Phase 5: Inspection & Occupancy (Weeks 12–16)
- Pass inspections (structural, electrical, plumbing, fire safety).
- Receive occupancy approval.
- Install emergency supplies (water, generator, comms, first aid).
- Move in and plan the next stage of rebuilding.
Further practical tips and pathways for prefab design options can be found at Prefab House Revolution.
Case Studies & Examples
Below are example templates to collect local data and build case studies after interviews and procurement. These are placeholders to be filled with municipal or NGO reports.
Community X — Rapid-deploy ADUs after Wildfire
Placeholder example (data to insert after interviews):
- Location (province): [Insert]
- ADUs deployed: [Insert]
- Assessment to occupancy: [Insert] weeks
- Cost per unit: [Insert]
- Funding sources: DFAA, municipal, charity/Red Cross coordination, insurance
- Outcomes: families stayed near schools and jobs; faster neighbourhood recovery
Town Y — Flood Recovery with Semi-Modular ADUs
Placeholder example (data to insert after interviews):
- Location (province): [Insert]
- ADUs deployed: [Insert]
- Assessment to occupancy: [Insert] weeks
- Foundation choice: [elevated / flood-resistant]
- Lessons learned: permitting sequence, utility hookups, drainage and backwater valve choices
For national supports relevant to case work, consider Red Cross Canada (redcross.ca) and CMHC (cmhc-schl.gc.ca).
Common Questions (FAQ)
Can ADUs be used as emergency housing?
Yes. They are self-contained units with independent utilities and can be deployed quickly for emergency housing, then kept as durable housing. See ADUStart — Emergency Shelter Canadian ADUs for examples.
How to get Canadian ADU funding for disaster recovery?
Start with your provincial disaster recovery office. Ask about DFAA assistance and resilience enhancements, and check municipal programs and timelines. Key federal guidance: Public Safety Canada — Schedule 3. See also an overview at EcoFlow — Disaster Recovery Funding and the ADU financing guide: ADUStart — ADU Financing Guide.
Are tiny homes compliant with building codes?
They can be, if designed and inspected to meet the National Building Code and local bylaws (fire safety, exits, ventilation, and more). For program models see ADUStart — Emergency Shelter Canadian ADUs.
How long does it take to rebuild with an ADU after a disaster?
Many modular pathways land in the 4–16 week range, depending on permits, site prep, and utilities. Traditional site-built ADUs often take 12–20 weeks. Expedited processes may shorten timelines during declared disasters. For federal timing context: Public Safety Canada — Schedule 3.
What insurance or documentation do I need?
Keep photos, video, an itemized inventory, receipts, and a running log of calls and decisions. Document before debris removal when safe. Helpful summary: EcoFlow — Disaster Recovery Funding.
What backup systems are essential?
Plan for power, water, and communications: generator or solar+battery, water storage and filtration, and redundant charging and radios. Guidance examples are available at ADUStart — Emergency Shelter Canadian ADUs.
Resources & Links
- Public Safety Canada — DFAA / Schedule 3: https://www.publicsafety.gc.ca/…
- ADUStart — Emergency Shelter Canadian ADUs: https://www.adustart.ca/emergency-shelter-canadian-adus/
- EcoFlow — Modernized disaster recovery funding summary: https://www.ecoflow.com/ca/blog/disaster-recovery-funding-canada-modernised-preparation
- WM Construction — Ontario ADU regulations example: https://wmconstructionco.com/adu-regulations-ontario/
- CMHC (verify program pages in 2026): https://www.cmhc-schl.gc.ca/en
- Accessible Canada — Accessible-ready housing standard: https://accessible.canada.ca/…
- Red Cross Canada: https://www.redcross.ca/
- Canadian Housing and Renewal Association (verify): https://chra-achru.ca/
- Ontario ADU Zoning Guide: https://www.adustart.ca/ontario-adu-zoning-guide
Disaster recovery ADUs can shorten the gap between displacement and stable housing by combining tiny home rebuilding speed with durable, code-compliant post-disaster construction. The best results come from doing funding, permitting, site prep, and procurement in parallel, while choosing materials and systems that are ready for the next wildfire, flood, or outage.
Practical next step: Document damage and contact your provincial disaster recovery office within days of a declared disaster. Request municipal expedited ADU permitting and gather modular ADU quotes. For financing, consult ADUStart — ADU Financing Guide and reach out to CMHC or local planners for program details.
Leave a Reply