
Estimated reading time: 11 minutes
Key Takeaways
- Tiny home storage in Canada is a livability issue, not just an organizing task, because wet and bulky gear quickly takes over compact homes.
- Vertical storage, gear zoning, and multifunctional built-ins are some of the fastest ways to reclaim floor space.
- Moisture control matters for skis, boots, bikes, and camping gear to reduce mildew, rust, and condensation.
- ADU design allows stronger built-ins and better entry planning, especially when lockers, ventilation, and drying routes are considered early.
- Practical Canadian solutions include bike hoists, wall-mounted ski racks, under-stair drawers, and low-cost pegboard systems inspired by small-space storage ideas.
Table of contents
- Tiny Home Storage in Canada: Space-Saving Ideas for Skis, Bikes, and Camping Gear
- Key Takeaways
- Why Tiny Home Storage Needs Specialized Thinking in Canada
- Core Space-Saving Design Principles for Tiny Homes and ADUs
- ADU Design Ideas for Outdoor Gear Storage
- Gear-by-Gear Storage Solutions for Skis, Bikes, and Camping Equipment
- Best Space-Saving Furniture and Built-Ins for Gear-Heavy Homes
- Moisture Control, Maintenance, and Gear Care for Canadian Climates
- Budget-Friendly Storage Solutions by Price Tier
- DIY Project Plans Readers Can Actually Build
- Layout Examples and Micro Floorplan Concepts
- Materials, Finishes, and Hardware That Hold Up in Canada
- Shopping and Canadian Resource List
- Safety, Insurance, and Permit Notes Canadians Should Know
- Case Studies / Mini-Profiles
- Quick Checklist
- Frequently Asked Questions
Tiny Home Storage in Canada: Space-Saving Ideas for Skis, Bikes, and Camping Gear
Tiny home storage gets harder in Canada because small homes often hold big outdoor gear. If you live with skis, bikes, boots, helmets, and camping bins in a home under 400 square feet, storage is not just an organizing job. It is a daily design problem.
Wet boots, muddy bikes, salt-covered skis, and camping tubs can quickly take over the kitchen, hallway, loft ladder, and under-bed space. In real Canadian living, that means clutter, damp air, and less room to move. This guide covers space-saving storage ideas, gear zones, and ADU design strategies for 2026, with practical options for both new builds and retrofits, drawing on smart small-space storage ideas.
At a glance, the fastest wins are simple:
- Vertical hoists for bikes: save floor space and can work for heavier bikes when installed correctly into joists.
- Wall-mounted ski racks: fit multiple pairs in a narrow footprint and can pair with boot drying below.
- Under-stair drawers: ideal for tents, stoves, and shoulder-season gear.
- DIY pegboard setups: low-cost, flexible, and excellent for accessories.
In a tiny Canadian home, every bulky item either earns its place or steals it.
Why Tiny Home Storage Needs Specialized Thinking in Canada
Tiny home storage in Canada is different from generic small-space advice. Canadian living includes snow, slush, road salt, spring mud, humid summers, and fast seasonal shifts. Storage has to work for all of that.
A wet pair of ski boots or a damp tent may not seem like much. In a tiny home, it is. Small interiors have less air volume, so moisture builds faster and lingers longer.
That can lead to:
- mildew
- musty odours
- rust on metal gear
- damp floors
- condensation on walls and windows
Road salt makes things worse. Salt and dirty snow can damage bike parts, ski edges, storage hardware, and flooring. A cheap rack may look fine at first, then corrode after one winter.
This is why tiny home storage is also a livability issue. One bike by the door can block the entry. A ski bag on the floor becomes a tripping hazard. Two camping bins under the bed can wipe out your only hidden storage zone.
There are structural limits too:
Tiny homes on wheels
- often have tighter weight limits
- may have fewer safe anchoring points
- must respect trailer height and weight balance
Backyard ADUs
- can support stronger built-ins
- allow more permanent lockers and storage walls
- still need careful planning for entry flow and moisture
Common Canadian pain points include:
- no place to dry skis after a day out
- bikes blocking entryways or loft ladders
- camping bins taking over under-bed storage
- boots and helmets cluttering the only transition space near the door
An example often cited in practical tiny living is a Calgary trailer using a 4 ft gear wall for vertical skis in winter and hoisted bikes in summer, reducing clutter and moisture spread. You can also compare this thinking with broader tiny home storage solutions and Canadian-focused ideas from ADU Start storage planning.
Core Space-Saving Design Principles for Tiny Homes and ADUs
The best small-space strategy is not just buying more bins. It is designing for access, drying, and seasonality.
Use vertical space first
Walls and ceilings are the least contested surfaces in a small home. Floors need to stay clear for walking, cooking, and daily life.
Use vertical storage for:
- full-height wall racks
- ceiling hoists and pulley systems
- upper shelves for off-season gear
- tall narrow lockers instead of wide floor cabinets
This works especially well for:
- skis
- poles
- paddles
- folded camp chairs
A good vertical setup can free the main 3 to 4 ft circulation path and make a tiny home feel dramatically larger.
Create distinct gear zones
A gear zone is a dedicated 3 to 6 ft section near the entrance or in a mudroom-style transition area. This is where wet or dirty gear stops before reaching the living space.
A strong gear zone should include:
- boot trays
- hooks
- slatwall or pegboard
- vented lockers
- a bench with hidden storage
It should separate wet gear, dry gear, and small accessories. That keeps the bed, sofa, and kitchen cleaner.
Choose multifunctional elements
In tiny home storage, one footprint should do more than one job.
- benches with lift-up tops
- platform beds with pull-outs
- stair drawers
- fold-down tables with shallow storage behind
- Murphy-style gear walls
Design for drying and maintenance
In Canada, gear storage must handle moisture. A rack that fits skis but traps wetness is not a good solution.
Plan for:
- air movement
- removable trays
- drip capture
- dehumidification
- washable finishes
Avoid sealed bins for damp ski gear, gloves, helmets, and tents. Wet gear needs airflow first. For indoor air and drying strategy, see these guides on air quality in tiny homes, tiny home air quality in Canada, and air quality sensors for tiny homes.
ADU Design Ideas for Outdoor Gear Storage
ADU design often gives you more flexibility than a tiny home on wheels. Walls, mechanical systems, and exterior storage options can be planned from the start.
Build a mini mudroom at the entry
A compact micro mudroom can be as small as 4 ft x 6 ft and still include:
- hooks at different heights
- a removable boot tray
- a bench
- upper cubbies
- a vented tall locker
- a durable floor surface
This is the best place for high-turnover gear like boots, helmets, gloves, poles, and backpacks.
Integrate lockers and storage walls during the design phase
Good ADU design includes backing and blocking before drywall goes up. That makes it much easier to support the real weight of bikes, skis, shelves, and heavy bins.
Built-ins offer:
- a cleaner look
- better weight support
- less wasted depth
- fewer loose pieces on the floor
Add exterior lockable storage where appropriate
Not all outdoor gear belongs inside. Some muddy, bulky, or theft-sensitive items are better in secure exterior storage.
Good candidates include bikes, tools, and some camping gear. Review options for outdoor storage in small backyards and related landscaping ideas for Canadian ADUs before building visible exterior storage.
Plan ventilation and drying routes
A smart ADU design should move warm air or ventilation toward the gear zone using:
- an exhaust fan
- a transfer grille
- louvered locker fronts
- a compact dehumidifier
- a heated boot rack near the entry
That improves moisture control and protects indoor air quality. It also aligns with climate-aware planning approaches seen in climate resilient ADUs in Canada and practical utility layouts from Canadian ADU utility connections.
Gear-by-Gear Storage Solutions for Skis, Bikes, and Camping Equipment
This is where tiny home storage needs to get specific. Different outdoor gear needs different racks, clearances, and drying methods.
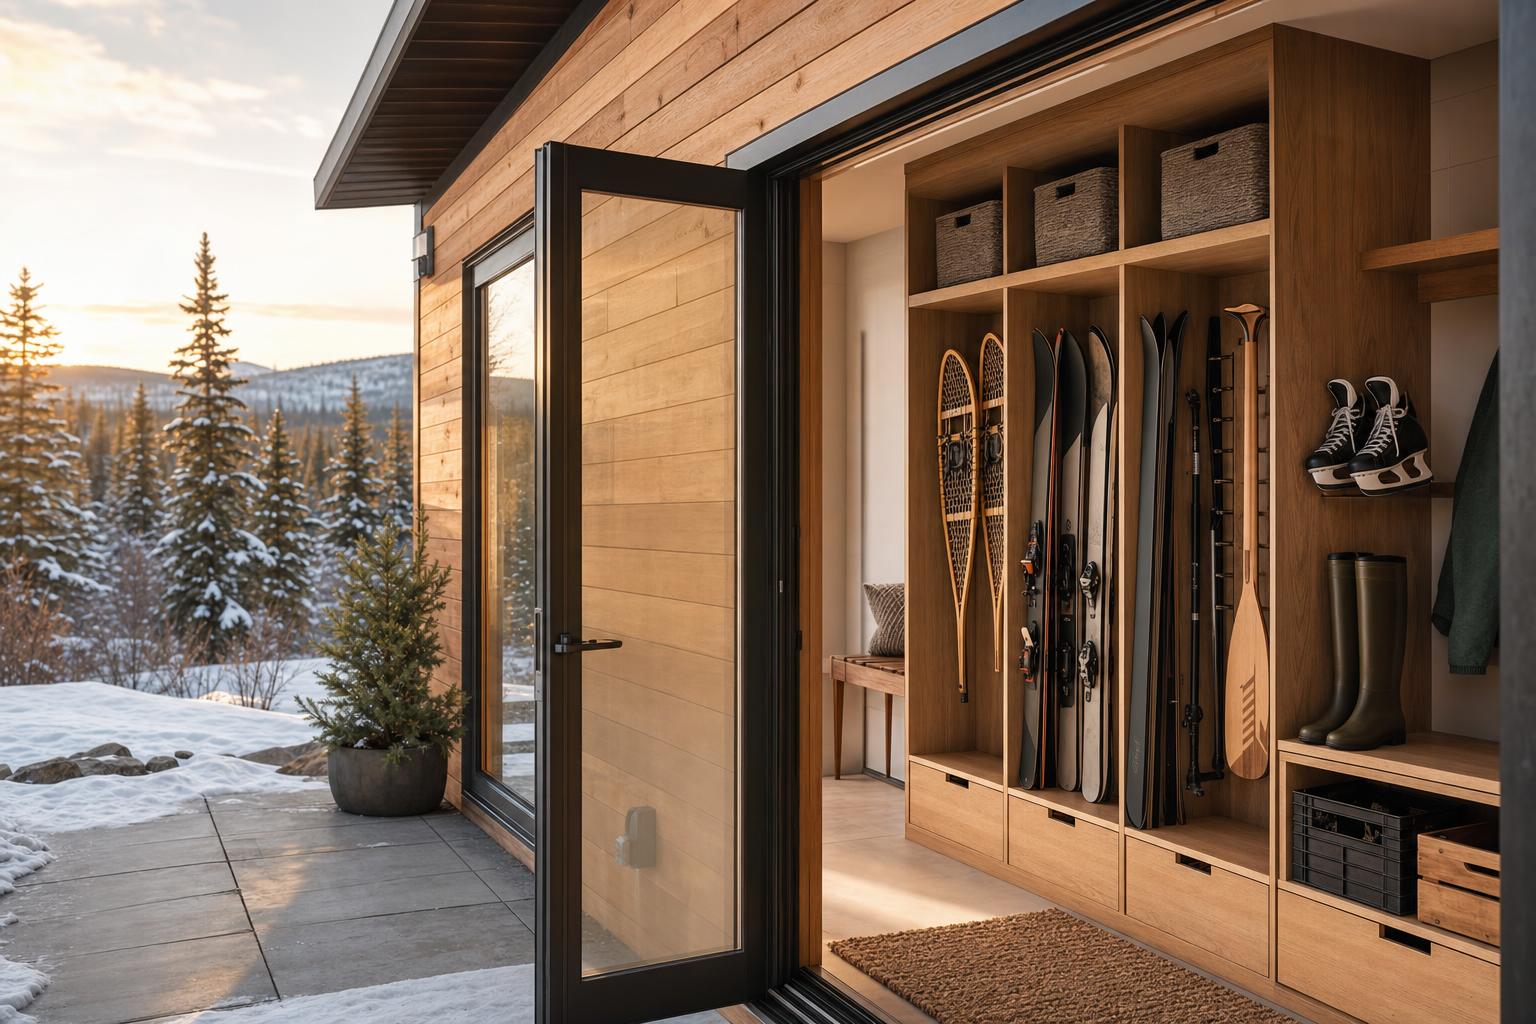
Ski and snow gear storage in a tiny home or ADU
Skis are long, narrow, and often wet. Vertical wall-mounted ski racks are usually the most space-saving option.
A narrow 3 ft zone can store about 4 pairs when planned well.
Good ski storage features include:
- vertical wall-mounted racks
- floor-to-ceiling ski lockers
- removable boot trays for meltwater
- ventilated cubbies for helmets and goggles
Good materials include:
- powder-coated steel
- sealed plywood
- rubberized holders
For drying, consider heated boot dryers, low-watt heat pads, or vented drying cabinets. For product categories and outdoor accessories, MEC is one useful Canadian reference point.
A simple DIY option is a floor-to-ceiling pole system with notches for skis. It is efficient, narrow, and surprisingly effective.
Bike storage ideas for small spaces and ADUs
Bikes are one of the hardest items to store in a tiny home. Handlebars, pedals, tires, and mud all compete for space.
If your ceiling structure allows it, a ceiling rope hoist is often the best answer. Some hoists can handle heavier bikes, including some e-bikes, if joist anchoring and manufacturer instructions are followed.
Other smart options include:
- fold-up wall mounts
- semi-vertical bike racks
- compact floor racks for heavy e-bikes
For e-bikes, plan for a charging point, tidy cord management, and dry, ventilated conditions. For shopping and reference, check Canadian Tire and Delta Cycle.
Important installation rules:
- anchor to joists or studs only
- use a stud finder
- do not trust drywall anchors for heavy dynamic loads
- verify ceiling load specs and hardware ratings
- test lower loads first
If lifting a heavy bike overhead feels unsafe, use a compact floor rack instead.
Camping gear storage without clutter
Camping gear gets messy because it includes many item types at once:
- tents
- tarps
- sleeping bags
- camp stoves
- cook kits
- chairs
- lighting
- repair supplies
The best method is to store by kit, not by item type.
For example:
- one bin for cooking
- one bin for sleep system
- one bin for shelter accessories
- one repair pouch
Useful tools include collapsible shelves, labeled bins, hanging nets, and pegboards. For general bins and household organizers, retailers like Walmart Canada and hardware options from RONA can help.
Safety callout: No indoor fuel storage. Store fuel externally and follow fire code and manufacturer guidance. Related utility planning can be reviewed through tiny home utilities in Canada and the broader tiny home utilities guide.
Best Space-Saving Furniture and Built-Ins for Gear-Heavy Homes
Good tiny home storage works best when furniture helps carry the load.
Storage benches
An 18" deep x 48" wide bench is a useful size near the entry. It can hold boots, helmets, and compact camping gear. If it stores damp items, the inside should be wipeable and vented.
Murphy gear walls
A fold-down panel or desk surface with shallow storage behind it can act as desk, storage, and visual cover all at once.
Stair drawers
These are ideal for tents, camp stoves, tools, and small accessories. Deep full-extension slides make a major difference.
Platform beds with deep pull-outs
Better than top-lift lids in narrow aisles because you can access them without rearranging the room.
Fold-down tables and convertible millwork
A work area can double as a tuning station or concealed storage wall.
Smart add-ons
- motion-sensor locker lighting
- smart dehumidifiers
- app-controlled heated boot drying where suitable
For more inspiration on compact storage thinking, review these small-space storage ideas, plus integrated tech options from smart home technology for ADUs and smart maintenance for tiny homes.
Moisture Control, Maintenance, and Gear Care for Canadian Climates
Moisture control is non-negotiable in Canadian living. Tiny spaces hold less air, so wet outdoor gear pushes humidity up quickly.
A practical target is around 40 to 50% RH indoors.
Use these moisture-control tools:
- dedicated drip trays
- boot trays with brushes
- vented lockers
- a compact dehumidifier
- an exhaust fan
- open-air drying when possible
Never seal wet gear in airtight bins.
Salt control matters too. After exposure to road salt:
- wipe down bike frames and parts
- rinse or wipe ski edges and metal pieces
- keep salty boots near the entry
- use corrosion-resistant racks and hardware
To prevent mildew:
- add silica packs in fully dry bins
- inspect yearly for mold or rust
- use breathable fabric covers when gear is dry but still needs airflow
Best materials include powder-coated steel, marine plywood, treated lumber, waterproof bins for dry gear, and breathable covers where airflow is needed. For appliances, product examples can be found through Midea, and finish durability is also supported by guidance on eco-friendly building materials in Canada.
Budget-Friendly Storage Solutions by Price Tier
The best first investment is usually the entry gear zone and moisture control, not just more containers.
$ Quick hacks under $100
- pegboard wall for camping tools and accessories
- over-door racks
- removable boot trays
- basic hooks and labels
- a low-cost pegboard setup from Canadian Tire
$$ Mid-range $100–$500
- bike hoists
- heated boot dryers
- modular shelving
- heavy-duty pull-out drawer hardware
- compact dehumidifiers
$$$ Built-ins $500+
- custom ski lockers
- integrated mudroom benches
- contractor-built under-stair drawers
- exterior lockable cabinets
For pricing comparisons and parts, Canadian shoppers often browse Home Depot Canada, RONA, and IKEA Canada.
DIY Project Plans Readers Can Actually Build
These simple projects create real space-saving gains without a full renovation.
DIY #1 Pull-out ski rack
Estimated time: 2–3 hours
Estimated budget: about $80
Use case: convert a lower cabinet, bench base, or vertical locker into a ski storage system.
Materials
- 24" heavy-duty drawer slides
- 3/4" marine-grade plywood
- screws
- rubber pads or edge guards
- optional drip tray liner
Tools
- saw
- drill/driver
- tape measure
- square
- sandpaper
Steps
- Measure the cabinet or bench cavity.
- Cut the plywood base to fit.
- Attach heavy-duty drawer slides to both sides.
- Secure the rack structure squarely.
- Add rubberized contact points.
- Test slide movement before loading.
- Confirm safe load based on manufacturer specs.
Safety note: Do not overload the slides, and make sure the cabinet carcass is anchored securely. Materials can be sourced from Home Depot Canada or RONA, and general build guidance is available in these DIY tiny home Canada tips.
DIY #2 Simple bike hoist install
Estimated time: about 1 hour
Estimated budget: about $50
Materials
- pulley/hoist kit
- screws or lag hardware specified by manufacturer
- rope included with kit
Tools
- drill/driver
- ladder
- stud/joist finder
- pencil
- measuring tape
Steps
- Locate joists, not just drywall.
- Mark hoist positions to balance the bike.
- Install brackets into joists.
- Thread rope and test the mechanism.
- Test with a lower load first.
- Check clearance for handlebars and pedals.
Safety note: Use only joist-based anchoring and confirm product capacity, especially for e-bikes. Hoist options can be checked at Canadian Tire or Delta Cycle, and broader planning ideas appear in this DIY prefabricated ADU kit guide.
DIY #3 Under-stair or under-bench gear drawers
This project is ideal for:
- tents
- stove kits
- repair tools
- shoulder-season gear
Use full-extension heavy-duty drawer slides and sealed plywood. Label each drawer by season or activity, such as winter ski kit, camp kitchen, or bike tools.
If carpentry is not your strength, this is an excellent small-contractor project. For planning inspiration, see compact living smart storage design and smart furniture for Canadian ADUs.
Layout Examples and Micro Floorplan Concepts
Most people do not need more square footage. They need better zoning and cleaner circulation.
Floorplan example 1: 200 sq ft studio tiny home
Picture a 10 x 20 ft tiny home.
Use a 3 ft entry gear zone near the door with:
- a vertical ski wall
- a bike hoist above the circulation path
- a boot tray below hooks
- loft bed pull-outs for camping gear
Floorplan example 2: 400 sq ft one-bedroom ADU
Use a 6 ft mudroom-like entry zone with:
- a bench
- integrated lockers
- a dehumidifier
- a drying rack near the laundry or mechanical area
Floorplan example 3: backyard shed-style ADU
For a gear-forward accessory unit, use:
- external lockable cabinets
- interior hanging racks
- a drying corner near the entry
Related layout and property context can be explored through backyard homes in Canada, this Canadian backyard cottage guide, and planning notes on parking and urban infill ADUs.
Materials, Finishes, and Hardware That Hold Up in Canada
In Canadian living, materials need to handle moisture, salt, and repeated use.
Choose:
- powder-coated steel for racks and exposed hardware
- marine plywood or sealed plywood for cabinets near wet gear
- treated lumber or moisture-resistant trim in splash zones
- waterproof bins for fully dry gear only
- breathable covers where airflow is needed
- removable rubber mats or trays instead of fabric liners near the door
Also check that all hardware is rated for the expected load and repeated movement. A drawer slide or hook that works in a bedroom may fail in a gear-heavy entry zone.
Shopping and Canadian Resource List
These are practical examples for Canadian living, not endorsements.
Bike storage and hoists
- Canadian Tire: hoists and garage storage systems
- Delta Cycle: bike hoists and wall mounts
Ski and outdoor storage accessories
- MEC: storage accessories and outdoor gear categories
DIY materials and hardware
Modular household storage
General bins and household organizers
Small-space inspiration
Safety, Insurance, and Permit Notes Canadians Should Know
A good tiny home storage plan should also be a safe one.
Structural anchoring
- racks and hoists must attach to studs or joists
- never rely on drywall alone
- dynamic loads matter for bikes and pull-out systems
Fuel and hazardous storage
- no indoor fuel storage
- follow local fire rules and manufacturer guidance
Electrical planning
- keep e-bike charging cords managed
- keep chargers and heated boot systems away from standing water
Permit and municipal issues
- some built-ins are simple
- exterior lockers, ventilation changes, or structural work may need approval
- check local ADU and laneway-home rules before exterior or structural changes
Insurance
- document high-value outdoor gear
- confirm theft and damage coverage
- secure storage and anchors may help lower risk
This is practical caution, not legal advice. For local context, review Canadian ADU regulations, the Ontario ADU permitting guide, and tiny home legal requirements in Canada.
Case Studies / Mini-Profiles
Alberta tiny home
A 200 sq ft trailer in Calgary used a 4 ft gear wall for tiny home storage. Skis stood vertical in winter, and bikes were hoisted in summer.
Why it worked:
- clear zoning
- seasonal rotation
- vertical storage
- moisture control
Ontario laneway ADU
A 300 sq ft Toronto laneway ADU used integrated entry lockers and a dehumidifier. Most outdoor gear stayed out of the main living zone.
Why it worked:
- design-phase planning
- a dedicated entry zone
- controlled drying
- better separation between mud and living space
More urban and maintenance-oriented inspiration can be found in innovative urban ADU design in Canada and this ADU maintenance checklist.
Quick Checklist
Use this as a simple seasonal tiny home storage check.
Winter
- skis racked, dried, and edges wiped
- boots on tray or drying rack
- gloves and helmets in vented cubbies
Bike season
- bikes hoisted or locked
- battery and charging area organized
- cords kept tidy and dry
Camping season
- gear sorted by kit
- sleeping bags vacuum-stored only if fully dry
- fuel stored correctly outside
Shopping checklist
- drying
- hanging
- bins
- anchors
- labels
Frequently Asked Questions
How much space should I set aside for gear storage in a tiny home?
A dedicated 3 to 6 ft gear zone is often enough if you use vertical racks, bench storage, and seasonal rotation.
What is the best way to store skis in a tiny home?
Use a vertical wall rack or narrow locker near the entry. Add a drip tray and ventilation so skis and boots can dry properly.
Can I store bikes inside an ADU without losing too much space?
Yes. Ceiling hoists, fold-up wall mounts, and built-in storage walls can make bike storage work well in an ADU design.
How do I prevent mold and mildew from wet gear?
Dry gear before sealing it away. Use airflow, a dehumidifier, and try to keep indoor humidity around 40 to 50% RH.
Do I need permits for ADU storage modifications?
Maybe. Non-structural built-ins may be simple, but exterior cabinets, ventilation changes, or structural alterations can require approval. Check local municipal rules.
Can I store camping fuel inside a tiny home?
No. Follow fire-safe external storage rules and manufacturer instructions.
Conclusion
Tiny home storage for Canadian living works best when it focuses on three things: zoning, vertical or multifunctional design, and moisture control.
Whether you live in a tiny home or are planning an ADU design, the best storage system matches how you actually use your outdoor gear through the seasons. A simple entry gear zone, a bike hoist, a ski drying rack, or under-bed camping bins can make a small home feel safer, drier, and much easier to live in.
Leave a Reply