
Emergency Preparedness for Tiny Homes in Canada: Prepping and Self-Sufficiency by Design
Estimated reading time: 14 minutes
Key Takeaways
- Emergency preparedness for tiny homes in Canada means planning for water, heat, food, sanitation, communications, and evacuation in a much smaller footprint.
- A resilient tiny home can be easier to harden, winterize, and partially off-grid when it is designed well, as shown in guides on disaster-resilient tiny homes in Canada, winter-proof tiny homes in Canada, and off-grid living in Canadian tiny homes.
- Tiny homes have also been highlighted as lower-cost, rapid-deployment housing in disaster contexts, including discussion from Deep Blue Home and emergency shelter planning through emergency tiny home shelters in Canada.
- In Canada, regional threats vary widely, from wildfire and smoke to floods, ice storms, blizzards, and remote-area supply delays.
- The smartest approach is simple: start with a 72-hour setup, then expand to 7 to 30 days based on climate, location, and storage.
Table of contents
- Key Takeaways
- Why emergency preparedness matters for tiny homes in Canada
- Quick action checklist for tiny home emergency preparedness in Canada
- Assess risks and set priorities for your region
- Legal, siting, and compliance constraints in Canada
- Core tiny home design principles for prepping and self-sufficiency
- Water security: capture, storage, treatment, and winterization
- Food storage and preservation in small spaces
- Power, heating, and energy self-sufficiency
- Sanitation, waste, and hygiene when systems fail
- Security and life safety systems
- Mobility, evacuation planning, and bug-out strategy
- Maintenance, redundancy, and seasonal adaptation
- Practical examples, layouts, and simple calculations
- Regionally tailored recommendations across Canada
- Ready-to-use checklist and shopping list for a 2-person tiny home
- Resources and further reading
- Conclusion
- Frequently Asked Questions
Why emergency preparedness matters for tiny homes in Canada
Emergency preparedness for tiny homes in Canada means designing and equipping your space so you can stay safe, warm, hydrated, fed, informed, and secure during short outages and long disruptions.
In 2026, that matters more than ever. Across Canada, people are dealing with winter storms, wildfire smoke, floods, power failures, and supply delays that can hit rural and remote areas especially hard.
Tiny home design needs to do more than save space. It also needs to support prepping and self-sufficiency. A tiny home has less storage and fewer backup systems than a standard house. But it also has one big advantage: when planned well, it can be easier to harden, winterize, and make partly off-grid.
Small does not have to mean fragile. In many cases, it can mean more intentional, more efficient, and easier to prepare.
That matters at both the personal and national level. Tiny homes have been highlighted as fast, lower-cost housing that can be deployed in days at roughly $30,000 compared with $300,000 or more for many standard builds. That makes them useful not only for daily living, but also for resilience and disaster response. Canada has also introduced 2026 measures to support those impacted by domestic natural disasters, which shows how urgent this issue has become.
This guide shows how to build emergency preparedness into tiny home design through practical prepping and self-sufficiency upgrades for water, food, energy, sanitation, safety, and evacuation readiness.
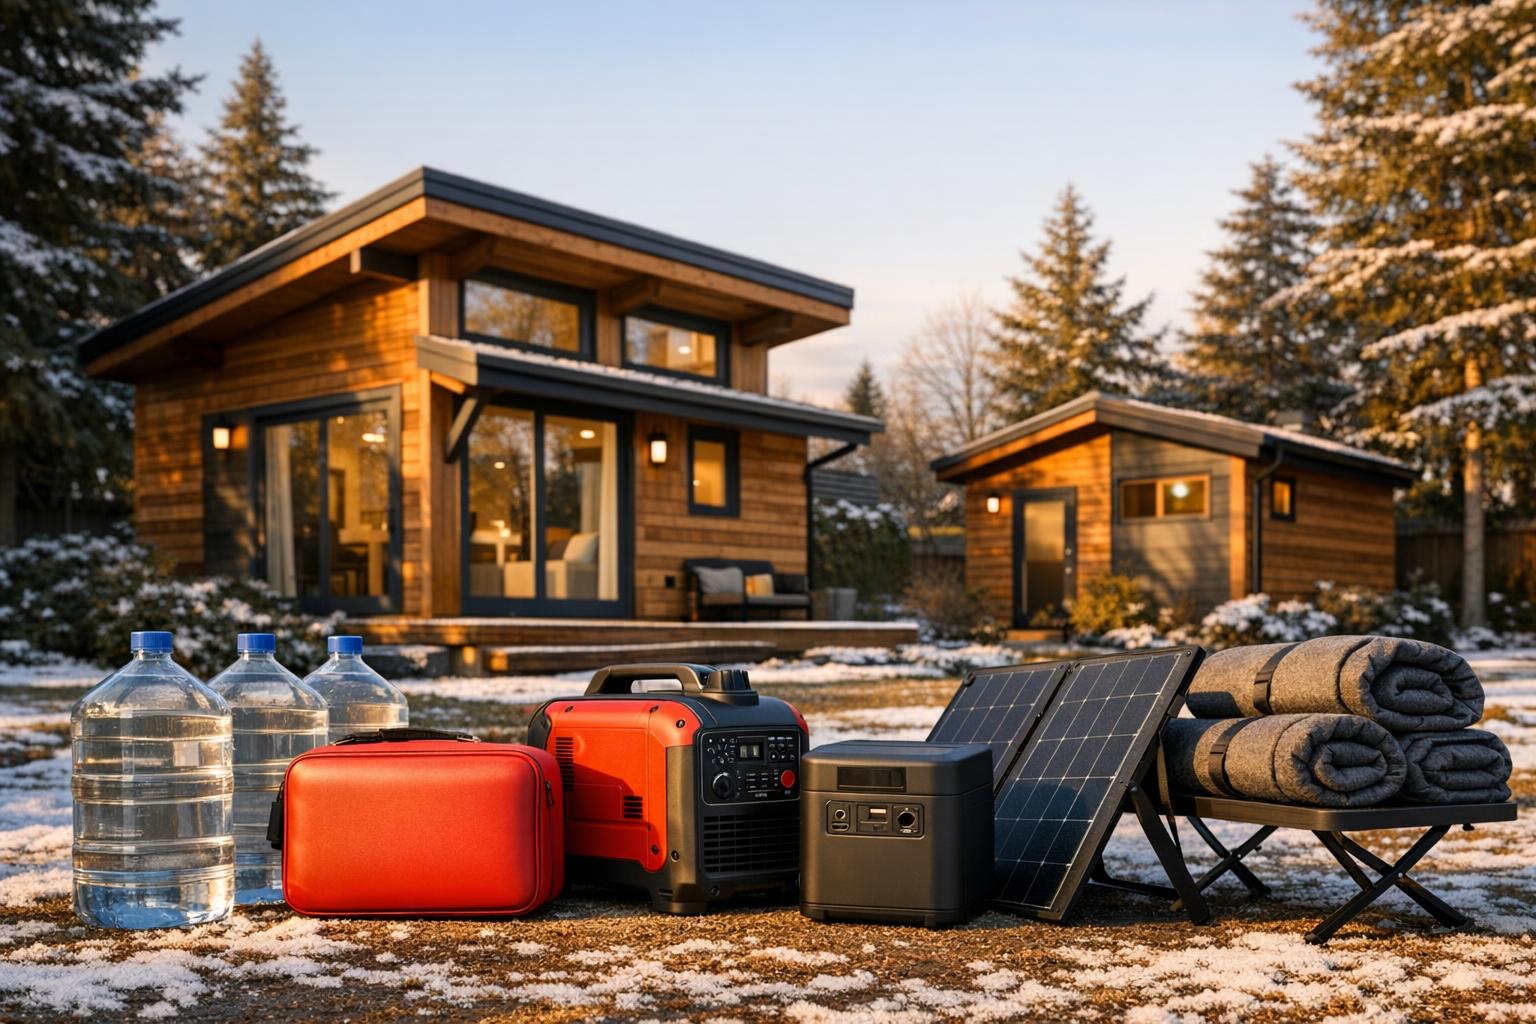
Quick action checklist for tiny home emergency preparedness in Canada
Start with a 72-hour baseline. Then scale toward 7 to 30 days based on your climate, how remote you are, and how much storage your tiny home design allows.
- Water: Store at least 4 L per person and pet per day for at least 3 days. Add a filter or UV backup.
- Food: Keep at least 3 days of non-perishable, calorie-dense food. Store a manual can opener. Rotate supplies.
- Power and heat: Keep a crank radio, LED flashlights, power bank, solar charger, warm blankets, and winter layers.
- Safety: Store a first aid kit, medications, and a simple floor plan. Aim for 2 exits per room where possible.
- Safe room: Choose one compact interior area for supplies. Strengthen doors and windows.
- Family plan: Write down emergency contacts, two meeting places, and a pet plan.
- Tiny-home-specific steps: Use vertical storage, winterize pipes, and confirm zoning or mobility rules.
This is the fast-start version. The rest of this article shows how to turn each item into a permanent part of your tiny home design and self-sufficiency plan in Canada, using preparedness guidance from EcoFlow’s Canada emergency preparedness resource, Saskatchewan Public Safety, and Ontario emergency planning.
Assess risks and set priorities for your region
Good emergency preparedness starts with one question: what is most likely to go wrong where your tiny home is parked or built?
A simple hazard assessment means:
- List the most likely events
- Estimate how long each one could disrupt normal life
- Identify which home systems would fail first
In Canada, risks vary a lot by region:
- British Columbia: wildfire, smoke, evacuation alerts, power shutoffs
- Prairies: blizzards, extreme wind, deep cold, road closures
- Ontario and Quebec: flooding, ice storms, power loss, water outages
- Northern or remote areas: isolation, delayed fuel delivery, slow resupply
For tiny-home prepping, set priorities in this order:
- Water
- Heat and shelter
- Food
- Sanitation
- Communications
- Security
Then decide when to shelter in place and when to leave.
- Wildfire: homes on wheels may leave early; fixed homes need defensible space and smoke filtration
- Flood: fixed homes need elevated siting; mobile homes may relocate if roads are safe
- Winter storm: staying put is often safer if you have backup heat and supplies
- Long outage: check battery runtime, water reserves, and road conditions before deciding
Do not wait until the event starts. Set evacuation triggers now. These might include a wildfire alert, a forecast flood crest, or a low battery or fuel threshold in extreme cold. That decision should be part of your tiny home emergency preparedness plan in Canada, not a last-minute guess.
For region-specific design risks, review guidance on flood-zone construction in Canada, forest fire safety for tiny homes in Canada, and wildfire-resistant tiny homes.
Legal, siting, and compliance constraints in Canada
Strong tiny home design starts with legal placement and safe siting, not just gear.
In plain language, key limits in Canada can include:
- Municipal zoning may treat tiny homes on wheels as RVs or temporary dwellings
- Building codes can affect insulation, exits, ventilation, structure, and heating
- Potable water rules can affect rainwater use, treatment, and storage
- Electrical and plumbing changes may need licensed work or inspection
Smart siting improves self-sufficiency and lowers risk:
- In flood-prone areas, elevate the home about 1 to 2 metres on piers where appropriate
- In wildfire-prone areas, create defensible space and use fire-resistant materials where possible
- In cold regions, orient glazing for south-facing winter sun while limiting summer overheating
- Keep access clear for emergency services or towing vehicles
In much of Canada, winterization is not optional. Frozen lines, bad skirting, and weak insulation can shut down a tiny home fast during an outage.
Important caution: This article is educational. Always check local bylaws and use certified professionals for structural work, electrical work, plumbing, heating appliances, chimneys, and stove installations.
Useful starting points include tiny home legal requirements in Canada, the Canadian ADU regulations guide, ADU permits in Canadian cities, and province-specific resources such as tiny home permits in British Columbia and the Ontario ADU permitting guide.
Core tiny home design principles for prepping and self-sufficiency
This is the design layer. It turns a small space into a resilient system.
Resilient tiny home design means every square foot should do at least two jobs: daily living and emergency use. In a tiny house, prepping is not about storing huge amounts of stuff. It is about smart integration.
Space-efficient storage
Use space that often gets wasted:
- Floor-to-ceiling vertical pantry shelves
- Under-bed and under-bunk compartments
- Under-stair storage
- Toe-kick drawers
- Under-floor storage for heavier items where structure allows
Add hidden or lockable spots for:
- ID and document copies
- Backup cash
- Medications
- Radio or communications gear
If weight and structure allow, under-floor water tanks in the 200 to 500 L range can support self-sufficiency without filling your living area. For ideas, see tiny home storage solutions and revolutionizing tiny home storage.
Thermal resilience
Insulation is not just about comfort. It is part of emergency preparedness.
In cold climates, high-performance walls and roofs reduce heat loss, stretch backup fuel, and make sheltering in place safer. A benchmark like about R-40 for walls or roof assemblies may be useful in some cases, but local code and wall assembly details matter.
Thermal mass is simple: dense materials soak up heat and release it slowly later. This can help smooth temperature swings. Window placement also matters. South-facing windows can capture winter sun, while insulated window coverings help reduce heat loss at night.
Learn more from resources on energy efficiency in tiny homes in Canada, the Passive House ADU Canada guide, and cold-climate tiny home construction.
Modularity and redundancy
When systems are easy to reach and easy to fix, problems are smaller.
Useful features include:
- Quick-disconnect plumbing
- Accessible service panels
- Standardized 12V systems
- Clear shutoff valves
Keep low-cost backups for each key need:
- Manual pump backup
- Portable water filter
- Battery lanterns
- Secondary cooking method
That is real self-sufficiency in a tiny home.
Water security: capture, storage, treatment, and winterization
Water is the first priority in emergency preparedness.
A practical minimum target is 4 litres per person per day for drinking and basic hygiene in a short emergency.
For 2 people, that looks like this:
- 72 hours: 24 L per person, 48 L total
- 7 days: 56 L total
- 30 days: 240 L per person, 480 L total for two people
That is the minimum for basic emergency use. Real life may require more for cooking, pets, sanitation, and hot weather.
Because full 30-day storage can be heavy and bulky, most tiny home design plans should combine stored water with catchment, refill, and treatment.
Stored water
Use more than one container. That prevents a single leak or crack from wiping out your whole supply.
Good options include:
- Stackable jugs
- Slim tanks
- Under-floor tanks
- Protected food-grade containers
Spread stored water across different parts of the home if weight balance allows.
Rainwater harvesting
Roof catchment is simple in concept. Rain lands on the roof, runs into gutters, passes through screening, and goes into storage.
Helpful parts include:
- Gutters
- Leaf screens
- First-flush diverter
- Cistern or storage tank
A 100 sq ft roof can collect roughly 50 to 100 L in a rain event, depending on rainfall and losses. That makes rainwater a useful backup, though it should not be your only source. See rainwater harvesting for tiny homes, rainwater harvesting for tiny homes in Canada, and urban ADU rainwater recycling.
Water treatment
Different methods solve different problems:
- Filtration: removes particles and some microbes, depending on the filter
- UV purification: uses light to disable many microbes
- Boiling: kills many pathogens if done correctly
- Chemical disinfection: can treat some biological risks when used properly
No single method is perfect for every contaminant. Layered treatment is often safest. A good tiny-home prepping plan uses one permanent treatment system and one portable backup. For related design ideas, review smart water management for Canadian ADUs.
Winterization
Water systems fail fast in Canadian winters unless they are built for cold.
Use:
- Insulated PEX
- Interior pipe routing where possible
- Heat tape or heat trace where appropriate
- Tank insulation
- Drain-down capability
- Isolation valves to shut off one line without killing the whole system
Also check local rules for potable water capture, storage, and treatment in Canada, and review resources on greywater solutions for tiny homes in Canada and the water rights rural ADUs guide.
Food storage and preservation in small spaces
The goal of prepping in a tiny home is not to overcrowd your life. It is to build enough shelf-stable food to bridge a disruption.
A simple planning benchmark is 2,000 calories per person per day, though needs vary by age, body size, climate, and activity.
Plan by time frame
- Short-term: 72 hours of ready-to-eat or low-cook food
- Medium-term: 7 to 30 days of pantry food with rotation
- Long-term: compact staples like rice, oats, beans, canned meat, and freeze-dried food if space and budget allow
Use small-space storage methods
Good options include:
- Vacuum-sealed pouches
- Mylar bags with oxygen absorbers
- #10 cans
- Narrow vertical shelving
- Over-door racks
- Under-bench storage
Label everything and use FIFO: first in, first out.
Keep two food zones:
- Daily-use pantry
- Emergency-only reserve
That helps stop accidental use of your backup food.
Add food resilience, not just storage
Useful ideas:
- A countertop dehydrator
- Safe, simple vegetable fermenting
- A cool bench for hardy produce
- Vertical gardens
- Balcony planters
- Microgreens for fresh vitamins
For compact planning, aim around 1 to 2 cubic feet per person for a tight 30-day supply, depending on food type and packaging. Helpful related reading includes tiny home greenhouses in Canada, urban farming for tiny homes in Canada, winter gardening for tiny homes, and the ADU greenhouse guide.
Power, heating, and energy self-sufficiency
In a Canadian tiny home, energy resilience is really two different problems: electricity and heat.
Here, self-sufficiency means reducing dependence on the grid for critical needs. It does not always mean going fully off-grid.
Critical-load planning
Start with essentials only:
- Lights
- Water pump
- Phone charging
- Communications gear
- Refrigeration
- Medical devices
A modest 2-person setup may need roughly 1 to 2 kWh per day for critical loads.
Solar and battery basics
Starter ranges for resilience may include:
- 400 to 800 W of solar panels
- 2 to 5 kWh of lithium battery storage
- 2000 W pure sine inverter
These are not universal. They are starter ranges only.
A simple formula is:
Solar watts ≈ daily kWh need ÷ winter sun hours
In Canada, winter sun hours are lower, so systems should be planned conservatively.
For deeper planning, see how much solar an ADU needs, the solar-powered ADUs Canada guide, the solar-ready ADU design guide for Canada, community solar for tiny homes, tiny home energy storage in Canada, and solar appliances for off-grid Canada.
Backup heat options
- Wood stove: excellent off-grid heat, but needs clearance, chimney certification, safe fuel storage, and ventilation
- Propane radiant heat: compact and strong, but depends on fuel supply and CO safety
- Electric heat: easy to use, but drains batteries fast unless your system is large
Also think about generator and propane performance in winter. Cold weather affects fuel systems and storage.
Do not cut corners with combustion appliances, ventilation, battery wiring, or inverter installation. These are safety-critical systems. You may also want to compare heat pumps for tiny homes, hydronic heating for tiny homes, solar-powered heating for tiny homes, and the eco-friendly heating ADU guide for Canada.
Sanitation, waste, and hygiene when systems fail
Sanitation is often ignored in prepping. In a tiny home, that mistake shows up fast.
Smells, moisture, and contamination build up quickly in a small enclosed space. Good emergency preparedness needs a sanitation plan.
Key options include:
- Composting toilets
- Low-water toilet systems
- A portable emergency toilet backup
- Greywater collection or diversion where legal and safe
Store hygiene basics in one dedicated bin or cabinet:
- Soap
- Hand sanitizer
- Wipes
- Bleach or disinfectant
- Gloves
- Feminine hygiene supplies
- Diapers if needed
- Waste bags
Infection prevention in a tiny home means:
- Isolate waste quickly
- Clean high-touch surfaces
- Keep clean-water and waste zones separate
- Control ventilation and moisture to prevent mould
A small space needs strict routines. Clean often, dry surfaces, and air out the home when safe. For system options, review composting toilets for tiny homes in Canada, composting toilet design for tiny homes in Canada, tiny home wastewater solutions in Canada, and greywater recycling for tiny homes in Canada.
Security and life safety systems
Security matters because tiny homes can be more exposed. They may have lighter construction, remote siting, and visible gear like solar panels, tanks, or tools.
Physical security
Use practical hardening steps:
- Reinforced door frames
- Good deadbolts
- Long strike plates
- Lockable windows
- Shatter-resistant glazing or security film
- Exterior lighting
- Lockable storage for tools, fuel, and batteries
Safe-room concept
A tiny-home safe room can be a compact interior area with fast access. It might be a reinforced 4×4 ft alcove or another small protected spot.
Store inside it:
- Radio
- First aid kit
- Flashlights
- Water
- Document copies
- Backup power
- Medications
If appropriate, harden the door.
Fire and CO safety
Keep:
- Smoke alarms with battery backup
- Carbon monoxide detectors
- Fire extinguishers near cooking, heating, and exits
- Emergency lighting strips or lanterns for nighttime escape
Communications
Communications redundancy is vital in Canada, especially where cell coverage is weak.
Keep:
- Crank or solar radio
- Battery bank
- Whistle
- Satellite messenger for remote areas
Tiny home design should support fast access to these items, not bury them behind storage bins. For more on safety and hardening, see tiny home safety in Canada, tiny home fire safety in Canada, smart home security for tiny homes, and the tiny home safety guide for Canada.
Mobility, evacuation planning, and bug-out strategy
Evacuation planning depends on whether your tiny home is mobile or fixed.
Tiny homes on wheels
Main advantage:
- They may be moved away from wildfire zones or flood risk
Main limits:
- Road legality
- Weather
- Tow vehicle size
- Notice time
- Safe destination availability
A practical towing benchmark is a 3/4-ton truck, though real needs depend on total weight and provincial rules.
Foundation-based tiny homes
If your home cannot move, your plan must focus on moving people, pets, documents, and compact survival kits.
Go-bag and departure protocol
Keep a 72-hour bag in a fast-access location such as under-bed storage.
Include:
- Paper maps
- Key phone numbers
- Medications
- Pet carrier
- Copies of documents
- Chargers
- Warm clothes
Choose two meeting places:
- One close to home
- One outside the neighbourhood
Set clear “leave now” triggers:
- Official evacuation alert
- Visible flood rise
- Fuel resupply blocked
- Battery or fuel dropping too low in extreme cold
That makes prepping practical instead of reactive. See also moving a tiny home in Canada, moving a tiny home across provinces, tiny home on wheels comparison, and tiny home parking in Canada.
Maintenance, redundancy, and seasonal adaptation
Preparedness systems fail when they are installed once and forgotten.
Use a simple schedule.
Monthly
- Test lights, radios, alarms, pumps, and battery banks
- Check stored water dates
- Review food expiry dates
- Replace used supplies
Seasonally
- Winterize rainwater systems and exposed lines
- Inspect skirting, seals, insulation gaps, and roof penetrations
- Rotate or condition fuel
- Check generator and stove systems
- Update contact lists and printed documents
Annually
- Review your hazard assessment
- Recheck evacuation routes
- Review insurance and bylaws
- Confirm tow readiness if you have a home on wheels
Keep a tiny-home spare parts kit with:
- Plumbing fittings
- Hose clamps
- Fuses
- Connectors
- Spare filters
- Tape
- Sealant
- Basic hand tools
- Work gloves
Redundancy is simple: one backup is good, but two independent ways to meet a basic need is much safer.
For maintenance planning, review the ADU maintenance checklist for Canada, ADU warranty, builder contracts, and maintenance, and smart home maintenance for tiny homes.
Practical examples, layouts, and simple calculations
A real setup helps make emergency preparedness feel manageable.
Picture a 200 sq ft tiny home for 2 people with:
- A 20 sq ft rear pantry and safe-room combo
- An under-bunk 200 L water tank
- A small roof solar array
- Bench storage for food and sanitation supplies
- An exterior locker for tools and fuel where legal and safe
Simple formulas:
- Water litres = 4 × number of people × number of days
- Solar watts = daily kWh need ÷ average effective sun hours
- Food storage = about 0.5 cubic metres per person for a 30-day setup, depending on packaging and food density
Ballpark trade-offs:
- A 72-hour starter setup may cost about $300
- A 7-day setup may cost about $1,000 and take around 2 cubic metres of space depending on gear and food choices
The key point is that prepping can be phased in. You do not need to build full self-sufficiency in one weekend.
Regionally tailored recommendations across Canada
There is no single emergency preparedness template for Canada. Climate and location shape your priorities.
British Columbia
Focus on:
- Defensible space
- Fast evacuation readiness
- Smoke filtration
- Backup water
- Roof cleaning for ash and debris
In higher wildfire-risk areas, a stronger target of 30 m of defensible space may be appropriate where site conditions allow. Helpful reading includes Firewise landscaping for tiny home safety and tiny home air quality in Canada.
Prairies
Focus on:
- Wind bracing
- Skirting
- Extra insulation
- Dual heat systems
- Planning for -40°C events
Ontario and Quebec
Focus on:
- Flood resilience
- Drainage and sump thinking where applicable
- Raised storage
- A 7-day outage plan for municipal service disruption
See flood-resistant ADU design in Canada for useful ideas.
Northern and remote Canada
Focus on:
- 30-day planning
- Larger fuel reserves
- Slower resupply assumptions
- Satellite communication
- Weatherproof storage
Review northern housing context through Indigenous Services Canada, as well as guides on tiny homes in northern Canada and cold-climate homes in northern Canada.
Ready-to-use checklist and shopping list for a 2-person tiny home
Use this 72-hour starter list as your base. Then scale toward 7 to 30 days for stronger self-sufficiency.
Water
- About 50 L stored water
- 1 water filter
- 1 UV purifier or another treatment backup
Store most water inside climate-controlled space if possible.
Food
- About 6,000 calories minimum total for 72 hours for 2 adults
- Shelf-stable foods that need little or no cooking
- Manual can opener
Store emergency-only food inside, dry, and pest-protected.
Power
- 1 battery bank or small solar generator
- 1 crank radio
- 2 or more flashlights
- Spare batteries
- Charging cables
Keep batteries inside controlled temperatures.
Sanitation
- Waste bags
- Toilet backup supplies
- Bleach or disinfectant
- Wipes
- Gloves
Keep these in one sealed bin.
Medical
- First aid kit
- Daily medications
- Prescription list
Store medications inside the home unless the label allows otherwise.
Tools and communications
- Multi-tool
- Whistle
- Paper maps
- Document copies
- Chargers
Miscellaneous
- Tarps
- Duct tape
- Cash
- Extra clothing
- Pet supplies
Some bulky items can go in an exterior locker, but keep critical gear, medications, electronics, and documents inside the home. For official-style starter guidance, revisit EcoFlow’s Canadian emergency preparedness week summary and Saskatchewan Public Safety’s preparedness page.
Resources and further reading
For emergency preparedness, tiny home design, and self-sufficiency in Canada, these sources are useful starting points:
- Government preparedness guidance summarized through EcoFlow’s Canada emergency preparedness week resource
- Ontario emergency planning page
- Saskatchewan Public Safety preparedness page
- Canadian tiny home examples and communities at Tiny Tiny Homes
- Tiny homes and emergency housing context in Canada through Whirlpool Canada and Habitat for Humanity Canada
- Tiny home insurance and disaster protection via tiny home insurance for remote Canada, tiny home insurance in Canada, and the ADU insurance claims guide
- Disaster recovery planning from the disaster recovery ADUs guide
Also check:
- Your municipal bylaws
- Your provincial emergency management page
- Applicable CSA and code requirements for heating, electrical, plumbing, and water systems
Emergency preparedness in Canada works best when your design choices, local rules, and real risks all line up.
Conclusion
Effective emergency preparedness for tiny homes in Canada comes from integrating prepping and self-sufficiency into tiny home design. It is not about stuffing random supplies into every drawer.
The right order is simple:
- Assess hazards
- Fix siting and legal issues
- Secure water
- Build compact food storage
- Add power and heat redundancy
- Improve sanitation, safety, and evacuation planning
- Maintain the whole system through the seasons
Start this week by building a 72-hour setup, then expand to 7 to 30 days as your space and budget allow.
Frequently Asked Questions
How much water should a tiny home store for emergencies in Canada?
A good minimum is 4 litres per person per day for at least 72 hours. For two people, that is about 48 litres. If you live in a colder, remote, or disaster-prone area, scaling to 7 to 30 days is much safer.
Can a tiny home really be self-sufficient during a long outage?
Yes, partly. A well-designed tiny home can improve self-sufficiency with stored water, backup filtration, compact food reserves, battery storage, solar panels, safe heat options, and sanitation backups. Full off-grid independence is harder, but partial resilience is very achievable.
What is the biggest emergency preparedness weakness in most tiny homes?
Usually it is a combination of limited storage and lack of redundancy. Many tiny homes have only one water source, one heating method, or one power dependency. The solution is to build layered backups into the design.
Are tiny homes on wheels better for disasters than fixed tiny homes?
They can be better for evacuation, especially during wildfire or localized flood threats, because they may be moved early. But they also depend on tow readiness, legal road use, destination planning, and weather. Fixed homes can be safer in severe winter conditions if well-sited and well-insulated.
What are the best first purchases for a 72-hour tiny home emergency kit?
Start with these basics:
- Stored water
- Water filter or purifier
- Shelf-stable food
- Flashlights and batteries
- Crank radio
- Power bank
- Warm blankets and winter clothing
- First aid kit
- Sanitation supplies
- Document copies and emergency contacts
Do Canadian tiny homes need special winter emergency planning?
Absolutely. Winter changes everything. Pipes can freeze, batteries lose performance, fuel delivery may be delayed, and a short outage can become dangerous fast. Canadian tiny homes should prioritize insulation, skirting, backup heat, interior water storage, and clear cold-weather evacuation triggers.
Leave a Reply