
Estimated reading time: 12 minutes
Key Takeaways
- A DIY green wall is a practical way to bring indoor plants into a tiny home or ADU without sacrificing floor space.
- It supports biophilic design, can improve the feel of a room, and fits well with modern tiny home decor.
- Plants may offer modest humidity and VOC benefits, but they do not replace proper ventilation, filtration, or an air quality monitor.
- Compact systems, modular panels, drip kits, and LED grow lights have made green walls much easier to build in 2026.
- The best results come from careful planning: light, moisture protection, structure, drainage, plant choice, and easy maintenance access.
Table of contents
- Why add a living green wall to your tiny home?
- Planning your DIY green wall in a tiny home or ADU
- Choosing the right green wall system and materials
- Best indoor plants for a tiny home green wall
- Step-by-step DIY green wall build and installation
- Irrigation, lighting, and air quality considerations
- Maintenance, troubleshooting, and longevity
- Styling a green wall as part of your tiny home decor
- Cost, time estimate, and materials checklist
- Safety, building codes, and renter-friendly alternatives
- Quick-start checklist for readers
- Final thoughts
- Frequently Asked Questions
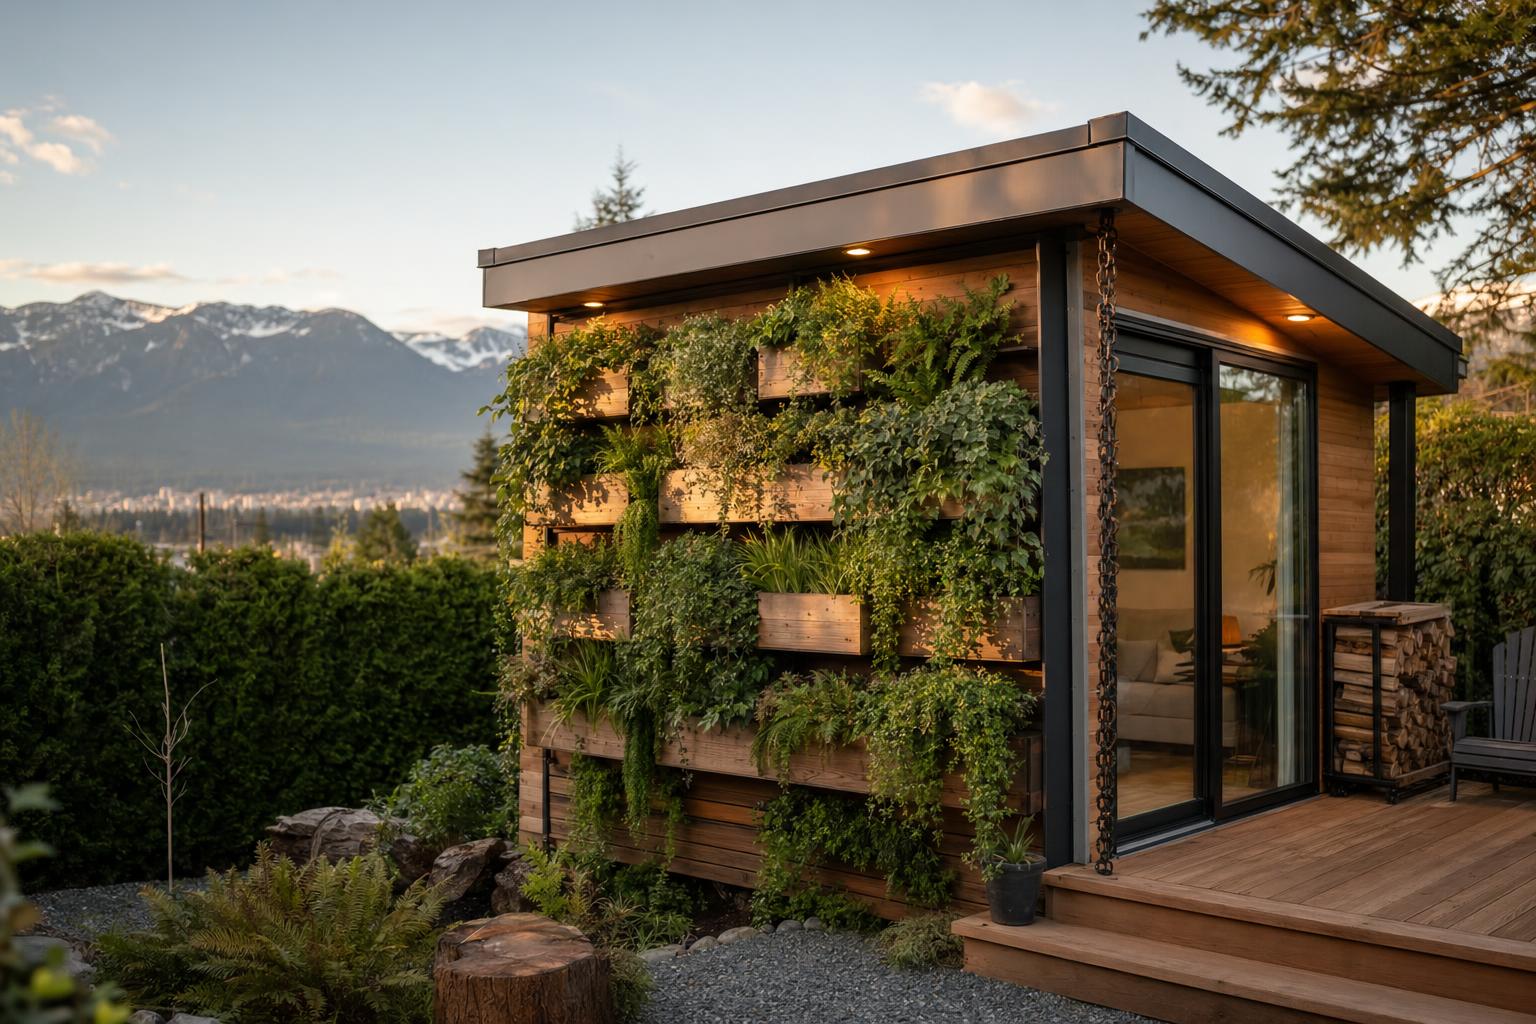
A DIY green wall is a vertical garden of indoor plants fixed to a wall or frame. In a tiny home or ADU, it brings nature indoors without using precious floor space. That makes it a smart fit for 2026, when more people want decor that feels calm, useful, and rooted in biophilic design, wellness-focused interiors, and thoughtful tiny home decor ideas.
A well-planned DIY green wall can make a small space feel softer, more layered, and more alive. It may also offer modest comfort and air quality benefits. Still, it is not a replacement for proper ventilation, exhaust fans, or mechanical filtration. Plants can support a healthy home, but they do not solve indoor air problems on their own. That is why it helps to pair them with good design decisions and, ideally, an air quality sensor informed by a broader understanding of air quality in tiny homes.
The good news is that green walls are easier to build than they used to be. Compact modular panels, small drip kits, low-energy LED grow lights, and renter-friendly setups have made small-space builds far more realistic in 2026. Practical guides from Building Moxie and Green Adelaide reflect the same trend: vertical growing is becoming more accessible, especially in homes already designed to think vertically, such as those inspired by vertical tiny home layouts and modular furniture systems.
Why add a living green wall to your tiny home?
In a tiny home, every square foot matters. A DIY green wall uses vertical space, so you get the look and feel of indoor plants without giving up room for walking, storage, or furniture. That makes it a natural fit for homes focused on vertical living and smart tiny home storage solutions.
Biophilic design means shaping a space so it feels more connected to nature. That can include greenery, wood, natural colours, soft textures, and organic forms. In a compact home, this matters even more. A wall of plants can break up hard lines, add visual depth, and make the room feel layered instead of cramped. This is one reason biophilic design in tiny homes and broader wellness design ideas continue to gain attention.
There are also realistic wellness benefits.
- Indoor plants may help with modest VOC absorption from new furniture and finishes.
- A green wall can slightly buffer humidity in some rooms.
- Being around greenery may help lower stress and improve focus.
- A natural focal point can make a compact home feel calmer and more welcoming.
It is important to keep expectations realistic. Plants can contribute in small ways, but they do not meaningfully manage indoor CO2 in an occupied home. Ventilation and filtration still do the heavy lifting. A DIY green wall works best as a complement to healthy indoor air strategies, especially when paired with an air quality sensor and proper ventilation planning.
In small homes, the best design choices do more than look good. They work hard, save space, and improve how the room feels every day.
For decor alone, the appeal is obvious. A green wall adds softness, colour, and depth. It can turn a plain corner into the most inviting part of the room. If you want inspiration, both Building Moxie and Green Adelaide show how effective a simple planted wall can be, especially when it is integrated into a room with a clear tiny home decor strategy.
Planning your DIY green wall in a tiny home or ADU
Good planning is what keeps a DIY green wall from becoming a leak, mold, or maintenance problem. In a small home, that matters even more because moisture and mess spread fast. This is especially important if your home already requires careful thinking around water handling, such as with tiny home wastewater solutions or greywater systems.
Measure the wall and map your usable space
Start with a simple site survey.
- Measure wall height and width
- Find stud locations
- Check door swing and furniture clearance
- Note nearby vents, trim, and outlets
- Check whether you can reach the wall easily for pruning and watering
For most beginners, a wall around 1 m x 1 m is a smart starting size. It gives visual impact without taking over the room. In a compact interior, that balance matters just as much as good storage planning.
Check structure, moisture, and clearance
A planted wall gets much heavier after watering. For a beginner compact setup, plan around a cautious 20 kg load and verify support before installing anything. Make sure the wall is dry, stable, and protected from trapped moisture. Structural context matters, whether you are working in a conventional interior or a home shaped by unusual constraints like certain tiny home foundation options or stone-framed small homes.
Also check for:
- Water access
- Drainage or drip collection
- Existing dampness
- Enough room to clean behind or below the system if needed
Estimate light and humidity before you buy plants
Light level matters more than plant labels. Lux is simply a way to measure how much light reaches the wall.
- Low light: 200–500 lux
- Medium light: 500–1000 lux
- Bright indirect: above that range, without harsh direct sun for many indoor species
A phone light meter app can give you a rough reading, especially when paired with a better understanding of tiny home light design.
For humidity, 40–60% is a useful target for many indoor plants. A green wall may raise local humidity a little. That can help in a dry home, but it can also become a problem in an already damp area, which is why it is worth understanding indoor air quality conditions before you build.
The best wall is one you see every day and can reach without hassle. In tiny homes, good spots often include entry walls, kitchen corners, loft ladder zones, and narrow transition spaces. Useful planning references include Building Moxie, Green Adelaide, this beginner guide from Foliage Design, and broader thinking around tiny home design in Canada.
Choosing the right green wall system and materials
The best DIY green wall system depends on your budget, whether you rent, how much weight your wall can handle, and how much maintenance you want.
Best system for renters
Felt pockets or modular panels
These are light, simple, and usually the easiest option. Some are light enough to work on a removable support frame instead of direct wall mounting. They are good for swapping indoor plants and keeping costs down.
Potted-pocket, magnetic, or freestanding systems
These are ideal if you want stylish decor with less commitment. They are easy to remove and maintain, though they do not look as seamless as a built-in wall. They also pair nicely with flexible interior strategies like modular furniture.
Best system for homeowners
Tray or pocket systems with a frame
These often use cedar or aluminum and give a cleaner, more finished look. They are sturdier and more customizable, but also heavier and slower to build.
Hydroponic NFT or self-watering tray systems
These are compact and efficient, and some are very sleek. But they cost more, are more technical, and carry a higher leak risk. In a tiny home, even pump noise matters, which is why it helps to think through utilities using guides on tiny home utilities and smart water management.
Materials that protect your wall from water damage
Whatever system you choose, moisture protection matters.
Useful materials include:
- Corrugated plastic backing
- Waterproof membrane
- Drip tray
- Corrosion-resistant screws or fasteners
- Root barrier if needed
- Easy-disconnect irrigation parts
A practical tip: test the load before final install. A filled 20 kg bucket gives you a simple way to understand how heavy a watered setup can feel. Helpful visual references include Green Adelaide, the Evergreen Walls installation tutorial, Building Moxie, this YouTube guide, Urban Strong, and the beginner overview from Foliage Design. If your setup touches drainage ideas, it is also worth reviewing greywater recycling guidance.
Best indoor plants for a tiny home green wall
The best indoor plants for a DIY green wall are not just attractive. They should also match your light, stay fairly compact, and have similar care needs.
Look for plants with:
- Shallow or manageable roots
- Slow to moderate growth
- Small to medium leaves
- Similar watering needs
- Tolerance for indoor conditions and occasional dry spells
Use only 3–4 species in a small wall. This keeps the design clean and makes care easier.
Low light (200–500 lux)
- Pothos
- Philodendron
- Snake plant
These are forgiving, beginner-friendly, and useful for a biophilic interior. Trailing pothos softens edges, while snake plant adds structure.
Medium light (500–1000 lux)
- Spider plant
- Peperomia
- Fittonia
- Baby rubber plant
These add colour, texture, and compact growth. They work well when you want decor that feels layered but not busy.
Bright indirect light
- Small ferns
- Tradescantia
- Hoya
These can create a lush look, but they need more careful attention to light and humidity.
Avoid:
- Very fast growers
- Very large leaves
- Plants with very different watering needs in the same zone
A good mix is simple: one trailing plant, one upright plant, and one compact filler. That gives your wall a richer, more natural look without clutter. For more ideas, see Building Moxie, Green Adelaide, and broader plant-focused inspiration such as native planting ideas and urban gardening tips.
Step-by-step DIY green wall build and installation
This is the core build process. Keep the first project simple and follow the steps in order.
Tools and safety gear
You will need:
- Drill
- Level
- Hammer
- Screws and anchors
- Staple gun if using felt or mat systems
- Measuring tape
- Pencil
- Utility knife or scissors
- Gloves
- Safety goggles
- Drop cloth
Choose fasteners based on the system weight and whether you are fixing into studs or using a support frame. Remember that wet systems are heavier than they look. Reference builds from Building Moxie, Green Adelaide, and Foliage Design can help, especially if you are assessing your own DIY skill level.
Step 1 — Measure and sketch the wall
Mark your footprint on the wall, such as 1 m x 1 m. Then mark:
- Studs
- Outlets
- Vents
- Trim
- Door swing clearance
Sketch the plant layout, irrigation line, and drip tray position. This helps the wall feel like part of the room, not an afterthought. It also connects well with evolving tiny home interior trends.
Step 2 — Prep and protect the wall surface
Clean and dry the wall. Add a waterproof membrane where needed. If the system needs extra support, install plywood or another suitable backer first. Then add a moisture-resistant backing panel.
This step matters because trapped dampness can lead to wall damage and mold. In a small home, that can hurt comfort and air quality quickly. The importance of this is reinforced in beginner guidance from Foliage Design and in broader discussions of tiny home air quality.
Step 3 — Build or assemble the frame/pocket system
Attach cedar or aluminum strips to studs or to your support frame. Fix your felt pockets, trays, or modular panels onto the backing. If you are working in rows, install the top row first and align the lower rows beneath it.
Keep everything level. That helps water move evenly and keeps the finished DIY green wall looking neat. In a tight space, build as much as possible on the floor first, then lift sections into place. Both Building Moxie and the Evergreen Walls tutorial are useful references, especially if you are adapting the design to a compact room with modular elements.
Step 4 — Install irrigation or choose a hand-watering plan
You have two beginner-friendly options.
Hand-watering
- Best for smaller walls
- Lower cost
- Easier to install
- Needs consistency
Drip irrigation
- More even watering
- Good for walls that dry unevenly
- Needs tubing, a timer, and a water source or small reservoir
For tiny setups, a compact 1 L reservoir may be enough in some systems. Small drip kits around 0.5 L/hour can work if adjusted properly.
Whatever you choose, control runoff. Water should never drip behind the wall or onto the floor. Use a tray and watch the first few watering cycles closely. Helpful references include Green Adelaide, this YouTube walkthrough, and advice on smart water management for ADUs.
Step 5 — Plant the wall
Lightly moisten your growing medium first. Remove each plant from its nursery pot and loosen packed roots gently. Insert the roots into pockets or trays, angling them slightly if that helps them stay put. Secure them with the growing medium or mat material.
Place larger or trailing plants where they can drape without blocking smaller plants. Alternate shapes and textures so the wall looks balanced. This is where biophilic wellness design really shows up: soft forms, natural rhythm, and varied leaf textures. You can also use Building Moxie as a practical reference for arrangement ideas.
Step 6 — Water, settle, and test
Water the whole wall until the root zone is evenly moist. Then check for:
- Leaks
- Drips
- Pooling
- Sagging
- Dry pockets
The first 2–3 weeks are the settling period. Some indoor plants may droop a little while they adjust. Keep a closer eye on moisture, humidity, and airflow during this stage so you protect both the plants and the room’s air quality. A compact wall can often be built over a weekend if your materials are ready, as shown by Building Moxie, the Evergreen Walls tutorial, and Green Adelaide. Monitoring with an air quality sensor can also help during the early stage.
Renter-friendly installation variations
If you cannot drill into the wall, try:
- Tension rods
- Freestanding frames
- Leaning plant ladders
- Adhesive modular panels if the load is safely within limits
For renters, lighter systems and easy cleanup matter most. Green Adelaide offers useful inspiration here, as do flexible space-saving ideas connected to portable homes and modular furniture.
Irrigation, lighting, and air quality considerations
A good-looking DIY green wall depends on the care systems behind it.
Hand-watering vs drip irrigation
Hand-watering is enough for many beginner walls, especially small ones. A timer-based drip system helps if the wall dries unevenly or if you want more consistency. Moisture sensors can help prevent overwatering, which is especially useful in cool or humid interiors. Useful references include Green Adelaide, this video guide, and practical tools such as water leak detection systems and smart water management.
How to light a green wall in a low-light tiny home
Many tiny homes do not get enough natural light for a dense wall of indoor plants all year. A full-spectrum LED grow light is often the simplest fix.
Useful starting points:
- Around 10W for a small wall
- About 6500K
- Roughly 12 inches above the plants
These are starting benchmarks, not strict rules. If plants stretch, pale, or lean, adjust the light. Helpful references include Foliage Design, broader guidance on tiny home lighting design, and newer solutions in smart lighting for Canadian tiny homes.
What a green wall can and cannot do for air quality
A green wall may help with small amounts of VOC absorption and may raise local humidity by around 5–10%, depending on size and conditions. That can improve comfort in dry spaces. But it will not manage CO2 well enough on its own. Ventilation still matters most.
A simple humidity or air monitor can help you care for the wall based on real conditions, not guesswork. In 2026, these tools are easier to find and more affordable than before. For context, see Building Moxie, air quality sensor guidance, and practical advice on tiny home ventilation.
Maintenance, troubleshooting, and longevity
A DIY green wall does not need expert care. It just needs a simple routine.
Weekly routine
- Check moisture
- Remove dead leaves
- Lightly prune overgrowth
- Look for pests
Monthly routine
- Fertilize at about 1/4 strength
- Check for crowded roots
- Clean trays and catch areas
- Wipe nearby surfaces if moisture leaves residue
Seasonal adjustments
In winter, plants grow more slowly and water evaporates less. Reduce watering. If daylight drops, run LED lights for about 12 hours a day. Seasonal interior shifts like this fit well with broader seasonal furnishing strategies.
Common problems and fixes
| Problem | Likely cause | Fix |
|---|---|---|
| Yellowing leaves | Too much water, too little light, or nutrient imbalance | Check moisture, increase light, adjust feeding |
| Mold or mildew | Poor airflow or chronic overwatering | Improve airflow, reduce watering, clean affected areas |
| Rootbound pockets | Plants have outgrown the space | Divide, trim roots, or replace plants |
| Mealybugs or aphids | Pest spread in dense planting | Isolate affected section and treat early |
| Salt buildup | Fertilizer residue | Flush with plain water now and then |
A well-maintained wall can last 3–5 years or longer, though some plants will need replacing over time. Healthy plants and clean moisture control also protect indoor air quality by lowering the chance of mold. See Building Moxie, Green Adelaide, and practical pest-prevention guidance for tiny homes in Canada.
Styling a green wall as part of your tiny home decor
A green wall should look like it belongs in the room. The goal is to make it part of your decor, not a random add-on.
Good placement ideas include:
- Entryway for a welcoming focal point
- Above the bed for a calm backdrop
- Kitchen area for herbs or compact foliage
- Stair risers or loft access walls where floor space is tight
In a very small room, keep the wall to about 30% of wall coverage or less. That helps the space feel fresh, not crowded.
To make the design feel balanced:
- Match the frame to nearby finishes like warm wood or matte black metal
- Use trailing plants for softness
- Add upright plants for structure
- Mix fine and broad textures carefully
In 2026, earthy colours work especially well with biophilic design. Sage green, warm taupe, reclaimed wood, and matte black details all pair naturally with indoor plants and small-space styling. For inspiration, explore Building Moxie, tiny home decor ideas, and current interior trends.
Cost, time estimate, and materials checklist
Costs vary based on tools, system type, and whether the build is permanent or renter-friendly.
| Budget level | What it includes | Estimated cost | Estimated time |
|---|---|---|---|
| Low budget | Felt pockets, hand-watering, basic plants | $150–300 CAD | 3–6 hours |
| Mid-range | Framed system, better backing, drip irrigation | $400–600 CAD | One weekend |
| Premium | Hydroponic or self-watering system with LEDs | $800+ | About one week |
Materials checklist
- Cedar strips or aluminum frame
- Corrugated plastic or suitable backing panel
- Waterproof membrane
- Felt pockets, trays, or modular planters
- Growing medium or mat system
- Indoor plants
- Drip tray
- Irrigation kit, tubing, timer, and reservoir if needed
- Screws, anchors, staples, sealant
- LED grow light if needed
- Tools and safety gear
If you already own the tools, the project cost drops quite a bit. Budget references from Green Adelaide, Building Moxie, and broader tiny home budget tips can help you plan realistically.
Safety, building codes, and renter-friendly alternatives
Safety matters even more in tiny homes because water, wiring, and living space are close together.
How to reduce leak and mold risk
- Keep loads conservative
- Waterproof the wall properly
- Use drip trays
- Clean spills fast
- Maintain airflow around the wall
For compact non-structural setups, a cautious benchmark like under 20 kg/m² can be useful for planning, but always verify support instead of treating that as a universal rule. This is especially important if you are already thinking about the weight limits of a tiny home structure.
Electrical safety around irrigation and grow lights
Keep plugs, timers, and power bars away from water paths. Secure tubing so it cannot slip. Use lights and electrical parts as directed by the maker, especially in damp spaces. That is consistent with broader guidance on tiny home safety in Canada and good planning for a solar-ready ADU.
No-drill alternatives for renters
If permanent mounting is not possible, try:
- Standing vertical planters
- Hanging planters
- Magnetic pots
- Adhesive modular panels where safe
- Freestanding ladders or shelves grouped with indoor plants
These options can still support biophilic design, improve decor, and add some of the same comfort benefits as a true wall system. Good references include Green Adelaide, Foliage Design, Urban Strong, and design ideas for portable or flexible small homes.
Quick-start checklist for readers
- Measure wall height, width, stud locations, and light level.
- Choose a system: pockets, panels, or pots based on weight and renter status.
- Pick indoor plants by light level, growth habit, and size.
- Prep the wall with waterproofing and backing.
- Install irrigation or set a hand-watering routine.
- Plant, settle, and monitor moisture for 2–3 weeks.
- Prune, fertilize lightly, and check for pests monthly.
- Monitor humidity and air quality, then adjust lighting, watering, or ventilation as needed.
For a deeper dive into the process, review Building Moxie, Green Adelaide, practical advice on air quality in tiny homes, and guidance on smart water management.
Final thoughts
You do not need a large house or a professional installer to enjoy a DIY green wall in 2026. In a tiny home or ADU, a small, well-planned wall can make a big difference.
Done properly, a DIY green wall can lift your decor, support a calmer biophilic style, and contribute modestly to comfort and air quality when paired with good ventilation and steady care. Start small, keep the system simple, and choose indoor plants that match your real conditions. For broader context, see wellness design ideas and practical guidance on air quality in tiny homes.
Frequently Asked Questions
Is a DIY green wall a good idea for a tiny home?
Yes, if it is planned carefully. A green wall uses vertical space instead of floor space, which makes it especially useful in compact homes. It can also support a more natural and calming interior style.
Can a green wall improve air quality?
It may help in small ways, such as modest VOC absorption or a slight rise in local humidity, but it will not replace ventilation, filtration, or a good air monitoring setup.
What is the best green wall system for renters?
Lightweight felt pockets, modular panels on removable frames, freestanding plant ladders, and magnetic or potted systems are usually the easiest renter-friendly options.
What plants work best in a small indoor green wall?
Beginner-friendly choices include pothos, philodendron, snake plant, spider plant, peperomia, fittonia, and baby rubber plant. The best pick depends on your actual light level.
How much does a DIY green wall cost in 2026?
A simple setup can start around $150–300 CAD, a mid-range framed wall may cost $400–600 CAD, and premium hydroponic or self-watering builds with LEDs can run $800 or more.
Do I need grow lights for a green wall?
Often, yes. Many tiny homes do not have enough consistent natural light for a dense wall of indoor plants year-round. A small full-spectrum LED grow light can make the system much more reliable.
How do I avoid leaks and mold?
Use proper waterproof backing, a drip tray, controlled watering, safe mounting, and steady airflow. In compact homes, quick cleanup and regular checks are especially important.
Leave a Reply